How to Get Around ‘the Requested URL Was Rejected. Please Consult with Your Administrator’

We’ve all gone through situations where for some reason, our internet browsers won’t let us access some specific sites. It’s unpleasant, to say the least, especially if we need to access those websites.
While it’s difficult to diagnose precisely why an internet browser would block websites from loading, some common reasons include the site being down or an over-accumulation of your browser’s data.
There could be other reasons too. In this write-up, we’ll look into this issue and offer some simple steps to resolve it.
Clearing Cache & Cookies
Cache and cookies are pieces of information that websites store on a user’s computer to improve the performance of their web pages. By storing cookies on the user’s computer, sites can load faster. Each time you access a website, your computer sends the cookies back to the server, making internet browsing a much smoother experience.
Sometimes there’s an over-accumulation of these cookies, which could end up in your browser blocking out specific sites. To resolve this issue, you can clear the cache and cookies. It works for most users.
Clearing Browser Data on Google Chrome
If you use Google Chrome to browse websites, follow the steps below to clear your browser data.
Step One
Click the three vertical dots in the top right corner of the Google Chrome browser.
Step Two
From the pull-down menu, click on More Tools and then select Clear browsing data.
Step Three
Google Chrome will now ask you the time from when you want the browser data cleared. To clear all your browser cache, choose the beginning of time and select the data you want to get rid of. In an ideal situation, you should delete all your cache and cookies to increase your chances of solving the problem.
Step Four
Shut down the browser and restart your system. Open the browser again and check if your browser is still rejecting the URL.

Clearing Browser Data on Mozilla Firefox
If you use Mozilla Firefox, follow the steps below.
Step One
Click the menu button at the top-right corner of the screen and then select Preferences.
Step Two
From the menu on the left, select the Private & Security panel.
Step Three
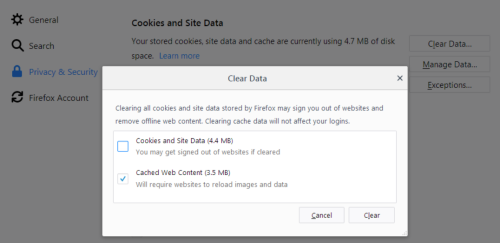
Go to the Cookies and Site Data section and select Clear Data.
Step Four
We recommend you delete the cookies and site data, as well as the cached web content. After checking both boxes, click on Clear.
Step Five
Close your browser and restart your system. You shouldn’t have any problems now.
Clear Browsing Data on Microsoft Edge
If you use Microsoft Edge as your default browser, follow the steps below to clear your browser data.
Step One
Click on the three horizontal dots at the top-right corner of the browser and select Settings.
Step Two
Go to the Clear Browsing Data section and click on Choose What To Clear.
Step Three
In the window that appears, check the first four boxes and select Clear This Data. Close the browser and restart the system. Your Microsoft Edge browser should not be blocking URL(s) anymore.
Adding URL(s) to Trusted Websites
If the problem persists with one particular website, your browser may be rejecting the URL because it’s malicious. If you’re confident that there’s no threat on the website you’re visiting, you can add the website as a Trusted Site to circumvent security checks. To do this, follow the steps below.
Step One
Launch Internet Explorer. Look for the cog icon located in the top right corner of the window. From the pull-down menu, select Internet Options.
Step Two
Now navigate to the Security tab and select Trusted Sites. Paste the URL of your website in the text box and click Add.
Step Three
Once the website is added, ensure that you disable the Require server verification option (https) for all sites in this zone option, and then close the window.
Open your browser and try rerunning the URL. Your browser shouldn’t reject it anymore.
Enjoy Browsing Again!
We hope that following these steps will stop your browser from rejecting websites in the future. Let us know if you’ve had any such trouble and if you’re satisfied with the solutions provided here. Also, if you have another solution, feel free to share it.