How to create a system image of your current Windows 10 state

Windows 10 doesn’t have a whole lot of easy ways to create backups without a third-party tool, but one thing you can do is create a system image backup. It may seem intimidating at first, but it’s actually really easy to create. You only have to press a couple of buttons — Windows 10 does all of the heavy lifting.
Follow along below and we’ll show you just how to do it!
What you’ll need
When you create a System Image, you’re really creating it for backing up your PC in case anything were to happen to it. If you leave it on the same drive as your operating system, and that drive crashes or dies, you’re not going to be able to access that System Image at all. That’s why you need an external source. So, once the Image file is ready to go, make sure you have another place to put it — another hard drive, a large flash drive, etc. In fact, to even create the System Image, you need another drive to save it to, as you can’t save it to the same hard drive.
Creating the system image
The first step is to plug your external drive into your computer. Like we said, it can be an external hard drive or flash drive — it’s not too picky about the type of external storage it is.
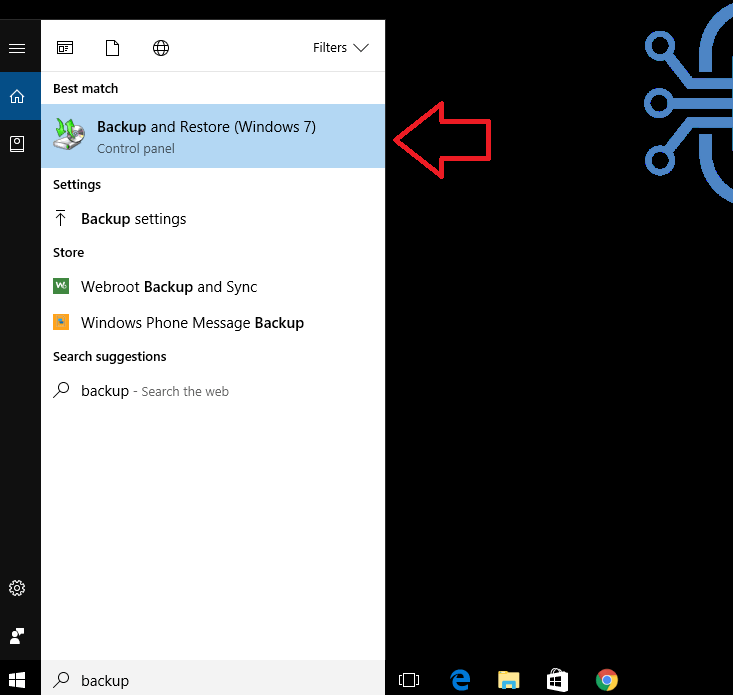
Next, open the Start menu and in the “Search” box type in Backup and Restore (Windows 7). You’ll want to select the Backup and Restore (Windows 7) program within Control Panel, as pictured above.
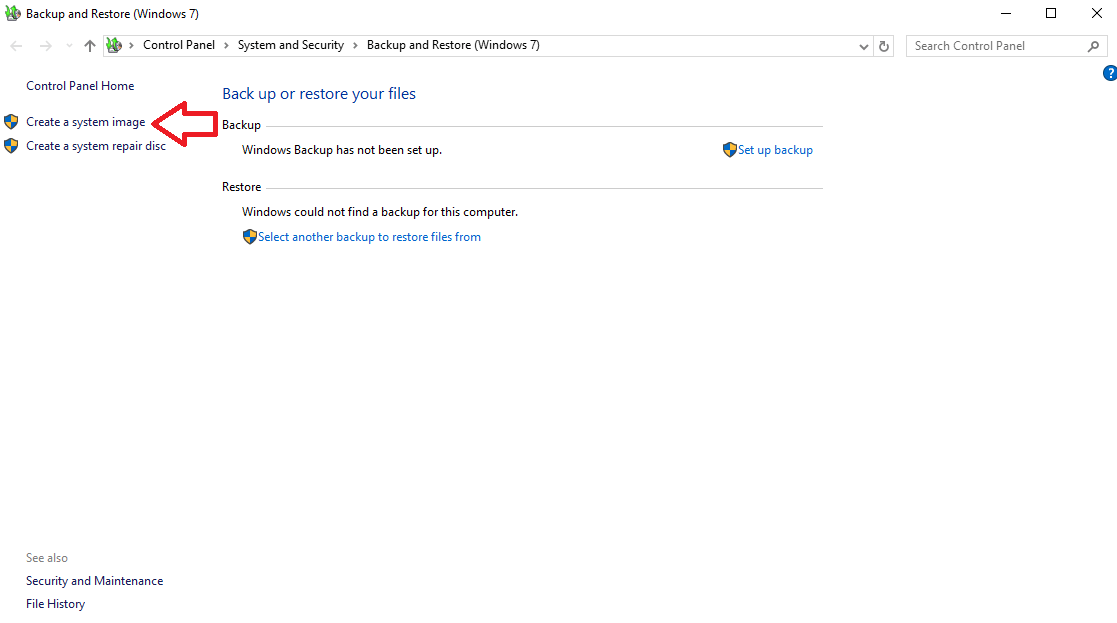
Finally, on the left navigation pane, click on Create a system image.
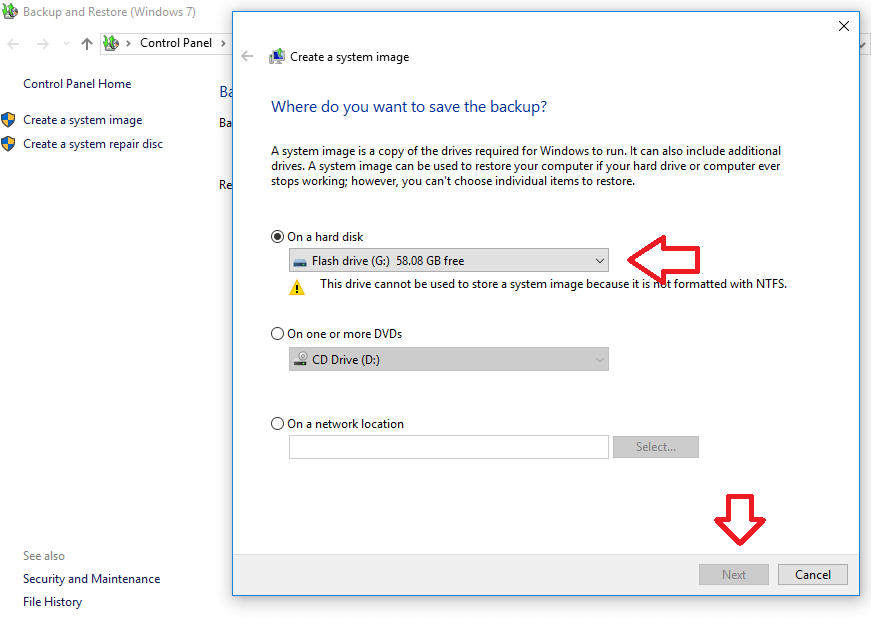
This is where that external drive comes in. A dialog box will appear, having you choose either an external storage device or a writable DVD for saving the System Image. Once you press “Next” with your selected choices, the wizard will take you step by step. Do keep in mind that, with the drive you’re using, it has to be formatted as NTFS for you to use it.
It’s worth noting that this process can take up to a couple hours. This System Image is, well, an image of your entire operating system — your boot sector, applications, all of your files, etc. The image file it creates is basically a compressed version of all of this, and so, because of the scale of it, it can take some time to complete.
When it completes the backup, you’ll be asked again if you want to create a System Recovery Disc. If you have an optical drive and a blank, writable DVD, you can do this here. Alternatively, you can create a Recovery Drive with your flash drive, using the Recovery program in Control Panel.
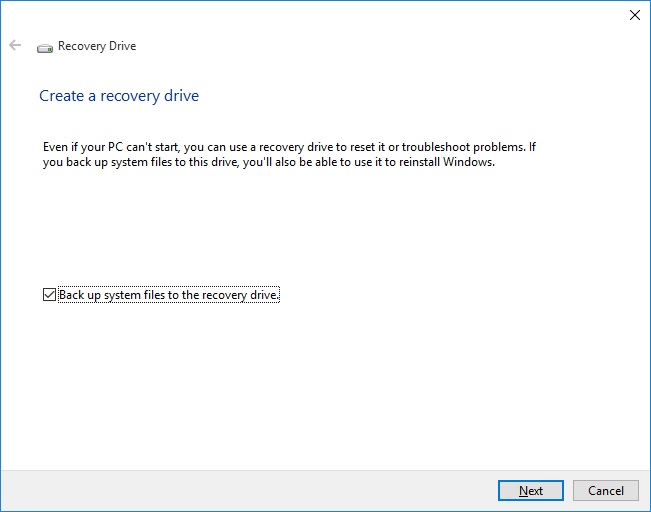
If you’re not given a shortcut to access it, you can search Create a recovery drive in the taskbar. Click the link to the Control Panel program. You might need to enter an administrator password to continue from here. But, basically, it takes you right into the wizard. You can simply follow the steps, just make sure Back up system files to the recovery drive is checked before continuing.
It’s also worth noting that you won’t be able to use that flash drive for anything else after this wizard — it’s now become a dedicated Recovery Drive for your Windows 10 system. You should also make sure you’re using at least a 16GB flash drive when checking the Back up system files to the recovery drive option.
Restoring with your System Image
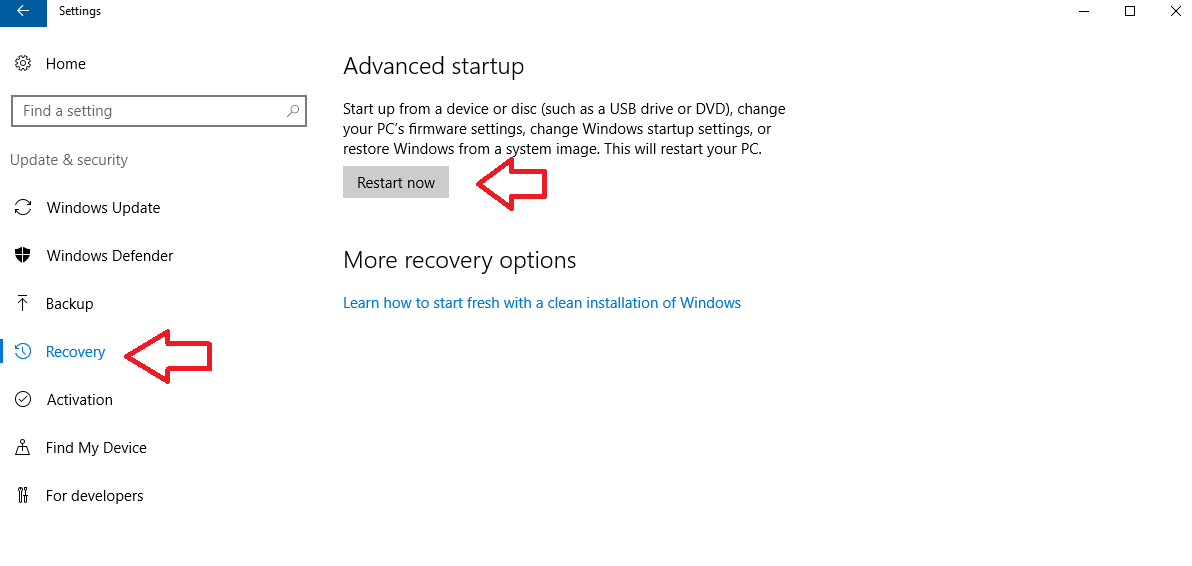
Microsoft in Windows 10 makes it really easy to restore with a System Image like this. If you’re able to boot into Windows 10, you can simply open the Settings menu, head into Update & Security and then under the Recovery tab in the left navigation pane, there should be a “Restart Now” button that lets you start up from your flash drive or System Recovery Disc we created earlier.
If you can’t boot into Windows 10, you’ll have to enter your disc or flash drive and change the boot order. But, don’t be alarmed — it’s really easy to do and you aren’t going to hurt anything by doing it. To change the boot order, you’ll need to restart and then press the F2 command when starting up. Depending on your machine, that command may be different. You’ll need to consult the manual your computer came with, search for the correct key online, or see if it tells you the specific key on boot up.
Once you’re in the Setup screen, you’ll need to search for a “Boot” or “Boot Order” selection. When you find it, use the on-screen commands to change the boot order to either your optical drive for the System Recovery Disc or your flash drive to boot off of the Recovery Drive we created. And, just to reiterate, for any of these to work, you need to create the System Recovery Disc or Recovery Drive in the earlier steps.
Once you changed the boot order to boot off of either device, follow the on-screen commands to exit the setup and reboot your computer. It’ll now either boot off of the optical disc or the Recovery Drive. And from there, you can follow the wizard to restoring your PC back to normal. Generally, it’ll ask you to choose the keyboard language, then a Troubleshoot option should appear. There, you should see options for Reset this PC and Recover from a drive.
Closing
By following the steps above, you can create a backup of your entire operating system inside a simple System Image file. It makes things really easy for backing up your PC in case something were to happen — once you create a Recovery Drive with your flash drive, it’s as simple as booting off of it.
If you do a lot on your computer, it’s recommended that you follow this process a few times a year. It’s always handy to have an entire system backup like this available to you. Of course, this shouldn’t replace your daily backup habits, but instead, serve as an “extra.”