How to Install a New Graphics Card on a Windows 10 PC
Installing a new graphics card is key for a world of difference in an enhanced gaming experience, better video performance, or a smoother running computer overall.
However, there’s no need to take your computer to a repair shop because replacing your current graphics card is a straightforward process.
Read on to learn what needs to be done before installing your new graphics card and how to install it. Have it up and running in no time with the steps listed below.
How to Install a New Graphics Card on a Windows 10 PC?
For a clean install of your new graphics card and to prevent potential driver incompatibility issues, it’s highly recommended that you first uninstall the drivers that Windows currently uses. One way to do this is by uninstalling the drivers via “Device Manager.”
Part One: Uninstall Your Current Drivers
Here’s how to uninstall your drivers:
- Go to the “Start” menu and search for “Device Manager.”
- In “Device Manager,” expand the “Display Adapters” section.
- Right-click your current graphics card, then select “Uninstall.”
- Complete the onscreen prompts to delete the driver.
- Your display will show in low quality for now. Turn off your computer.
Part Two: Ground Yourself
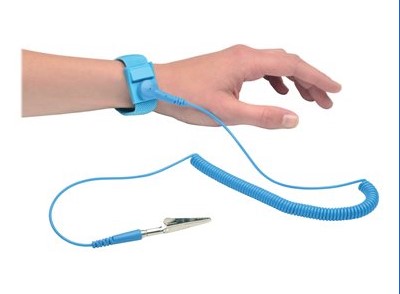
Before you remove the graphics card, you need to ground yourself. Grounding prevents your body from acting as a static electricity source, and the static from your fingers can damage or destroy sensitive computer components.
Here are ways in which you can ground yourself:


- Use an anti-static wrist strap attached to exposed metal in the computer case.
- Ensure your computer is on a table and not your carpet.
- Ensure the computer is disconnected from the power supply.
Part Three: Open Your Computer
Now that you’re grounded, it’s time to open your computer case.
Many modern cases have thumbscrews on the back for easier removal of the side panels. Alternatively, you could use a Philips-head screwdriver. Once all the peripherals are disconnected, to remove the side panels:
- For easy access to your motherboard, start at the end opposite.
- To know which side your motherboard is on, look on the back of your PC for the I/O panel. It’s a panel with various ports like USB, Ethernet, etc.
- Lay your PC on its side, then unscrew the opposite panel.
Part Four: Find Your Old Graphics Card
If your monitor were connected directly to the motherboard for integrated graphics, you wouldn’t have a graphics card to remove. In that case, skip this section and go to Part Six.
To find your old graphics card:
- Locate the long PCI-E x16 nearest to the heat sink of your CPU. This should be the first or second expansion slot.
- If your computer is an older model, the graphics card will be inserted into the AGP slot.
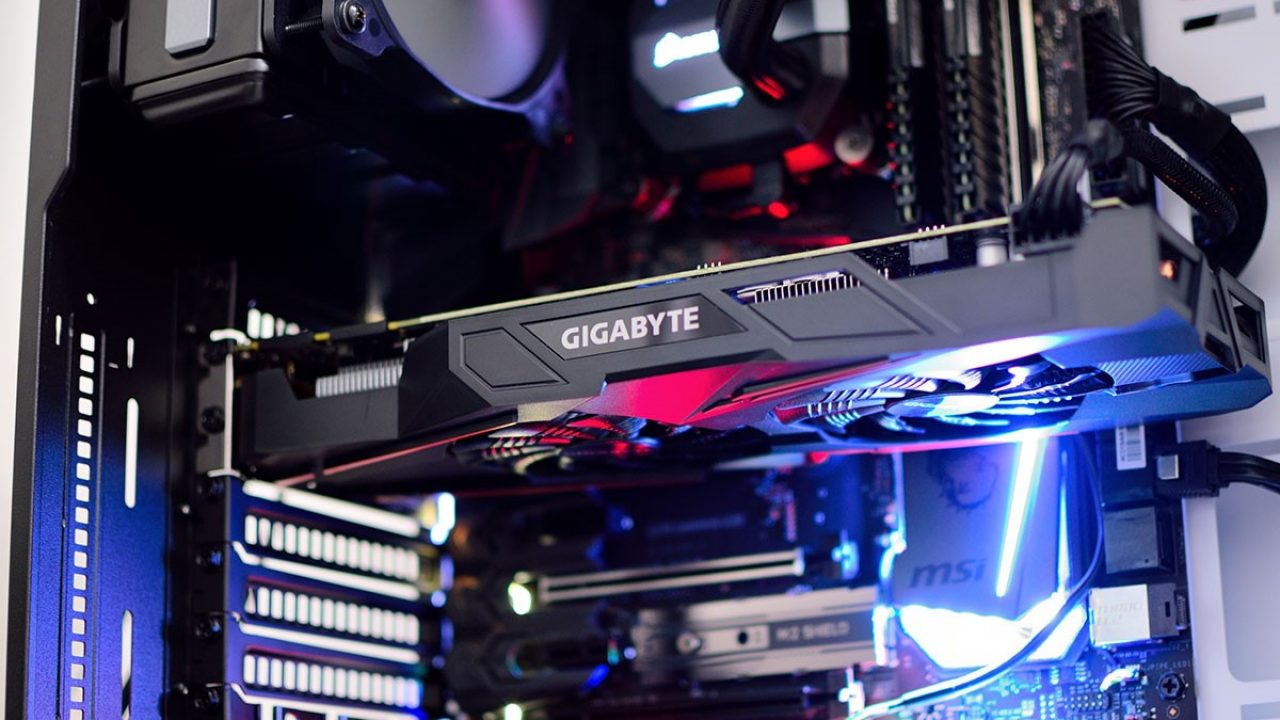
The graphics card will likely be the largest card slot on the board, with fans and heatsinks attached to it.
Part Five: Remove Your Old Graphics Card
Follow these steps to remove the graphics card:
- Ensure all cables connected to the graphics cards are removed from the back panel.
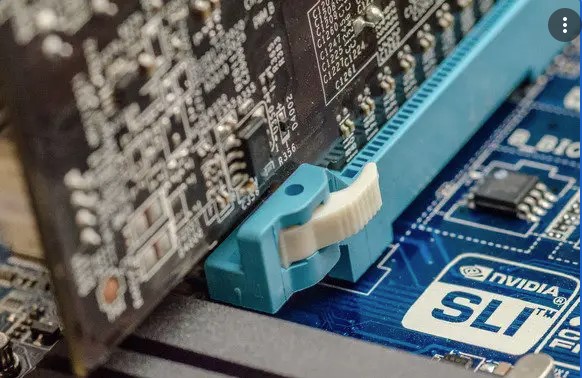
- With a crosshead screwdriver, unscrew the screws connecting the card to the chassis. On newer cards, near the back of the PCI slot, a tab underneath just needs to be released to pull the graphics card out.
- To prevent causing damage to the PCI slot, pull the card upwards as you remove it.
Part Six: Remove the Dust
Opening up a tower would be a great time to get rid of the accumulated dust over time. You can use canned air/compressed air to remove the dust from all the crevices. A build-up of dust can cause the components to overheat. So, to help extend the life of your PC, give it a good clean once in a while.
Part Seven: Install Your New Graphics Card
Follow these steps to install your new graphics card:
- Avoid touching any circuitry or contacts when removing the graphics card from its anti-static bag.
- Before you start, ensure there are no cables or other components in the way. Insert the card into the empty PCI-E slot. To get it completely seated, apply a little pressure to the top. If there’s a clip, you’ll hear it click into place.
- Once the card is firmly in place, use the case screws to secure it to the chassis.
- Now connect the power supply. The power supply connector port should be at the top of the card. Connect one or two PCI-E connectors from the power supply.
- Close your computer, then connect your display to your new graphics card.
Part Eight: Install New Drivers
Once you’ve switched your computer on, your OS will detect the new graphics card and attempt to fine-tune your display to use the optimal resolution and color depth. Accept the changes once this is complete.
To install the driver:
- If the graphics card has a driver disk, insert it to begin the setup process.
- Alternatively, for the latest release of drivers, go to the official website for the graphics card brand, e.g., NVidia or AMD, to download and install the driver.
- Follow the onscreen prompts to complete the setup process.
How to Install the New Graphics Card Drivers on a Windows PC?
This section will discuss installing your new graphics card using Windows 7 or 8. For the most part, the steps are identical to the Window 10 section above. So, here we’ve provided a slimmer version:
Part One: Uninstall Your Current Drivers
For a clean install and to prevent potential driver incompatibility issues, here’s how to uninstall your drivers using Windows 7 and 8:
- At the “Start” menu, enter “Device Manager.”
- In “Device Manager,” expand the “Display Adapters” section.
- Right-click on your current graphics card, then select “Uninstall.”
- Complete the prompts to delete the driver.
Part Two: Ground Yourself
To prevent your body’s electrical charges from potentially interfering with highly conductive computer parts, you’ll need to ground yourself.
You can do this by making sure the computer is disconnected from the power supply. Also, consider wearing an anti-static wrist strap attached to the exposed metal in the case.
Part Three: Open Your Computer
Ensure all the peripherals are disconnected, then remove the side panel opposite your motherboard. The motherboard will have the I/O panel. Lay your PC on its side to unscrew the opposite panel.
Part Four: Find Your Old Graphics Card
Your old graphics card is likely to be the largest card on the board, with fans and heatsinks attached to it. Typically, it’s in the first or second expansion slot on your motherboard.
Part Five: Remove Your Old Graphics Card
Follow these steps to remove the graphics card:
- Ensure all cables connected to the graphics cards are removed from the back panel.
- Unscrew the screws connecting the card to the chassis, or release the tab underneath it.
- Gently pull the card upwards to remove it.
Part Six: Remove the Dust
This would be a great time to get rid of the accumulated dust over time. You can use canned air/compressed air to remove the dust from all the crevices.
Part Seven: Install Your New Graphics Card
Follow these steps to install your new graphics card:
- Before you start, ensure there are no cables or other components in the way. Insert the card into the empty PCI-E slot. To get it completely seated, apply a little pressure to the top.
- Once the card is in place, use the case screws to secure it to the chassis.
- Connect the power supply, and close the case.
- Reconnect your display to the graphics card.
Part Eight: Install New Drivers
Once you’ve switched your computer on, your OS will detect the new graphics card and attempt to fine-tune your display to use the optimal resolution and color depth. Once your computer completes its fine-tuning, accept the changes.
Then to install the driver, use the driver disk if the card came with one. Otherwise, go to the brand’s official website to download and install the latest drivers.
Additional FAQ
Do You Need to Uninstall Old Graphics Card Before Installing New One?
Yes. Your monitor will use your new graphics card. Therefore, there will be no use for the old one, which will take up unnecessary space.
Computer Power
Once you start using your new graphics card, you’ll notice the difference in a better computer experience, especially when it comes to tasks like video editing, gaming, and cryptocurrency mining.
Swapping out your old graphics card is pretty straightforward.
Uninstalled the current drivers to avoid potential incompatibility issues later. Then locate the old graphics card on your motherboard – it’s the most prominent card there; you can’t miss it. Pop the new card in the old one’s place, install the latest drivers, then you’re good to go!