Why Are Some of My iTunes Songs Grayed Out?
Picture the scene. You’re logging into iTunes on your iPhone or iPad and go to your playlist only to see some songs grayed out. Perhaps you’re seeing entire albums gray instead of black. So what’s up with that? Why are some of your iTunes songs grayed out?
For the most part, iTunes is an exceptionally reliable platform. Despite the closed and limiting nature of the ecosystem, the application itself is very good. You can sync between devices, upload non-iTunes music and do a ton of sorting, curating and mixing while you’re there. You can then access your library on any compatible Apple device.
But occasionally things don’t go to plan. Sometimes you see iTunes songs grayed out when they should be available. So how do you fix it?
What to do when your iTunes songs are grayed out
As far as I have been able to find out, there are four main reasons why your iTunes songs are grayed out. They have become de-synced, there is a licensing issue with Apple Music, you’re a victim of overzealous DRM, or something happened to the original file. Syncing is the most common cause so we’ll tackle that first.
iTunes sync
Syncing is usually an issue if you have loaded songs from your Mac and want to access them from a different device. If you have moved or deleted songs on your Mac, it may not have synced those changes to iTunes and therefore will not be available to play on another device.
The easiest way to fix it is to resync your devices.
- Connect your devices to your Mac using the Lightning cable.
- Open iTunes and sync your devices. Use the small icon in the top left of the iTunes window that looks like a phone.
- Select Music from the left menu and then check the box to Sync.
Once set, your devices should sync automatically every time you connect them. You can also perform these steps over WiFi but I find it much more reliable to do it with the Lightning cable.
The original song is missing or damaged
If you, or someone else, has been tidying up your music collection and you haven’t synced your devices, you may see songs grayed out. This happens because when your device last synced, the file was there and when it comes to play it, the file is no longer available. Rather than giving you an error, it grays out the song.
The easiest way to overcome this one is to sync your devices as per the first fix above. This should remove any gray entries from your playlist.
Licensing issues with Apple Music
Another common cause of grayed out songs in iTunes is licensing. This situations bites us consumers in all manner of ways but this has to be one of the most annoying. Apparently, some tracks and some entire albums are licensed for purchase from the iTunes Store but not for streaming with Apple Music. This will cause songs to appear gray.
So you can listen to them on your primary device but cannot stream them to another device using Apple Music. It is a bizarre situation but it is a real one and affects more music than should be allowed.
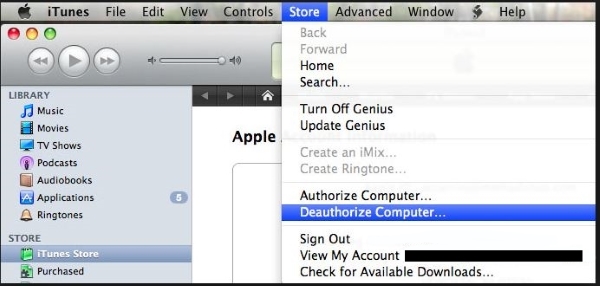
Digital Rights Management
Similar to the archaic licensing model we all have to contend with, DRM or Digital Rights Management is something that does nothing to enhance our experience either. Issues with DRM can cause iTunes songs to be grayed out. It could be linked to the licensing issue above or it could be that iTunes ‘forgot’ that you are authorized to listen to the song.
Each song within iTunes has a digital signature that tells the program that it is a legit copy and that you have permission to play it. If iTunes loses that digital signature, it can gray out the song as it thinks you don’t have permission to play it. All you need do here is reauthorize it.
- Go into iTunes on your device.
- Select Store from the top menu.
- Select Authorize this device from the dropdown menu.
Depending on what happened, this might not work and you may need to deauthorize first.
- Go into iTunes on your device.
- Select Store from the top menu.
- Select Deauthorize this device from the dropdown menu.
- Sign out of iTunes and reboot your device.
- Log back into iTunes and Authorize the device as above.
Depending on your setup, you may need to do this on your main computer or device or on the device having issues. If you use a Mac to manage your music, do the above on the Mac. If you’re purely mobile, do it on your primary device.