


How and Why to Change the Built-in Administrator Account Name in Windows

Have you ever tried to create a new Windows user named “Administrator?” If so, you know that Windows prevents you from doing it, and the reason is that all modern versions of Windows automatically create a default built-in Administrator account, regardless of any other accounts you set up. You don’t normally see this account, as it’s disabled by default, but it’s the most powerful account on your Windows PC because it has what are called “elevated” privileges.

Elevated privileges mean that the built-in Administrator can do anything that your own user-created admin account can do, but it won’t be prompted by User Account Control (UAC) when making key changes to the system. It’s therefore recommended that you keep this built-in Administrator account disabled, but you can also take one small step to further increase your PC’s security: rename the built-in Administrator account.
Because all Windows PCs from the last decade have an account called “Administrator,” hackers and malware know exactly which account credentials to try during a security breach. But if you change the name of your built-in Administrator account, you can potentially foil a hack or hijack of your PC. Here’s how to change the name of the built-in Administrator account.
First, you need to launch the Local Group Policy Editor:
Windows 7: click on the Start Button and type gpedit.msc in the search box. Click on it in the results list or press Enter to launch it.
Windows 8: head to the Start Screen and type gpedit.msc. You’ll see the Windows search bar appear on the right side of the screen, with the Local Group Policy Editor listed as a result. Click on it or press Enter.
With the Local Group Policy Editor now open on the desktop, turn your attention to the nested list on the left side of the window and navigate to the following location: Computer Configuration > Windows Settings > Security Settings > Local Policies > Security Options.
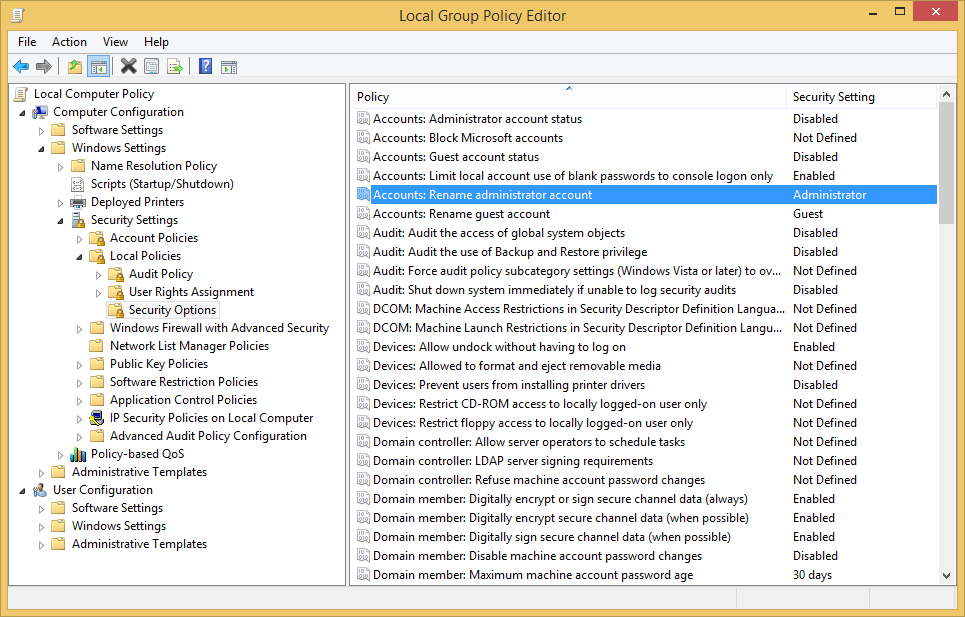
In the list on the right side of the window, find Accounts: Rename administrator account listed near the top. Double-click it to open that policy setting. As we discussed earlier, the setting’s “Explain” tab reveals why you may want to change the built-in Administrator account name:
Renaming the well-known Administrator account makes it slightly more difficult for unauthorized persons to guess this privileged user name and password combination.
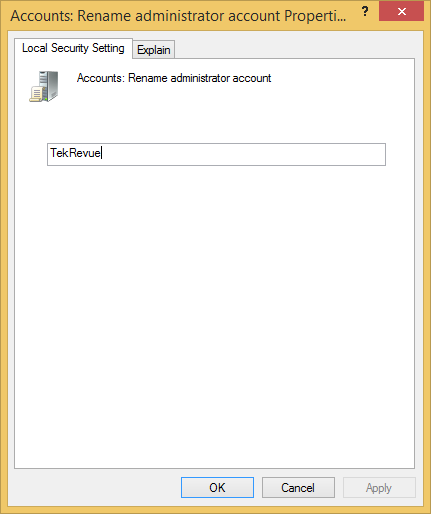
On the “Local Security Setting” tab, you’ll find a simple text box that says “Administrator” by default. This is where we’ll change the name of the built-in Administrator account. Pick any name you want, except for the name of any current or planned future user accounts (because, remember, you can’t have multiple Windows user accounts with the same name). Once you’ve made your selection and typed it in lieu of “Administrator,” click Apply and then OK to save your settings and close the window.
You can also now close the Local Group Policy Editor, as your built-in Administrator account name has been successfully changed, slightly increasing the security of your PC. Note that you can also change the name of the built-in Guest account using the Local Group Policy Editor, although the need to do so is a bit less than the Administrator account, as the Guest account has limited privileges.
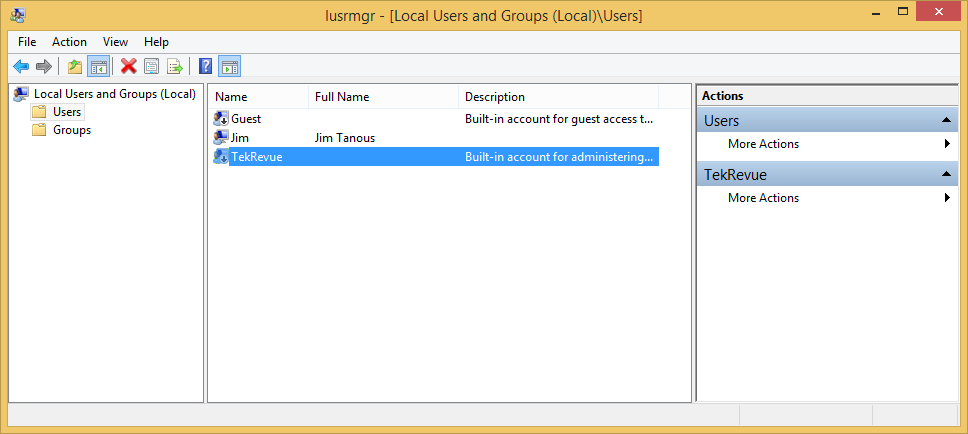
You can verify the change in the Administrator account name by paying a visit to the Local Users and Groups Manager (run lusrmgr.msc in the Windows 7 Start Button search box or Windows 8 Start Screen search bar). There are several other ways to rename your built-in Administrator account, but this is generally the easiest method for users of all skill levels to follow.


2 thoughts on “How and Why to Change the Built-in Administrator Account Name in Windows”