How To Clear Cache On Galaxy S8 And Galaxy S8 Plus
For Samsung Galaxy S8 and Galaxy S8 Plus owners, many of the problems that you may face can easily be solved using two different troubleshooting solutions, that only take a few minutes to complete. The best way to fix any bugs or other software problems on your Galaxy S8 or S8 Plus is to either complete a factory reset or to wipe the cache.

The best reason to clear the cache on a Samsung Galaxy S8 and Galaxy S8 Plus is when the smartphone has some delays, glitches, or freezes. The following is a guide on how to clear the Galaxy S8 cache.
What is the cache and what does it do?
First, it’s important to know what the cache is and why you should periodically clear it on your Galaxy smartphone. The Samsung Galaxy S8 and S8 Plus have two different types of caches. The first is the app cache and the other is system cache. All the apps on the Galaxy S8 and Galaxy S8 Plus have their own cache installed on the app.
This cache allows for the app’s temporary data to be stored for better efficiency when switching between apps. While the system cache on the Galaxy S8 does the same thing, it does it for the phone’s software instead of each individual app. That’s why when there are issues with apps crashing or freezing, it’s best to try clearing one of the caches to help fix the issue.
Clearing the system cache is a great way to clean your phone up without having to perform a full factory reset. Clearing the cache doesn’t delete any photos or contacts (although you may have to log back into certain applications) making it a great first step to fixing issues with your phone.
How to Know if its the System or an App
Understanding which cache to clear can cut down on some time. There are a few things to consider when clearing your cache:
- Did you recently download or update an app?
- Has your home screen changed its layout?
- Are all of your apps and functions misbehaving?
- Does your phone boot up slowly?
Clearly, if you’re having trouble with only one application, it’s probably the cache that needs to be cleared. First, ensure it is updated by visiting the Google Play Store. Then follow the steps below to clear the cache.
If your phone is having troubles it can be due to a launcher or recently added app. Adds popping up or your home screen layout changing are general indicators that your phone isn’t having an issue but you have a bad app. To confirm it’s a bad app, put your phone into safe mode. If the problem persists, it’s the phone.
To put your Galaxy S8 in Safe Mode do this:
- Hold the power button until you see the option to ‘Power Off’
- Long press the ‘Power Off’ option
- Tap ‘Safe Mode’

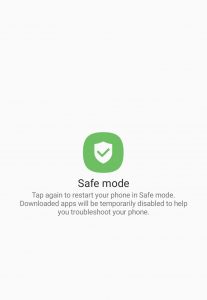
You will see the Safe Mode icon in the lower portion of the screen. Any applications or third-party software will be greyed out. Safe Mode shuts down any systems that aren’t natural to your phone, this makes it easier to determine if a problem is happening because of an app or the system.
If none of these options resonate with your current situation, your phone is booting up slowly, or you’re having other issues it’s probably time for a system cache dump.
How to clear the app cache on the Galaxy S8
For problems that are just happening on a specific app, it’s best to first try to clear the app cache. You can clear the app cache with these instructions.
- Turn on your Galaxy S8 or Galaxy S8 Plus.
- Go to Settings and then the App Manager. It may say ‘Apps’ depending on which version you’re running.

- Select the app you want to clear the cache for.
- After you’ve selected the app, look for the app info screen.
- Select Clear Cache. This may be located under the ‘Storage’ tab.
- To clear the app cache for all apps, go to Settings and then to Storage.
- Select Cached Data to clear all app caches simultaneously.
Don’t select Clear Data unless you want to lose all the information that app stores, like your user name, passwords, game progress, preferences, settings, and so on. This goes for installing and uninstalling as well. If the app isn’t connected to a login and username or your Facebook account, you may lose important information.
What to do when clearing the app cache doesn’t help?
After you cleared the cache of individual apps and you’re still having trouble on your Galaxy S8, the next best option is to uninstall the app and reboot the device. After rebooting the Galaxy S8 or Galaxy S8 Plus, if the problem is still happening then it’s suggested that you perform a system cache wipe, also known as wiping the cache partition on the Galaxy S8.
How to clear the system cache on the Galaxy S8
- Turn the Galaxy S8 or Galaxy S8 Plus off.
- Press and hold the Volume Up, Power, and Home buttons at the same time until the logo shows up and the phone vibrates.
- Then let go of the Power button and continue to hold the other buttons.
- Use the volume buttons to scroll down to highlight Wipe Cache Partition.
- Press the Power button to select the highlighted option.
- Scroll down to Yes and press the Power button.
- Scroll to Reboot System Now and press Power.
- Your Galaxy S8 will reboot with a cleared system cache.
In most cases, wiping the cache should be sufficient to solve smaller problems, and it’s a good place to start when you’re troubleshooting an issue.
Factory Reset
If you must erase everything on your phone, you can do a factory reset. Assuming the issue isn’t related to hardware (i.e. a failing motherboard), this will certainly fix any problem you have. Keep in mind, you may want to backup your phone before performing this step. Everything is permanently removed with a factory reset.
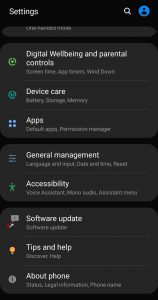
- Go to ‘Settings’ by pulling down from the top of the phone and tapping the cog
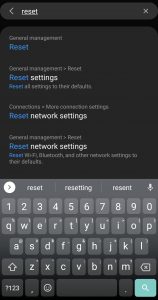
- Scroll down to ‘General Management’ (Or type ‘Reset’ into the search bar at the top of settings.
- Tap ‘Reset’
- Tap ‘Factory Data Reset’
- Tap ‘Reset’ and put in your password to confirm.
If the problem persists after the reset; there may be a corrupt file in your backup. Erase it again and restore your phone as new.