


Create A Headless Torrent Server With Deluge On A Raspberry Pi
Why Set Up A Dedicated Torrent Server?
You can download torrents on just about any computer fairly easily, so why would you want to set up a dedicated torrent server anyway? Well, there are a couple of good reasons that make the extra setup worthwhile.
First, you can access it from anywhere on your network. That means, if you want to download something, you don’t necessarily need to be on the same computer. You can use a laptop or computer in an entirely different room. You can also easily access and manage your torrents from anywhere. You can check if something’s done downloading from outside your house or change the priority of your downloads on the fly.
Having a dedicated server also means that you can turn off your computers without worrying about stopping your download progress. Your server will always be running in the background, even when your computers are off or you’re not even home.
A server is also much easier to manage. You don’t have to worry about any of the other programs on your computer getting in the way, or worse, crashing. The server also limits the amount of VPN connections you need to worry about, depending on your network situation.
What You’ll Need
Surprisingly enough, you don’t need much here. Everything will be based on your Raspberry Pi.
- Raspberry Pi 3 or better
- External hard drive or a networked drive
- Ethernet cable
- Power cord for Pi
- MicroSD card 16GB+
Flashing The SD Card
Raspbian is the default operating system for the Raspberry Pi. It’s also the perfect option for setting up the Pi as torrent server. Go over to the Raspberry Pi Foundation’s download page, and get the latest release of Raspbian Lite. You’re not going to need a desktop environment on your server. The lighter it is the better.
Once you have your image, unzip it. You want a file with the raw .img extension. Then, insert your MicroSD card into your computer.
If you don’t already have a preferred tool for flashing images to SD cards, there’s a great cross-platform application, Etcher, that you can use on any operating system to easily flash your image. Download the correct version for your OS.
Once you have Etcher, open it up or install it. The program breaks the process down into three simple steps. In the first section, select your image file. Then, find your SD card. When everything looks correct, click the button to flash your image. The process will take a while, so be patient.
After Etcher is finished writing your image, there’s one more thing you need to do. Mount your MicroSD on your computer. Look for the “boot” partition. Create a blank file in the base of the “boot” partition, called “ssh.” That file tells the Pi to enable SSH access by default.
Install Raspbian
Unmount your SD card, and remove it from your computer. Plug it in to the Pi. Connect the Pi directly to your router with an Ethernet cable. When everything is set, plug it in.
The Raspberry Pi will take some time to resize its partitions and fill up the SD card. While it does that, open your web browser and navigate to your router’s web interface. Keep an eye on the listing of connected devices. Eventually, the Pi will pop up as “raspberry.”
Once you see the Pi on your network, you can use SSH to connect to it. Open up OpenSSH, and connect with to the Pi’s IP address. The username is Pi, and the password is “raspberry.”
$ ssh pi@192.168.1.110
Set Up A User
You’re probably going to want to create a new user for Deluge. That user will run Deluge as a service daemon, and not much else.
$ sudo groupadd deluge
$ sudo -r –home-dir /var/lib/deluge -g deluge deluge
Make that directory and grand ownership to your Deluge user.
$ sudo mkdir /var/lib/deluge
$ chown -R deluge:deluge /var/lib/deluge
Connect To A VPN
It’s not strictly necessary to connect to a VPN, but it’s a very good idea. This process won’t be exactly the same, depending on your VPN provider, but it should be similar enough. Start by installing OpenVPN on Raspbian.
$ sudo apt install openvpn
Next, download the OpenVPN configuration files for your VPN. Again, this part is going to be different, depending on who you’re using. Most VPN providers will provide OpenVPN configuration files either by saying just that or as their Linux option. They usually come in a big .zip file. The files themselves usually have the .ovpn extension.
Find a location that you want to use. Depending on your needs, it might be a good idea to pick a server located outside the US. Copy that file into the system’s OpenVPN folder, and rename it.
$ sudo cp Downloads/config.ovpn /etc/openvpn/client.conf
Once it’s there, create a file for authentication. Use a plain text file, called auth.txt. On the first line, place the username for your VPN account. On the second line, add your password. Open the VPN configuration that you just copied over. Find the line below and make yours match the example.
auth-user-pass auth.txt
That will automatically log you in. Next, add the block below just before your certificates. These will handle logging and starting and stopping the service.
status /etc/openvpn/openvpn-status.log
log /etc/openvpn/openvpn.log

script-security 2
up /etc/openvpn/update-resolv-conf
down /etc/openvpn/update-resolv-conf
Save your file and exit. Then, restart the service.
$ sudo systemctl restart openvpn
$ sudo systemctl start openvpn@client
$ sudo systemctl enable openvpn@client
Create A VPN Killswitch
If you’re using torrents behind a VPN, your probably want a reliable killswitch that will cut off your connection of you lose contact with the VPN. Thankfully, that’s something that’s very easy to do on Linux systems with a firewall. Start by downloading UFW to make firewall management much easier.
$ sudo apt install ufw
Once you have UFW, you can start setting up your rules. Start by disabling UFW.
$ sudo ufw disable
Now, tell UFW to block everything by default.
$ sudo ufw default deny incoming
$ sudo ufw default deny outgoing
Allow all connections from the computer itself and the local network.
$ sudo ufw allow from 192.168.1.0/24
$ sudo ufw allow from 127.0.0.1
Then, allow everything through the VPN. Check the actual interface of your VPN.
$ sudo ufw allow in on tun0
$ sudo ufw allow out on tun0
Finally, allow contact to your VPN’s DNS server. Again, check the actual IP in /etc/resolv.conf.
$ sudo allow in 53
$ sudo allow out 53
When that’s all ready, re-enable UFW.
$ sudo ufw enable
Install Deluge
You’re finally ready to install deluge on your server. So, do just that.
$ sudo apt install deluged deluge-console
Wait for the install to finish. It should be pretty quick.
Set Up The Deluge Server
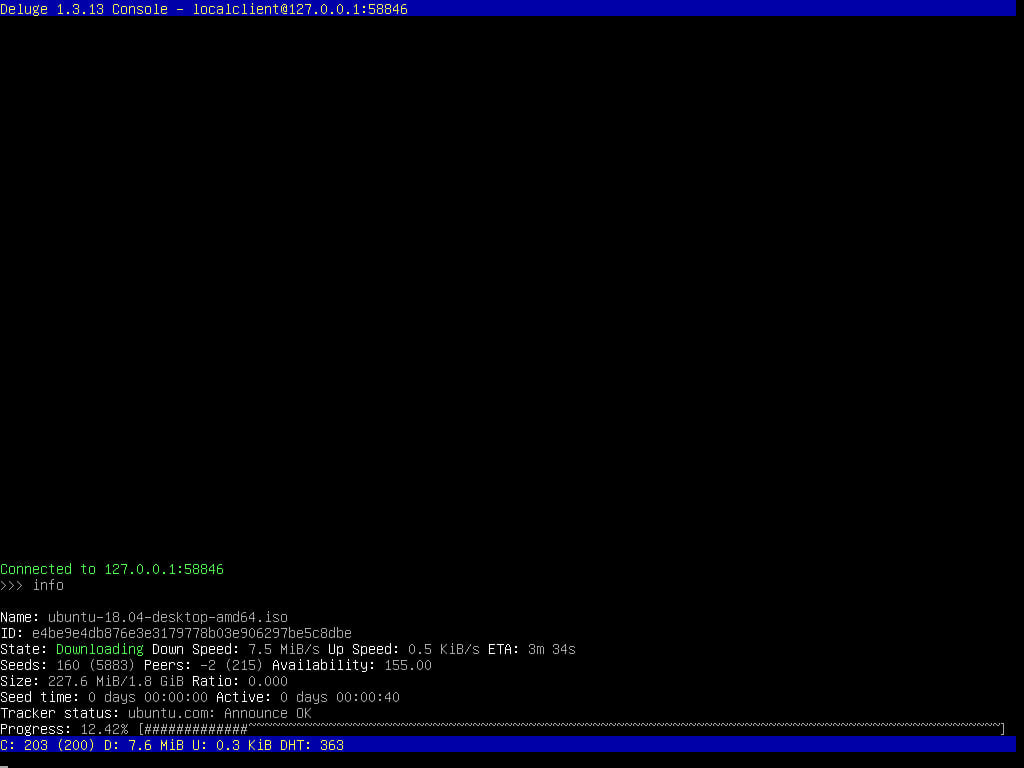
In order to allow connections to your server from other computers, you need to enable remote connections. Change to your Deluge user, and open up the Deluge console.
$ sudo su deluge
$ deluged
$ deluge-console
Then, enable remote connections.
config -s allow_remote True
Now, stop the Deluge daemon. You can do that by looking up the process and killing it.
$ ps aux | grep deluge
$ kill 1923
You need to add login records for your users. The file is located at / var/lib/deluge/.config/deluge/auth. Add your user records in the following pattern.
username:password:10
The number denotes privileges. 10 makes the user an admin user. When you’re done, save an exit.
Create A Deluge Service
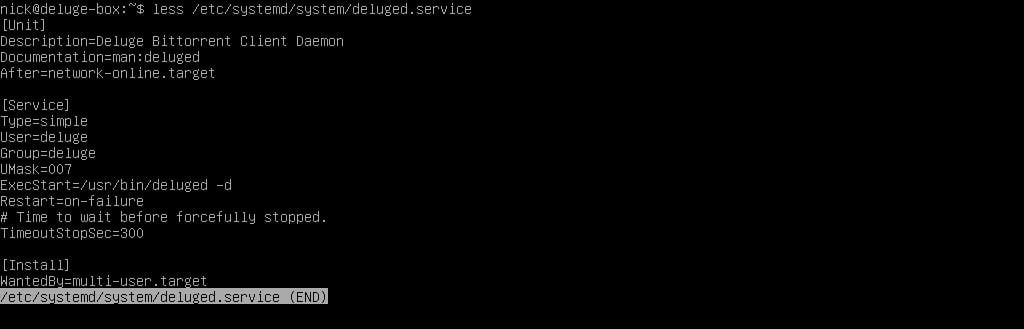
Since you want Deluge to start up automatically with the Raspberry Pi, you’re going to need to write a simple systemd service. Don’t worry, this is actually provided in the Deluge documentation. Create a file at /etc/systemd/system/deluged.service. In it, put the following:
[Unit]
Description=Deluge Bittorrent Client Daemon
Documentation=man:deluged
After=network-online.target

[Service]
Type=simple
User=deluge
Group=deluge
UMask=007
ExecStart=/usr/bin/deluged -d
Restart=on-failure
# Time to wait before forcefully stopped.
TimeoutStopSec=300

[Install]
WantedBy=multi-user.target
Test it out by starting up the service and checking the status.
$ sudo systemctl start deluged
$ sudo systemctl status deluged
If the service is up and running, make the change permanent by enabling the service.
$ sudo systemctl enable deluged
Install The Client
You can now install the Deluge client to connect to your server. Deluge is open source and readily available across multiple platforms.
Windows

Go to the Deluge download page, and grab the latest release for Windows. Run the .exe. The installation process is fairly standard. Feel free to click through the wizard, and accept the defaults.
Linux
As you’ve probably guessed, the Linux process is very easy. Just install the client with your package manager.
$ sudo apt install deluge-gtk
Connect To Your Server
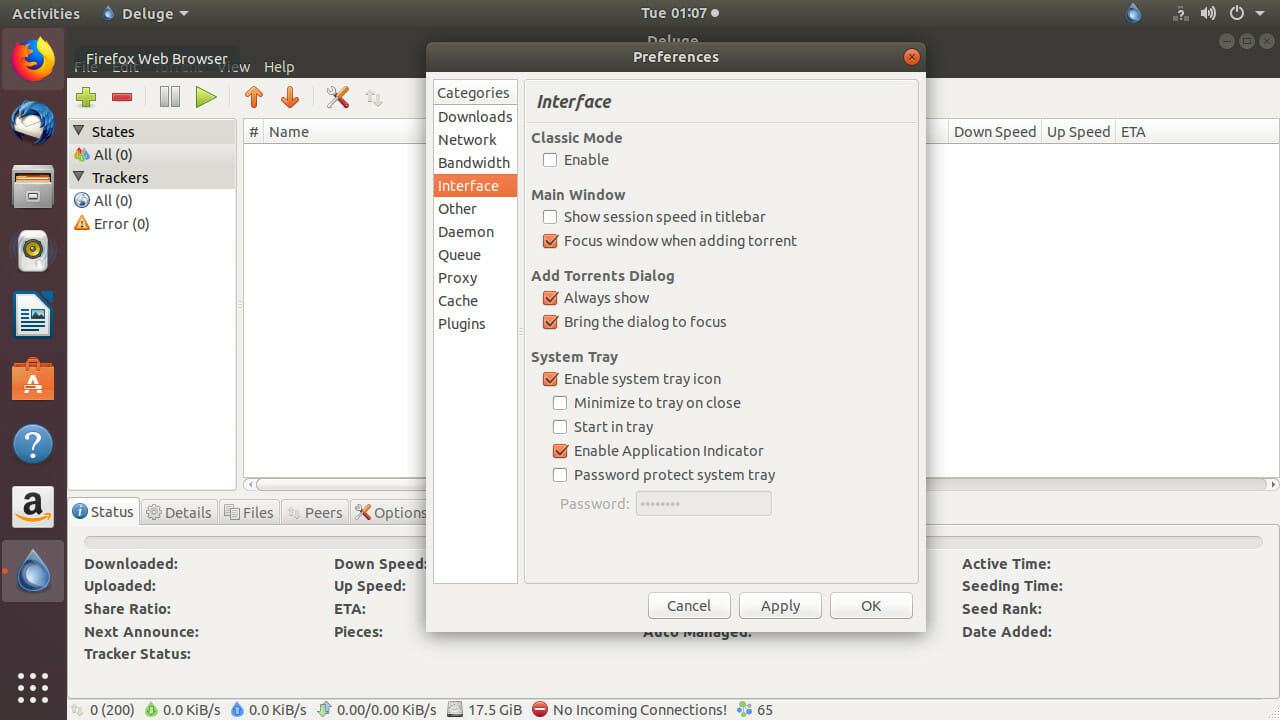
Open the Deluge preferences by clicking “Edit”?”Preferences.” On the side of the window that will open, you can find the “Interface” tab. Click on it. Near the top of the window is a checkbox that controls Deluge’s classic mode. Uncheck the box to disable it.
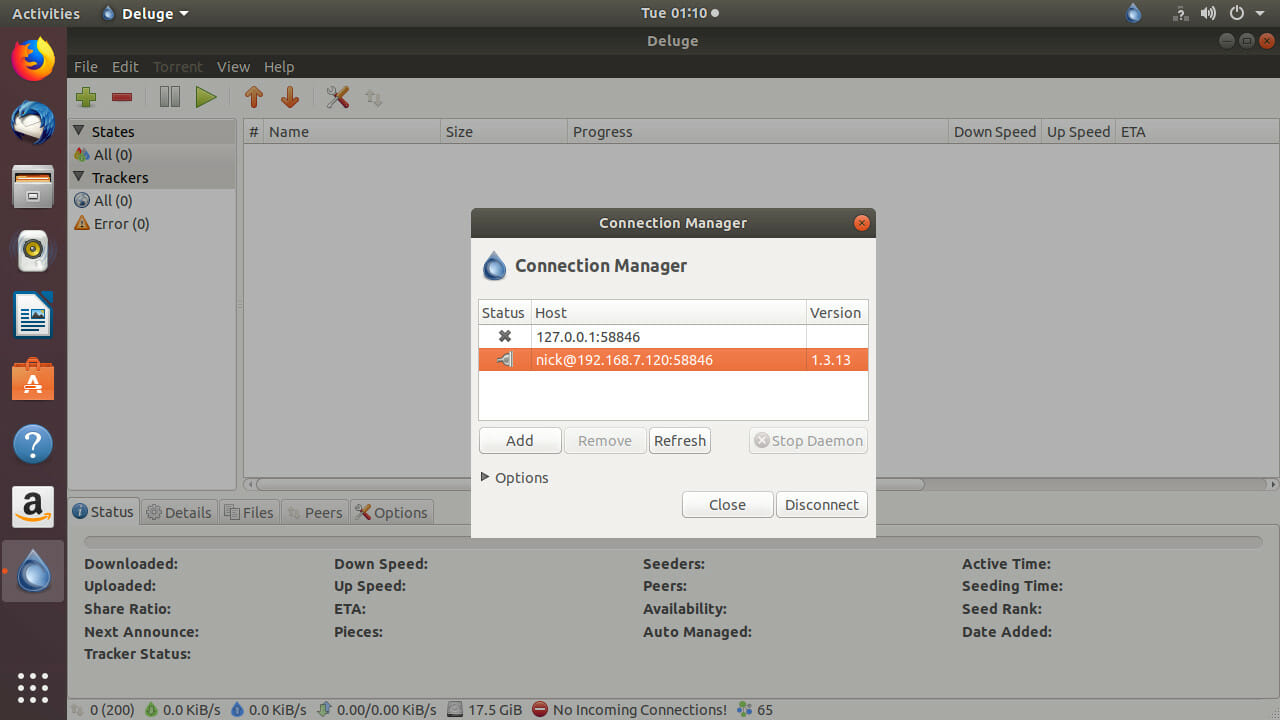
Click on the “Edit” button again. This time, select “Connection Manager.” By default, you’ll see the localhost IP there. Below the listing, there are buttons that allow you to add and remove connections. Click the “Add” button. Enter your server’s IP in the “Hostname” field. Leave the port number the same. Then fill in the username and password that you set up. Click “Add” to finish.
Back on the main “Add” window, you can now highlight your new entry and click on the “Connect” button at the bottom to connect to the server.
Configure Your Storage
Before you start downloading anything, you’re going to need to configure your storage. The two main options here are an external USB hard drive or a networked drive. Either way works. You just need something much larger than what the Raspberry Pi supports.
USB
Plug your USB drive in to the Pi. Then, through your SSH console, look at the devices available.
$ ls /dev | grep sd
You should only see the USB drive and possibly your SD card. The SD card will have multiple partitions, while the USB drive will probably only have one. It’ll look something like this:
sda
sda1
sda2
sdb
sdb1
In this case, the external drive is sdb, and the partition is sdb1. Create a directory to mount it to.
$ sudo mkdir /media/external
Now, open /etc/fstab with your text editor and create an entry to mount the drive automatically on boot.
/dev/sdb1 /media/external ext4 defaults,user,exec 0 0
Make sure that the path and the filesystem type match your drive. If you’ve only ever used the drive with Windows, the format is probably NTFS, and you need to install ntfs-3g on the server.
Run the following to mount the drive.
$ sudo mount -a
Networked
All networked drive configurations are different, but if you’re using a Linux NFS drive, you can create a directory to mount to and add a record to /etc/fstab.
$ sudo mkdir /media/nfs
Then, open fstab, and add your drive.
192.168.1.120:/media/share /media/nfs ext4 defaults,user,exec 0 0
Save and exit. Then, mount your drive.
$ sudo mount -a
Configure Deluge
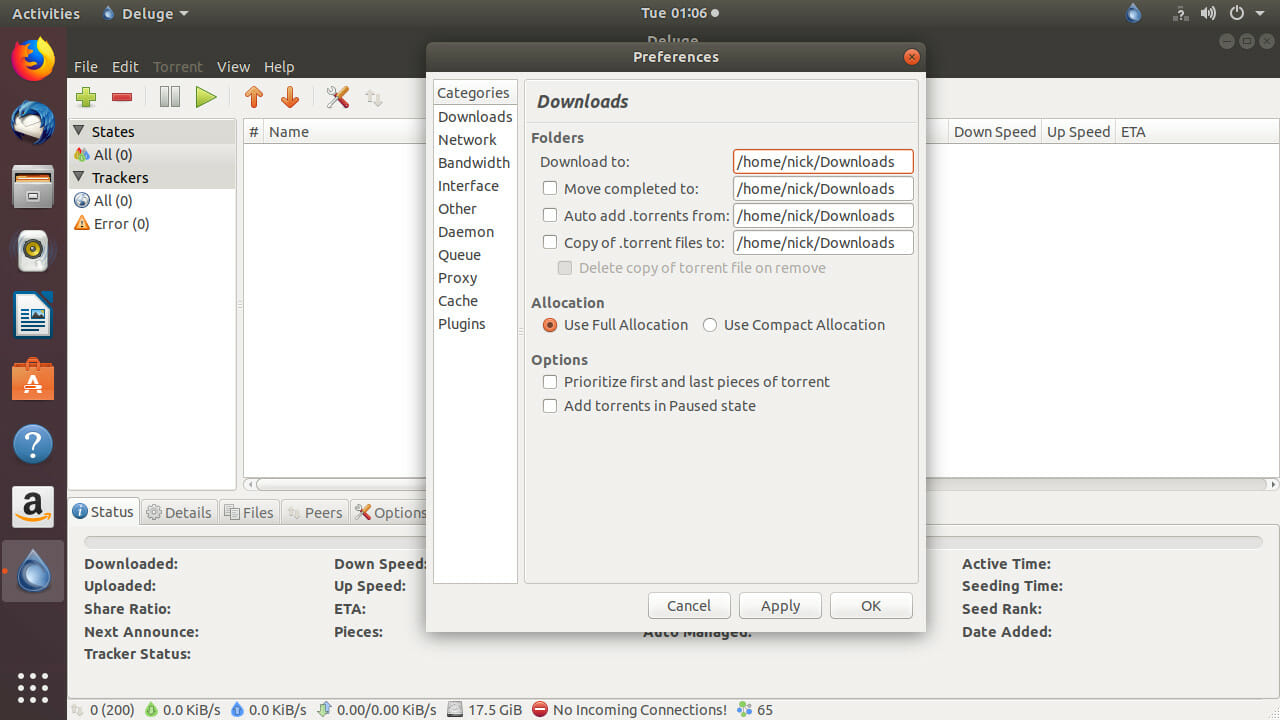
Back in the Deluge client, you can set the download directory for your torrents. Click on “Edit”?”Preferences.” In the first “Downloads” tab, you can set the download location for your files. Choose the location of your newly mounted drive.
Download A Torrent
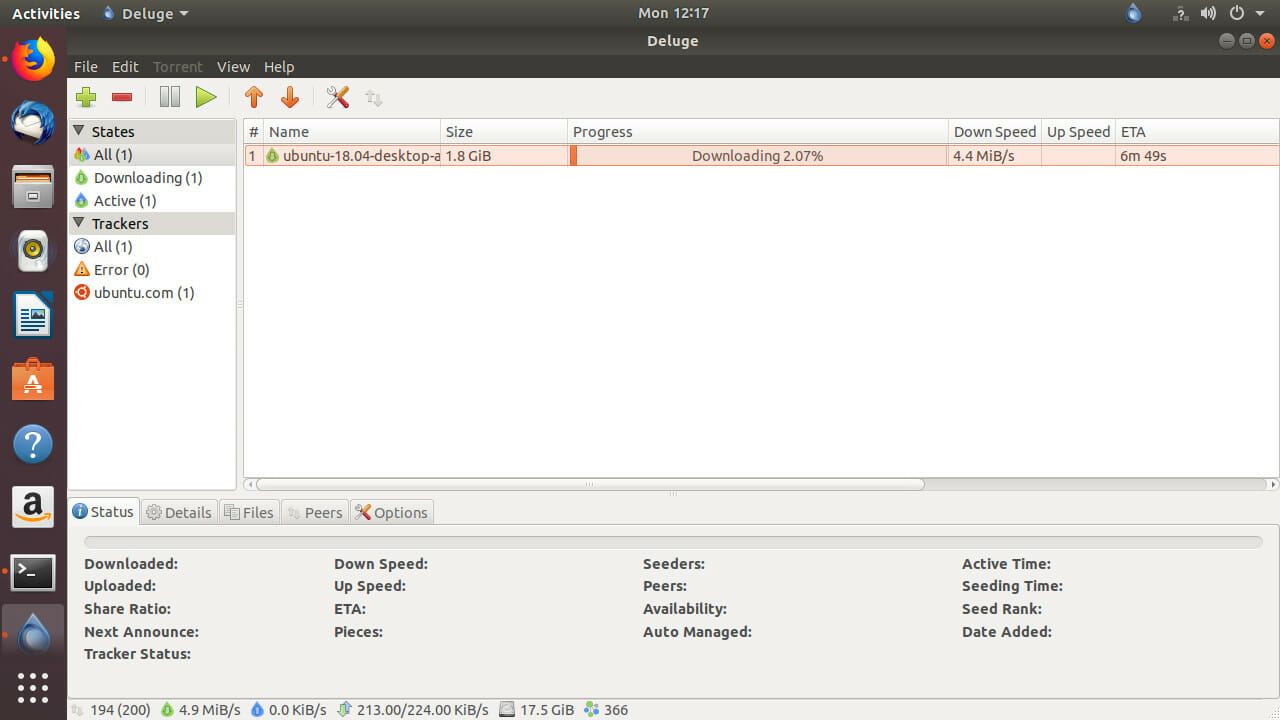
To download a torrent with Deluge, click on the plus sign icon at the top left of the window. A new window will open with different options for you to add the torrent. The two most common ones are going to be a torrent file and a URL. For the file, you can click on the button to browse to the location of your torrent file. Click the URL button, and paste in a URL to add a torrent via URL. The URL function works for magnet links.
The newly added torrent will appear in the main body of Deluge’s window. From there, you can track the progress of the torrent. If you would like to change the priority of your torrents, you can right click on them, and use the “Queue” option to move them up and down.
Right clicking on a torrent gives you a host of other options too. You can set download and upload limits, and pause a torrent outright too. There is also an option to remove a torrent too. Once you’re finished downloading, you can remove the torrent without removing the downloaded file. That will stop you from seeding. Of course, you can leave torrents seeding, and control the network usage of those completed torrents too.
Closing Thoughts
You now have a fully functional torrent server that’s configured and ready to download or seed as many torrents as you need. The server will run continually, independent of your computers. You’re also set up to run through a VPN, for added privacy and security. Enjoy your new torrenting experience!


2 thoughts on “Create A Headless Torrent Server With Deluge On A Raspberry Pi”
Nice one!
I never write in a blog. I just found yours looking for a solution for a killswitch for qBittorrent. Since the version for Debian is until 3.3.7, there are still a bug in the torrent server and the program is unable to be bind to a adapter, so I needed to play with the iptables.
After some looking in internet (weeks) I found that simple way you are proposing using “ufw”.
It is just working perfectly. I am wondering why you do not have any other comments, because you just saved my day.
Thanks a lot for your contribution.