




How to Edit a Photo in Photoshop Online (AI + Manual Techniques)
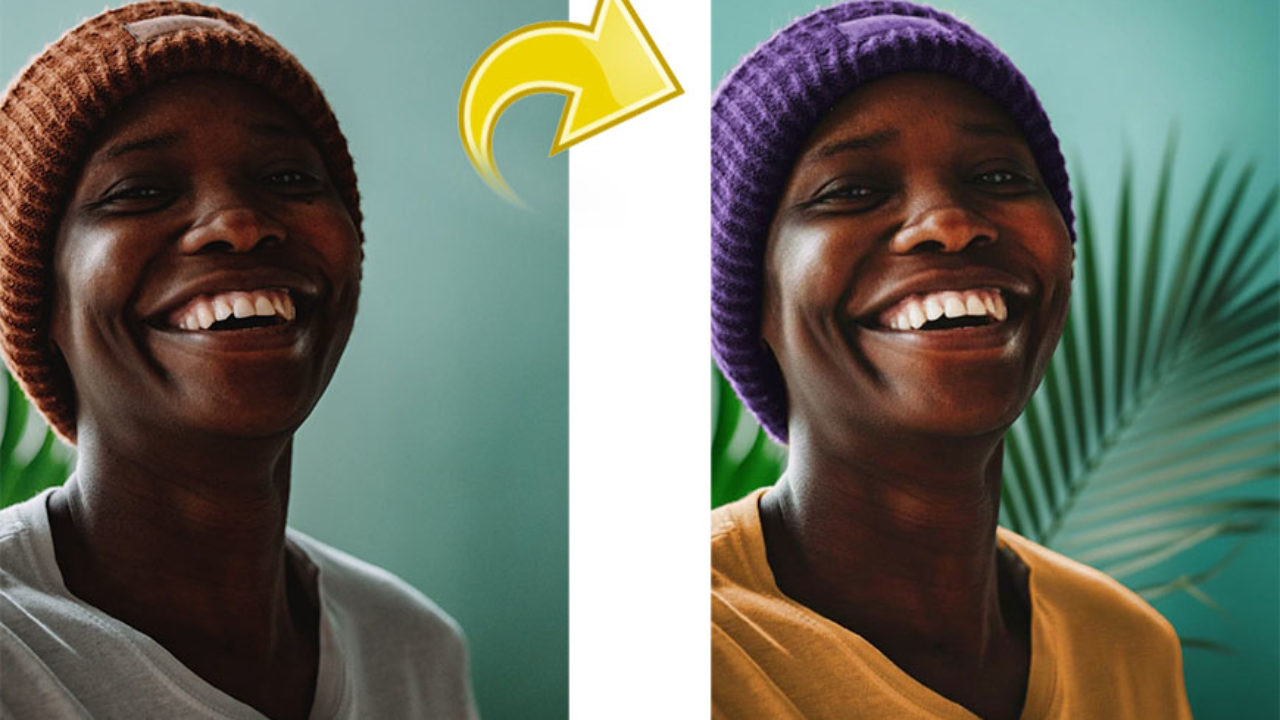
Editing your photos has never been easier. Thanks to AI, you no longer need years of experience to turn an ordinary image into an eye-catching one.
At the same time, manual editing tools are still essential for making precise adjustments and giving your images your own creative touch.
That’s why the best way to edit your photos is by combining both approaches. Let AI do the heavy lifting, then take over and fine-tune your image to your liking.
Photoshop online is the perfect photo editor because it allows you to easily integrate both approaches into your workflow – plus, it helps you learn how to improve your images.
This is because, in addition to the AI-powered tools that can simply do the task for you, it also has an AI assistant with two distinct modes. Automatic mode makes the edit for you instantly, while guided mode walks you through the underlying technique step by step. Either way, you can review the edit history, adjust each layer, and much more.
In this guide, we’ll follow that workflow as we work on a photo. First, we’ll use the AI Assistant to fix the biggest issues. Then, we’ll use layers and manual tools to fine-tune the result, and we’ll finish with the generative tools to replace the background and adjust the composition.
While it would be impossible for me to show you every tool available in Photoshop online, this basic workflow is meant as a starting point to help you understand how to edit a photo. Remember, there’s so much more to explore after this.
If you prefer to edit photos on your phone, most of what we’ll see here can be done in Photoshop mobile. In fact, all your documents are automatically saved as cloud documents, so you can seamlessly switch devices at any time.
How to Edit a Photo in Photoshop Online
You can use Photoshop on any computer; simply go to the Photoshop online website.
Here, you can upload your photo by clicking the New button at the top left of the screen.
Here you’ll find the option to upload your file from your computer or import it from Lightroom or Drive, or generate a QR code to upload a photo from your phone.
Alternatively, you can connect to Adobe Stock to find a photograph, or access your generation history in Adobe Firefly and open one of those images.
How to Use Photoshop AI Assistant
The AI Assistant is the perfect option for beginners because it automatically scans your photo and suggests actions to improve it.
Not only does it tell you where to start, but you can also interact with it using plain, everyday language — no technical terms required.
But I’m getting ahead of myself. First, you need to open the AI assistant by clicking on its icon on the right side of the screen. It looks like a talk bubble.
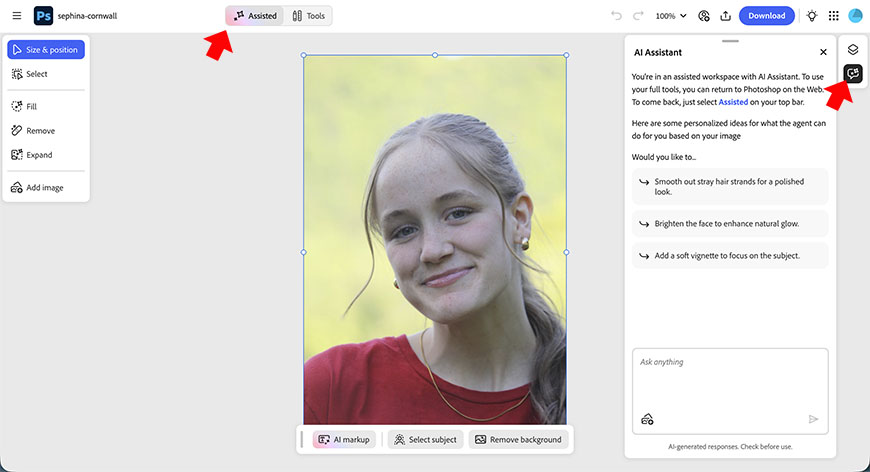
To get in and out of the AI-assisted workspace, you can click on the top buttons Assisted for AI and Tools for the traditional editing features.
When you toggle between workspaces, you’ll see the tools in the side panels change.
Ok, now that you’ve settled into the workspace, let’s jump back into the AI Assistant.
As I mentioned, it will automatically scan the picture as you launch the chat and offer suggestions on what to do. If you like any of them and want it to perform that task, simply click on it – you don’t need to type it again.
As it goes through the process, it will tell you all the steps it’s taking. So, the AI Assistant isn’t just a tool to edit your photos but also to learn.
You can also click on ‘View Edit History’ to review all the steps.
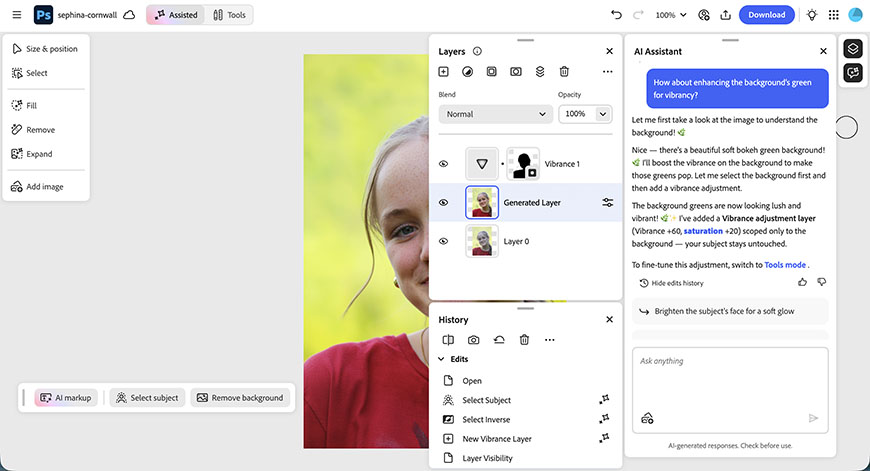
After each task, the AI Assistant will generate new suggestions to keep moving forward until you finish editing your photo.
If you want something you don’t see in the suggestions, simply type it in the prompt text space. For example, I want to brighten her eyes, so I type just that – you can use normal language, and it will understand you.
Notice how every edit you make with the AI Assistant generates a new layer. This is called non-destructive editing because the original photo you started with remains untouched in the first layer.
It also has other advantages that I’ll discuss in the upcoming steps.
How to Edit with Layers in Photoshop Online
Photoshop has long been famous for its layered editing workflow. It’s actually a big part of why professionals use it and why it’s the industry standard.
Photoshop online (as well as Photoshop mobile) kept this feature, and it’s really useful. Using layers not only protects your image but also lets you make local edits with masks, adjust how each layer interacts with the rest, come back to make changes at any time, and more.
Let me show you. The last thing I told the AI Assistant to do was to brighten the eyes, remember? Well, it did a great job, but I find them so bright that the result doesn’t match the face’s brightness.
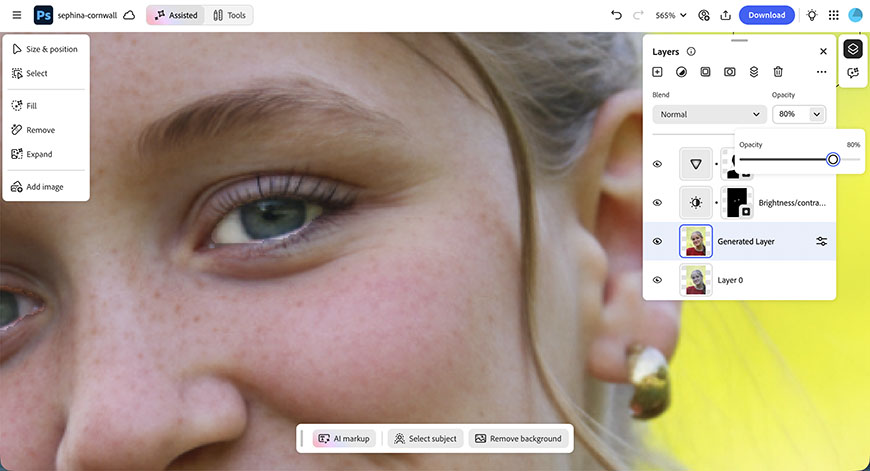
So I can simply lower the layer’s opacity to make the edit look more realistic.
Zooming in, I also notice that the selection included the lower lash line, which wasn’t supposed to be brightened. Not a problem, I just have to use a mask.
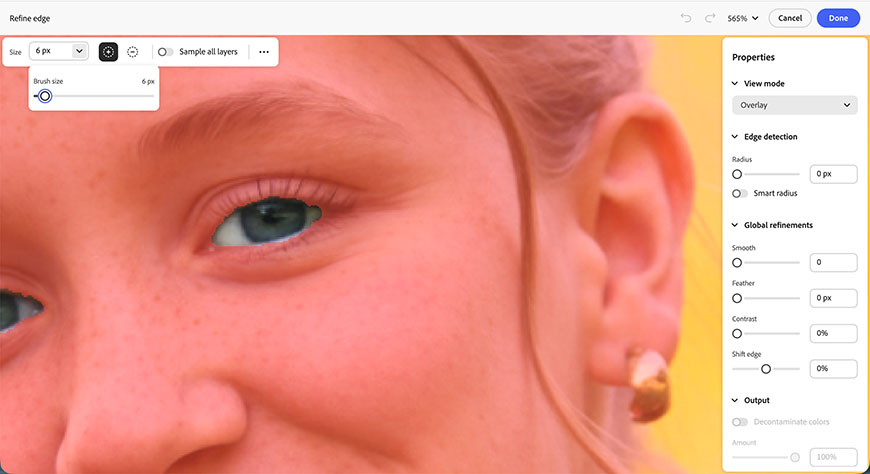
Masks cover or reveal parts of the layer, allowing you to make local edits. You can tell that a layer has a mask if there’s a square next to it on the Layers panel. In that square, you’ll see the hidden parts appear in black, and the visible parts are white.
In this case, I need to hide the lash line. To fix the mask, simply double-click it, and you’ll be able to refine the edges.
How to Manually Edit a Photo in Photoshop Online
While AI is a great solution to maximize impact with minimal time and effort, you sometimes want to tweak things yourself.
While it doesn’t include all the features found in Photoshop for pixel-level adjustments, you can absolutely edit a photo using traditional tools in Photoshop online.
Switch over to the Tools workspace by clicking on the button you’ll find at the top. The options in the left toolbar are different from the ones you have in the Assisted workspace.
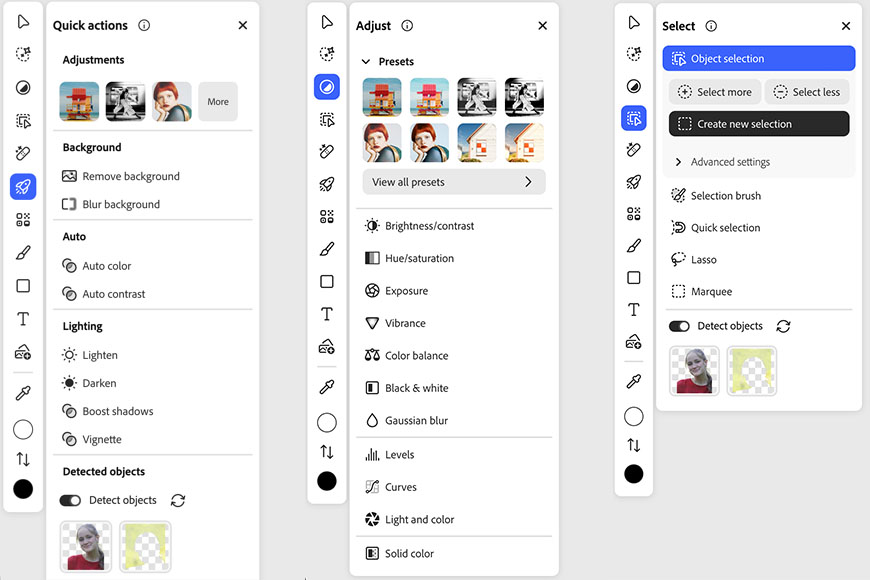
Here, you can head over to the Quick Actions if you want automated options such as ‘Auto-color’, ‘Boost shadows’, etc.
However, to grab more control over your editing workflow, you’ll want to open the Adjust tools. Here, you’ll find all you need to fix the light and color of your image.
Use the Exposure tool to change the overall brightness of the picture. Think of it as the equivalent of letting in more or less light at the time you take the photo.
Instead, Brightness/Contrast lets you target the midtones and adjust the contrast between highlights and shadows in the picture.
Pro tip: Use the Levels tool if you want to work on the highlights, mid-tones, and shadows separately. You can also work on each of the color channels independently.
Then, move on to the colors. Hue/Saturation has sliders that let you adjust the intensity and tones of your photograph. You can open the drop-down menu that’s usually set to Master and choose specific colors if you need to target something specifically. Notice how I’ve changed the background’s look by targeting only the yellows.
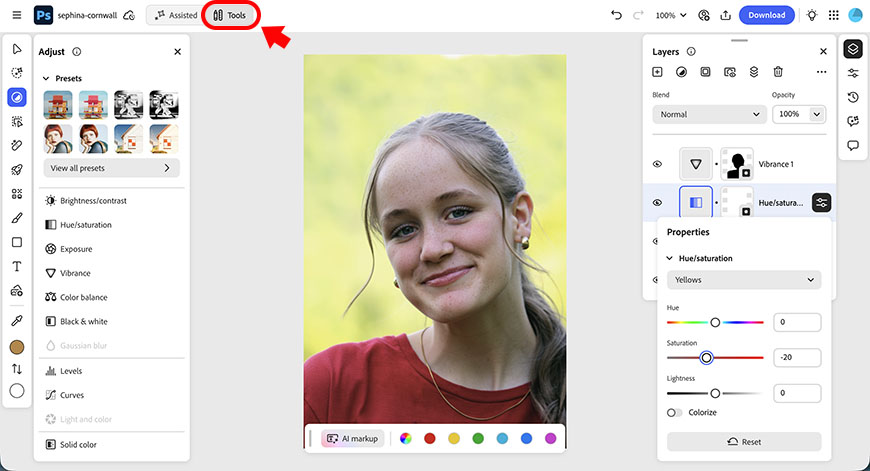
Remember that you can also select a part of the picture to adjust. Simply click on Select in the left toolbar to open all the available features. You’ll find tools to make a manual selection, and AI-powered ones to help you out – for example, select background.
Once you’ve made a selection, any tool you use will affect only that part of the picture.
How to Edit a Photo Using Generative Tools in Photoshop Online
On the toolbar, you’ll also find the Generative button. Here you have specific tools powered by generative AI. When powered by Adobe Firefly models, these tools produce commercially safe output — here’s what you can do with them.
Generative Fill
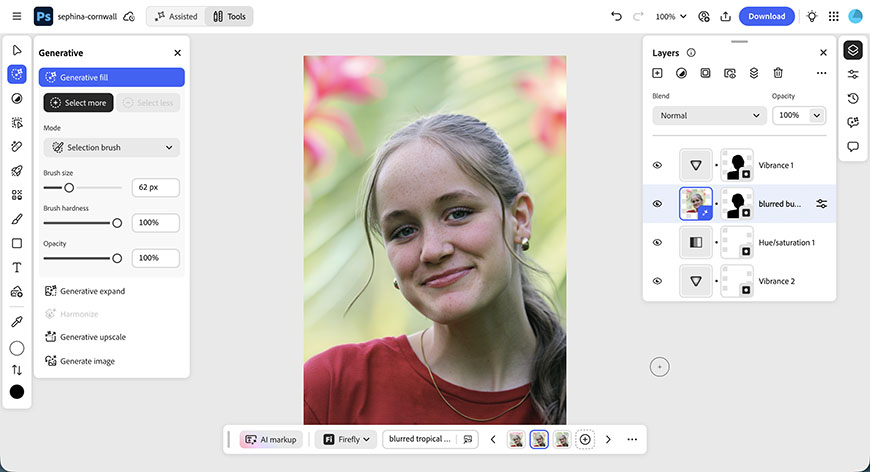
Use this tool to remove unwanted objects or introduce new ones. Simply use the brush to paint over the desired area and type what you want.
You can also use this to generate a new background if you prefer. You can use any of the Select tools first, then return to the Generative Fill tool to type a prompt. It’s not necessary to use the brush included in this feature for it to work.
Generative Expand
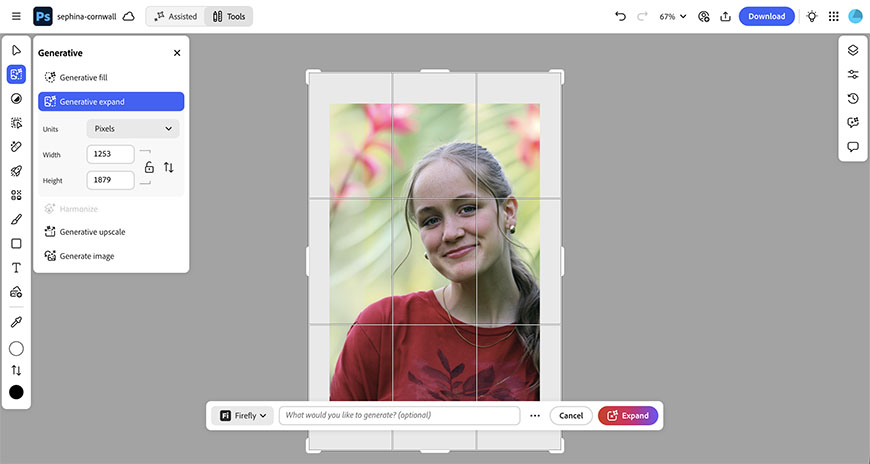
This tool allows you to add details outside the original edges of the picture. You can use this to change the picture’s orientation from portrait to landscape, and vice versa.
You can also change the aspect ratio, or simply add more room to improve the composition. Simply drag the edges to the new size and use the prompt space to type anything you want to add – you can also leave this space blank.
Upscale
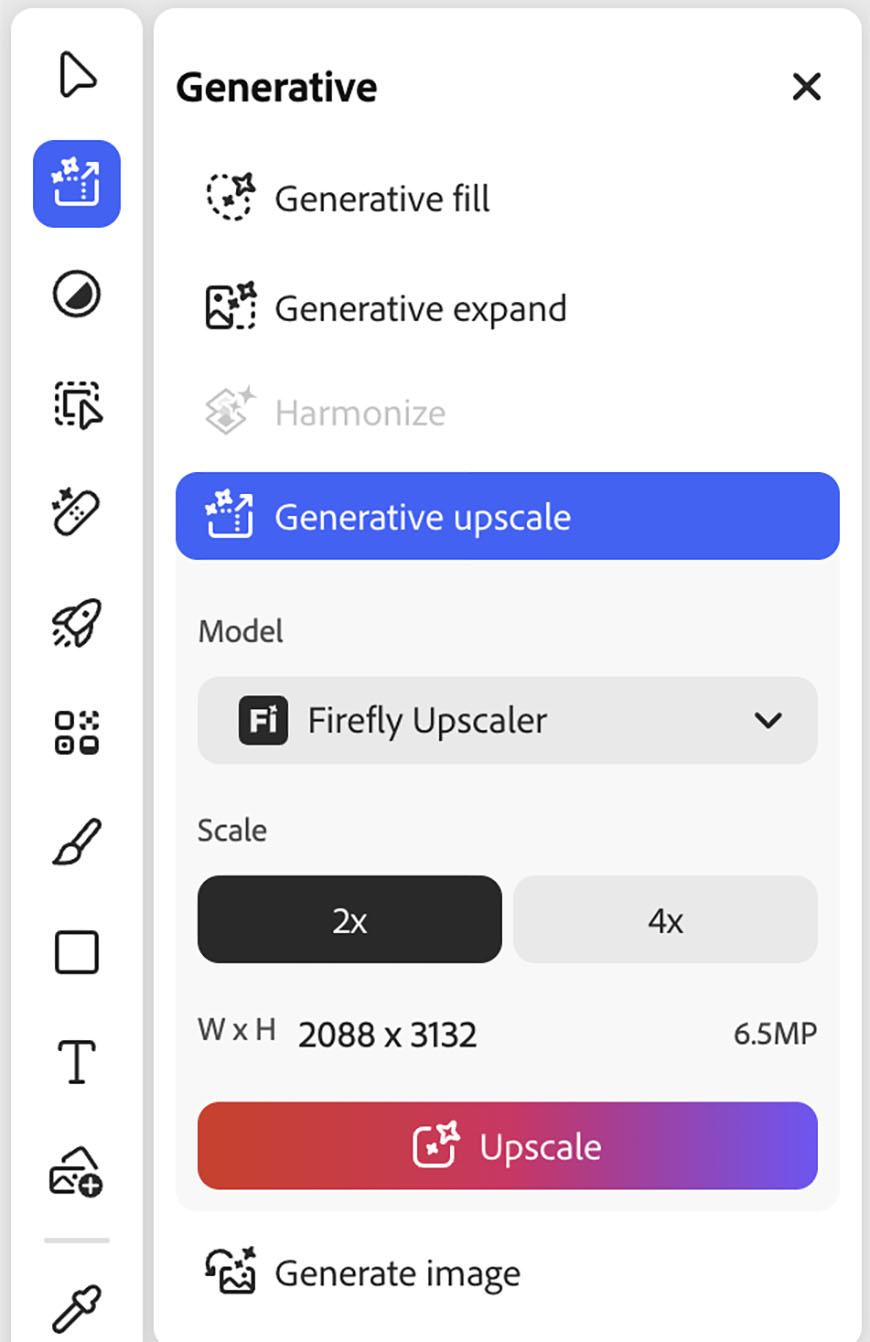
If you need your image to have a higher resolution, you can use the upscale tool. This will make it 2 or 4 times its original size with minimal quality loss.
How to Edit a Photo in Photoshop Online – Recap
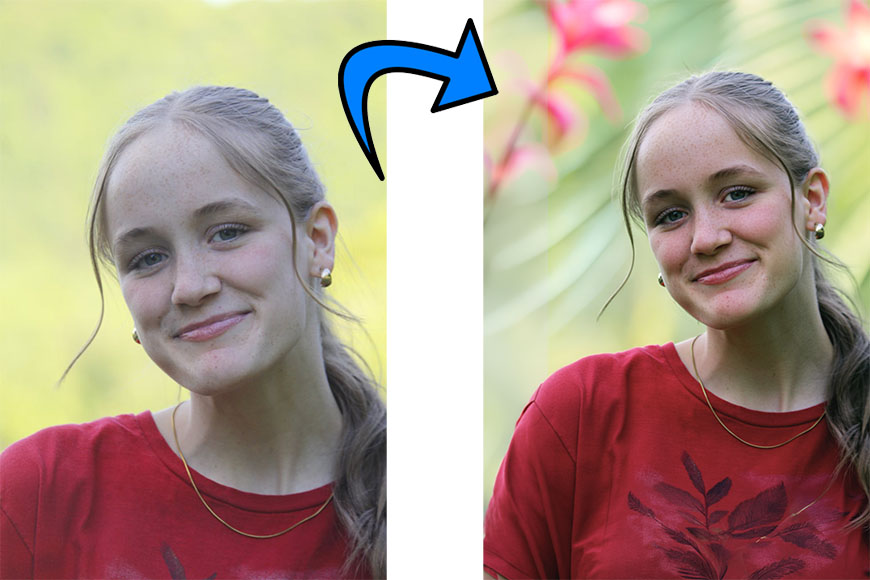
To sum up, I turned this photo from a flat and bland portrait to a vibrant and eye-catching one in just a few minutes. This is the workflow I followed.
- Asked the AI Assistant for a general enhancement of the picture.
- Accepted the AI Assistant’s suggestion for a more vibrant background.
- Fine-tuned the yellows using the Hue/Saturation tool.
- Fine-tuned the colors by channel using Levels.
- Asked the AI Assistant to brighten the eyes.
- Lowered the Opacity of the eye brightening layer down to 80%.
- Refined the edges of the mask of the eye brightening layer.
- Used Generative Fill to add tropical flowers in the background.
- Used Generative Expand to improve the composition.
Your turn to give it a try. Open one of your own photos, let the AI Assistant handle the heavy lifting, and see where your own creative touch takes it from there.
How to Troubleshoot Registry Access Error
Read Next