How to Flush the DNS Cache on MacOS

As you probably already know, website data gets stored in your computer’s system. Browsers and devices use this website location data for quicker access and load times. If you want to remove the stored website location details, your DNS cache needs to be flushed or cleared.
We’ll be showing you how to clear out the DNS cache on MacOS using Terminal, the method most commonly used by network developers, system administrators, and those who edit the hosts file or change domain name settings for servers.
Clear MDNS Cache
Since we’re going to use the Terminal application to clear your Mac’s DNS cache, go to “Applications” and find the Terminal application in the “Utilities” folder. The Terminal application can also be found using “Finder” on your Mac (the “Command” key and space bar are the Finder shortcut keys, or it may be pinned to your dock, if you use it frequently).
- Go to “Applications,” then select “Utilities” and double-click on the Terminal with your trackpad or mouse to open it. (Or use whichever method you prefer to find and use the Terminal application.)

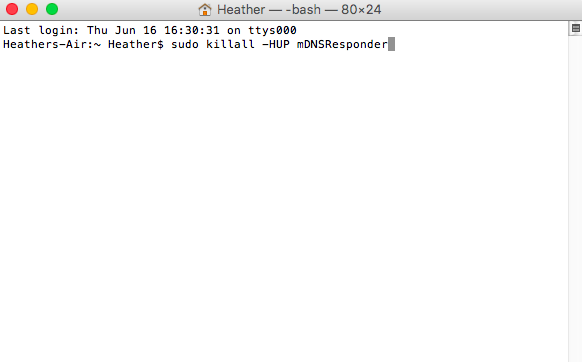
- In the Terminal, you’re going to type the following command: sudo killall -HUP mDNSResponder. Then, press the “Enter” key on your keyboard.

- Your Mac will ask you for your Admin password. Type it in to continue.

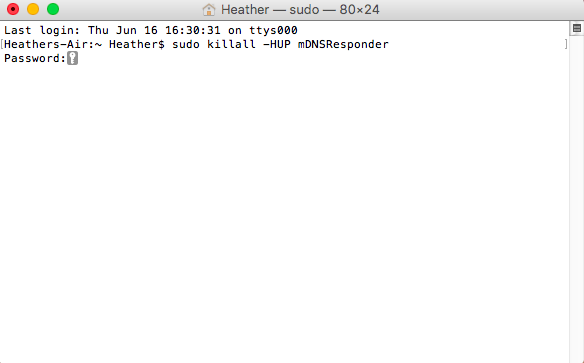
Once you’ve typed your password, the MDNS cache will be cleared.
Flush/Clear All and Reset DNS Cache
If you would like to clear and reset everything at once—this includes the MDNS and UDNS cache—you can do that as well. You can establish this by stringing the following two-command line codes together.
- Open the Terminal application.
- Type the command: sudo dscacheutil -flushcache;sudo killall -HUP mDNSResponder; say cache flushed. Then, press the “Enter” key on your keyboard.

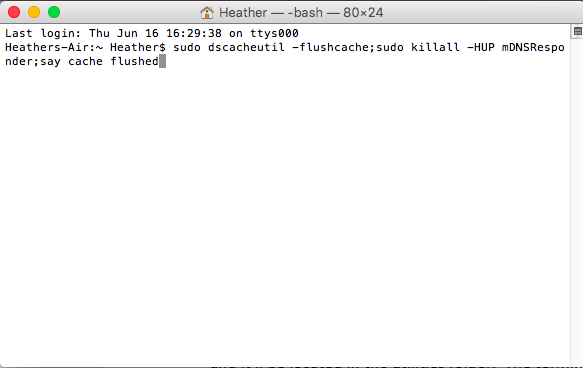
After you’ve typed the above command and entered it, your MacOS will announce that the cache has indeed been flushed. Kind of cool, huh? It’s as simple as that!