How To Map a Network Drive in Windows
Network drives are great a way to share data and resources. Once the preserve of business, anyone can share media across a network quickly and easily with Windows. As long as you have a PC and another device that share the same network, you can share assets between them. Here is how to map a network drive in Windows.
What is a network drive?
A network drive is essentially any hard drive or media drive that can be share on a network. It has to have sharing enabled in order for other devices to read data on it. Network drives are used widely in business to allow multiple users to share data between them but they have home uses too.
If you have a media server, network drives are essential to share that media. If you have NAS (Network Attached Storage) that is a network drive too. You can also share other resources such as printers on a network but this guide will concentrate on drives and files.
For a home network to function, you will need two devices that share the same IP range. This is usually controlled by your router. If it uses DHCP and allocates IP addresses automatically, they will already be in the same IP range. If you allocate them manually or have multiple networks, you will need to make all devices available to each other either across networks or on the same one.
This guide assumes you have one network and all devices are on it.

Map a network drive in Windows 10
Mapping a network drive in Windows 10 is refreshingly simple. To get it working you need to set the network drive up to be shared and know the login for the machine it is connected to. Part of the setup requires that login to complete. If the drive is not shared, you will not be able to access it remotely.
To set up the share on another computer:
- Open Explorer on the Desktop containing the drive or folder you want to share.
- Right click on the file or drive and select Properties.
- Select the Sharing tab and select Advanced Sharing.
- Check the box next to Share this folder (or drive).
- Click OK.
This will allow other users to view files on the selected drive or in the selected folder. If you want people to be able to move, add or change files and folders, check ‘Changing share permissions’ at the bottom of this guide to enable it.
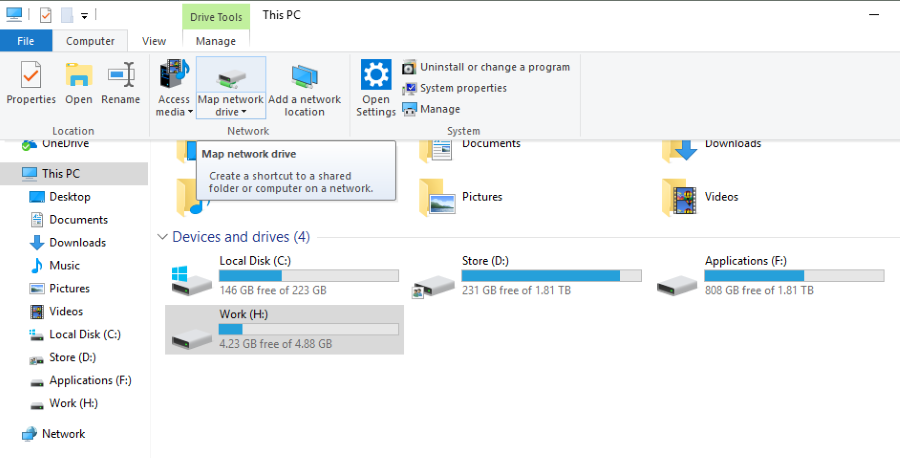
To map the network drive:
- Open Explorer on the Desktop.
- Select This PC in the left menu and Computer from the top menu.
- Select Map network drive.
- Choose a drive letter for the network drive from the drop down menu.
- Click Browse next to Folder or type the network address of the network drive.
- Make sure the checkbox is ticked next to Reconnect at sign-in.
- Click Finish.
You should now see your new share drive appear with the other drives within Windows Explorer. You can now navigate it as you would any attached drive.
The network address of a share can either be in IP address format or as a share name. For example, ‘\192.168.1.7\Sharedfolder’ or ‘\MySpareComputer\Sharedfolder’.
Changing share permissions
If you’re setting up a media server or streaming setup at home, the method shown above will work fine. If you want to be able to change files on the network drive, you have a little more work to do. By default, any share only allows remote users read only access. This is for security. If you want to be able to move, add or change files, you need write permission.
- Open Explorer on the Desktop containing the drive or folder you want to share.
- Right click the folder or drive you have shared and select Properties.
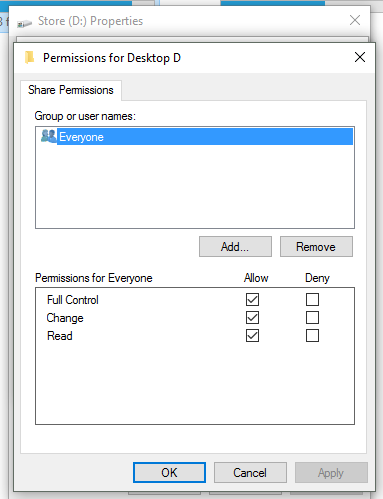
- Select Sharing, Advanced Sharing and Permissions.
- Check the box next to Full Control and/or Change.
- Select Apply and then OK once done.
This will grant full rights over files and folders within the shared drive to anyone connecting to it. You can restrict this to specific users but that’s a little out of scope for this guide. Just make sure that whoever has access to your network drive knows what files to touch and which to leave alone!
If all goes well you should now have a fully functioning network drive that you can access from within the network. It will not be accessible from outside and you will need to log into it with the credentials for the machine so it’s quite safe from the outside world.