


How To Setup a Belkin Router as an Access Point
In our modern interconnected world, everyone needs a good internet connection. Global e-commerce sales amounted to $2.8 trillion in 2018, and are projected to make up 17.5% of all worldwide retail sales by 2021. Making sure you’re reliably connected is becoming increasingly vital.
Whether you run a business, or have a large house, often you’ll find that just one wireless network won’t reach everywhere you need it to. Plus, offices with large numbers of computers connected to the network will soon find that they have run out of available IP addresses, and if they are on more than one floor, it’s unlikely that they’ll all be able to connect to the main router.
Access points are one of the main solutions to this issue. In this article, we’ll show you how to set up a Belkin Router as an access point so that you can be sure that you’ll be able to maintain a strong wireless connection wherever you roam, at work or at home.
Things to Keep in Mind
- Before you start, you need to connect one of the router’s LAN ports to your computer with an Ethernet cable, and also ensure that the router is switched on. An LED will flash on the LAN port to show you that the cable has been properly connected.
- When setting up a wireless router to work as an access point, you can no longer use the Internet port on the router. Any Ethernet cables that are connected to it must be plugged into ports 1 to 4.
- Make sure that you have a working internet connection before setting up your new access point.
- Routers from different manufacturers are not guaranteed to work together, though you will have better luck if they are using the 802.11n standard. For the best results, make sure both routers are the same make and model.
You have two options for configuring your Belkin router as an access point: activating the ‘Use as Access Point’ setting, or disabling the DHCP server on the router. The second option is only necessary if your router doesn’t give you the first one.
Activating ‘Use as Access Point’ Setting
- Open your web browser, such as Chrome, Firefox, or Edge.
- In the Address bar, enter either http://router or 192.168.2.1 (this is the default IP address for Belkin routers).

- Log into the router using the admin password. If you have not set up a password yet, then you should be able to leave this blank.
- Under the ‘Wireless’ section, click on ‘Channel and SSID’.
- Enter the name of the access point’s wireless network in the SSID field.
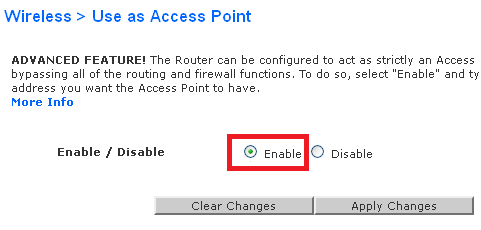
- Under the ‘Wireless’ section, click on ‘Use as Access Point’.
- Click on the ‘Enable’ option.

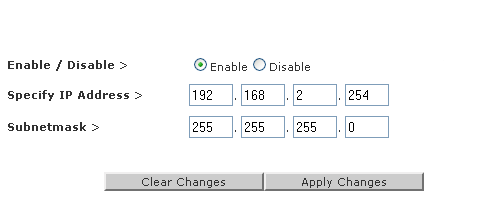
- Next, set the IP address and Subnet mask of the router. Make sure this is the same as your current network settings (The default IP is 192.168.2.1, and the default Subnet mast is 255.255.255.0).

- Enter a unique IP address for the access point. This needs to be within the range of the main router (192.168.2.2-254). By default, the IP will be set to 192.168.2.254, but you can change this to anything that doesn’t conflict with an existing device on the network. You should be fine leaving the Subnet mask as default.
- Click ‘Apply Changes’.
- Connect your access point to the main router using an Ethernet cable between the LAN ports on each device.
- Connect a device to the new wireless network.

Disabling the DHCP Server
- Open your web browser.
- Type http://router or 192.168.2.1 into the browser’s Address bar
- Log into the router using your admin password, if you have set one up. Otherwise you should be able to leave it empty.
- Under the ‘Wireless’ section, click on ‘Channel and SSID’.
- Enter a name for your new wireless network that is different from the one provided by the main router.
- Under the ‘LAN Setup’ section, click on ‘LAN Settings’.
- Enter an IP address for the access point that doesn’t conflict with any other devices on the network. The defaults for the IP and Subnet Mask are 192.168.2.254 and 255.255.255.0 respectively. You can leave these as is if in any doubt, unless your primary wireless network has a large number of devices (over 250) connected to it. If you assign an IP address yourself, ensure it is within the range of the main router (192.168.2.2-254).
- Next to the ‘DHCP server’ option, click on ‘Off’.
- Click on ‘Apply changes’.
- Connect your new access point to the main router via an Ethernet cable connection between the LAN ports of both routers.
- Connect a wireless device to the new network you have set up to test if it works.
Stay Connected
You should now have all you need to get a secondary access point set up for your network using a Belkin router. If you’d like a guide for any other brand of router, be sure to let us know in the comments section.


One thought on “How To Setup a Belkin Router as an Access Point”