



Why Did NVIDIA Drivers Uninstall Automatically?
In some cases, when you update Windows, it can affect other components, including drivers. If you’re asking, “Why does NVIDIA driver keep uninstalling?” the issue may be related to Windows Update replacing or changing the installed driver.
Why Does NVIDIA Driver Keep Uninstalling?
One of the main reasons why NVIDIA or other display drivers can seemingly disappear is due to Windows Update.
When Windows installs updates, including feature updates such as 25H2 or 26H2, Windows Update may install or replace a display driver if an applicable driver is available.
If Windows installs a different display driver, the NVIDIA App can detect the available NVIDIA driver and provide an option to download and install the latest driver.
However, in some cases, the NVIDIA App may not be available to manage the driver, or Windows may install a different driver version.
Part 1 – Find Your NVIDIA Driver Version and Stop Windows From Changing It
To prevent the situation where NVIDIA drivers uninstall after reboot, you need to stop Windows Update from modifying them in the first place.
Step 1. Right-click on the Windows icon (or Start icon) and select “Device Manager.”
Step 2. Expand the “Display adapters” section. In most cases, you should see at least one option in there. Make sure that it doesn’t have a warning symbol.
Step 3. Right-click on the entry and select “Properties.”
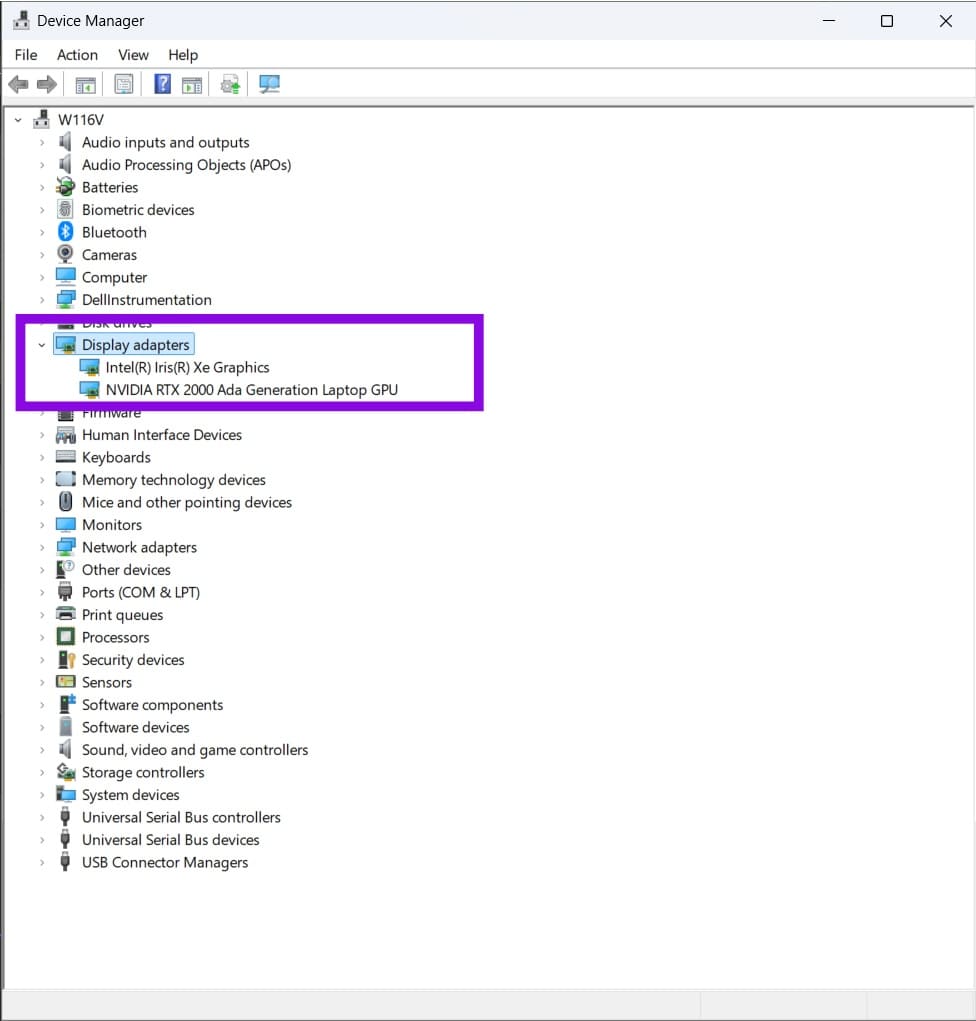
Step 4. Check the driver version and date. If needed, select “Update driver” and follow the instructions. If you’re completely missing a driver, locate it on NVIDIA’s website.
Step 5. Go to the NVIDIA drivers page.
Step 6. Enter your graphics card details as listed in “Device Manager” or on the graphics card’s manual.

Step 7. Download the driver and install it.
Part 2 – Prevent Windows Update From Modifying Drivers
Once you’ve installed the correct driver version, you can attempt to stop Windows Update from overwriting it in the future.
Step 1. Open “Settings” and go to “System.”
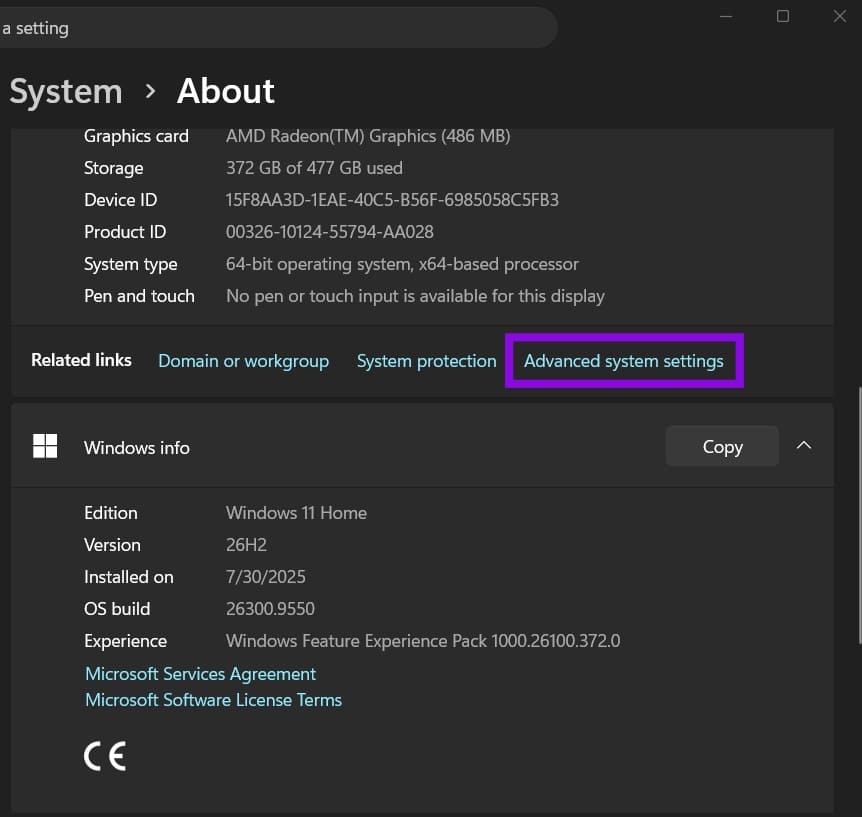
Step 2. Scroll down and select “About.” In there, click on “Advanced system settings.”
Alternatively, you can use the Run utility (“Win + R”) and enter “sysdm.cpl” into the box and click “Enter.”
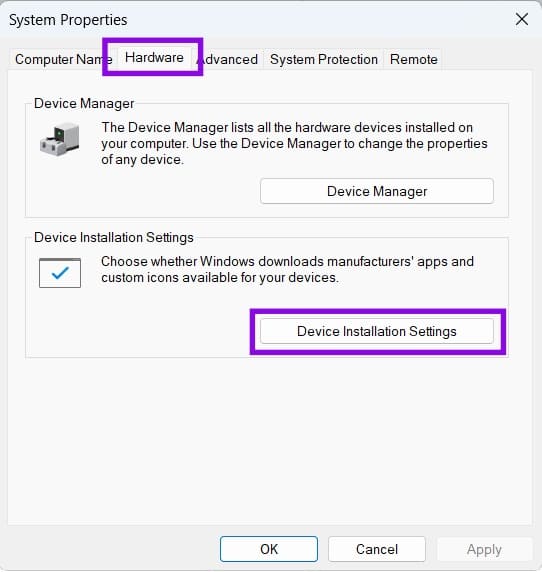
Step 3. Go to the “Hardware” tab at the top and select “Device Installation Settings.”
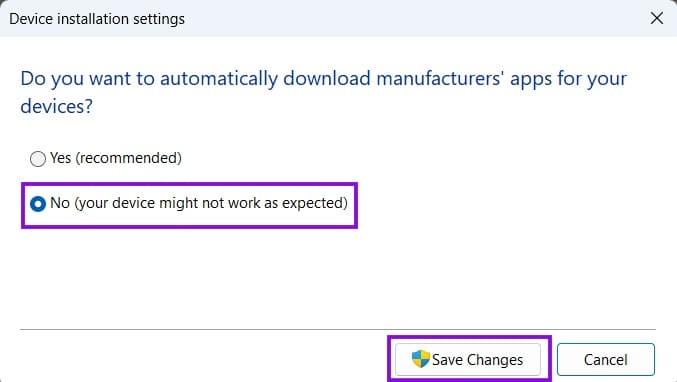
Step 4. Select “No” and click on “Save Changes.” You’ll need to confirm this, then apply the settings back on the previous screen.
Step 5. Restart the PC.
Step 6. Make sure to download the NVIDIA app and use it to detect, schedule, and download the latest stable drivers.
Alternative Fix – Check the Physical GPU Connection
If you can’t find an entry for a dedicated graphics card or it keeps randomly disappearing every boot, there’s a chance that it’s physically damaged or not getting enough power.
Step 1. Turn off your PC, turn off the power supply, and open the case.
Step 2. Remove the graphics card from the motherboard and check the card’s connector and the PCIe slot for visible damage or debris.
Step 3. Use a can of compressed air to remove any dust or debris from the connectors and the motherboard.
Step 4. If your motherboard has another compatible PCIe slot, you can try installing the graphics card there to determine whether the original slot is contributing to the problem.
Step 5. Recheck the power supply connection to the graphics card.
How to Easily Turn a PDF into a Word Document Online using Adobe Acrobat
Read Next