How To Clear Cache On Galaxy S9 And Galaxy S9 Plus

If you’re having software issues on your Samsung Galaxy S9 or S9 plus device the quickest fix (for most problems) is going to be clearing your cache. The same issues can be found on most Android-based devices. The top method to fix any bugs or software glitches on your Galaxy S9 or Galaxy S9 Plus is to either complete a factory reset or perform a cache wipe.
By clearing the cache on a Samsung Galaxy S9 and Galaxy S9 Plus, you can fix issues such as lag, glitches, or freezing by following the guide below. It doesn’t delete as much data as a factory reset, and the data it does delete is temporary and largely unimportant, so you don’t need to worry about any of your files. Considering that, it’s usually best to try this method first when you’re troubleshooting an issue.
What is the cache and what does it do?
What is the Cache and why should it be cleared on your Galaxy smartphone?
The Samsung Galaxy S9 and Galaxy S9 Plus have not just one type of cache, but two different types. The first is for the apps and the other one is for the system. Fittingly, these are called the app cache and the system cache respectively.
Any app you install on your Galaxy S9 or Galaxy S9 Plus has it’s own cache installed. It allows temporary data to be stored for better, more efficient use when switching between apps.
The system cache is almost exactly the same, but instead of storing app data, it does the same for the Android OS software. This is why, when an issue appears with apps crashing or freezing, the best option is to clear the app cache or the system cache, to help resolve the issue.
How to Clear the App Cache on the Galaxy S9 Or S9+
If you are having issues with one application it’s best to make sure that app is updated before doing anything else. Assuming the app is up-to-date with the most current version available, you can clear the cache on just that app.
- Go to your device Settings
- Open the “Apps” Settings
- Select the application in question
- Scroll down to “Storage”

- At the bottom tap “Clear Cache”
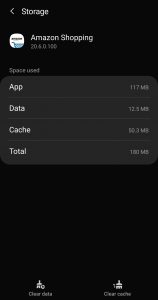
If you clear the cache for an application; information such as login info will not be deleted. If you choose the option to “Clear Data” all stored information (login information) will be deleted.
What to do when clearing the app cache doesn’t help
If you have cleared the cache of the individual apps and you are still having the same problems on your Samsung Galaxy S9 or Galaxy S9 Plus, then the next best solution is to uninstall the apps that are causing the issues and reboot the device.
If the Samsung Galaxy S9 or Galaxy S9 Plus has restarted and the problem is still occurring, then we suggest that you perform a system cache wipe (also known as wiping the cache partition on the Galaxy S9 or Galaxy S9 Plus).
Before Clearing the System Cache
In the current version (Android 10.0), each app’s cache is located in a system cache that gets cleared regularly by default. So users coming from earlier versions might be confused when trying to clear a few extra MB of storage or fix an in-app behavior problem.
There’s good news, though! The new system makes clearing storage space even easier. There’s a dedicated device manager that will monitor power, storage, and RAM. This manager can improve efficiency with a single tap. To do this, follow the steps below:
- Open Settings
- Go to “Device Care” (Older Android versions may list “Device Maintenance”)

- Tap on Memory
- Tap “Clean Now”
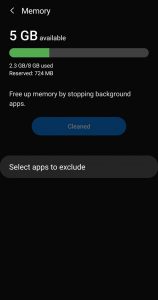
Performing this action will do a quick sweep of any unnecessary information stored on the phone. If your phone is still not acting properly, it’s time to clean the full system cache.
How to Clear the System Cache on the Galaxy S9:
- Start by turning the Galaxy S9 or Galaxy S9 Plus off.
- Then hold the Volume Up, Power and Bixby buttons all at the same time, until you see the Android logo appear and the phone vibrates.
- You can release the buttons when Recovery Mode starts to boot.
- Next, use the Volume buttons to scroll down and highlight the Wipe Cache Partition option.
- Once it’s highlighted, press the Power button to select it.
- Scroll down to Yes with the Volume button, and press the Power button to select it.
- Navigate to the Reboot System Now option and press the Power button to select it.
- Finally, your Galaxy S9 should reboot with a cleared system cache.
Other Things to Try
If your phone is having a software issue such as adds popping up delete the applications that you’ve downloaded recently. This can be done following the same steps listed above for clearing the cache. Instead of clearing the cache tap “uninstall” to remove the application. We have an article that can help.
Reviewing any previously downloaded applications as a source of your phone’s problems may take a little time, but it is better than doing a full factory reset.
You’ll also want to ensure that your device’s storage is not full. If your phone is lagging or glitching it could be because you have too many documents, photos, and apps downloaded.
If the problems persist, the next stage is to factory reset the Galaxy S9. If it comes to this, remember to back up everything on the phone, as a factory reset will delete all of your data. Keep in mind when restoring from a backup the problem can duplicate as the corrupted application of file will also backup and restore.
If the issue is serious enough, it may be best to set up your phone as a brand new device and slowly add content back.