How To Deauthorize a Computer in iTunes

iTunes uses a DRM system to protect its licenses and to ‘supposedly’ protect your book or movie collection. To access the media you already paid for, you have to authorize the device within iTunes and you are limited to how many you can have active at any one time. If you buy another device, you may need to deauthorize a computer in iTunes.
Not all content is covered by this DRM, most music isn’t covered but movies, eBooks and some other media is. While any company that uses Digital Rights Management tries its best to paint it as a user benefit, we all know the truth. Apple, like many other media providers have been hamstrung by archaic business models maintained by movie studios and publishers.
Some people get on with this kind of draconian restriction, some don’t. Other media services use DRM or limitations for licensing but manage to do it in a less intrusive way. However, it is what it is so we have to live with it.
Deauthorize a computer in iTunes
For some reason, iPhones, iPad and Apple TV do not count towards your device limit, only PC and Mac do. Fortunately, the process is the largely the same regardless of what operating system you use.
On a Windows PC:
- Open iTunes for Windows.
- Select the menu icon in the top left and select iTunes Store.
- Select Deauthorize This Computer.
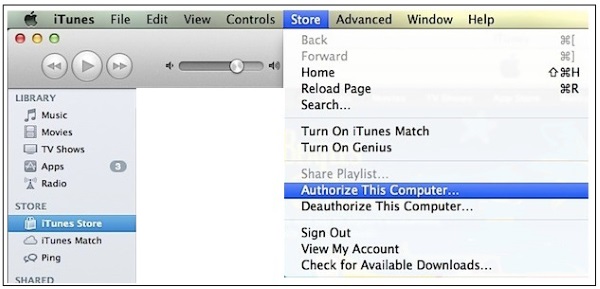
On a Mac:
- Open iTunes.
- Select the Store menu and then Deauthorize this Computer.
You will likely see a confirmation prompt for either process depending on what version of iTunes you’re using. From now on, any content consumed through iTunes that uses DRM will no longer be playable. Not all content is controlled this way so it will be hit and miss.
When should you deauthorize a computer in iTunes?
Authorizing and deauthorizing should only really happen once or twice during the computer’s lifetime. When you get a new computer, you will need to deauthorize the old one and authorize the new one. Otherwise there are only a few circumstances where you need to do it:
- If you make hardware changes to a Windows PC that uses iTunes. That would include a RAM upgrade, hard drive change or processor and motherboard change.
- If you change or upgrade the Windows version (windows 8 to Windows 10 for example).
- When you uninstall iTunes in favor or another media player.
- When you upgrade iTunes to a new version.
- Before you sell or otherwise dispose of your computer.
The DRM seems to use a digital signature like Windows 10. Rather than having you enter a code or serial number, iTunes will take a snapshot of your computer, note down what hardware you have and the MAC addresses and create a license using those details. Any significant changes to that hardware can cause iTunes to think you’re using a different computer.
As you are limited to five computers within your iTunes account, you should get into the habit of authorizing and deauthorizing when you make big changes to your system.
Good practice would be:
- Deauthorize iTunes.
- Upgrade your hardware or operating system.
- Finalize any other changes to your computer.
- Authorize iTunes.
This way, you remove the computer from your allocation, make all your system changes and then only authorize it once those changes are complete. This minimizes the risk of iTunes getting confused and using more than one allocation.

Deauthorize a computer remotely
If you’re working or staying away from home and have used all of your five allocations, or have disposed of a computer and forgotten to deauthorize it in iTunes, you can do it remotely. As usual, it isn’t as simple as it could be. You actually need to deauthorize all of your computers and then manually authorize those you want to use once more.
- Go to com and log in.
- Select the iTunes Store and Account.
- Enter your Apple ID once more.
- Select Deauthorize All where you see Computer Authorizations.
- Log into each computer individually and authorize each one.
You can only deauthorize all once per year so you need to make sure you only use this method if you really have to. If you get stuck, just contact Apple Support and ask them to help.
So that’s how to deauthorize a computer in iTunes. Know of any other ways to do it? Know of any ways around it without using pirated content? Tell us about it below if you do!