How to Delete Your Todoist Account

Every company needs a powerful go-to app to help its employees with focus and organization. Todoist supports more than 10 million people in their everyday assignments and helps them keep track of the progress they’re making.
This article will explain how to delete your Todoist account and will also introduce you to some of its great features, in case you decide to stay on the platform.
Deleting a Todoist Account
When you decide to delete your account on Todoist, keep in mind all your data like projects, task, files, comments, etc. will be permanently deleted as well. In case you’re still ready to delete it, and you’re using Windows, here’s how it’s done:
- Click on the gear icon in the top-right corner of your account.
- Select “Account.”
- Click “Delete Account.”
- Enter your email address and share your feedback and experience with Todoist.
- Click “Delete.”
If you have an iOS device, the process is quite similar:
- Click on the gear icon in the top-right corner of your account.
- Select “Settings.”
- Open the “Account” tab and click “Delete my Todoist account.”
- Type your password and any feedback you might have in the comment box.
- Click “Delete my account.”
Changing Your Email
In case you’ve decided not to delete your account and want to continue working with Todoist, then changing the email associated with the app will help you start over. Some people prefer to link project managing apps to their work email, so that their private ones doesn’t get crammed with notifications. If you want to do it now, we’ll jump right to it.
- Click the gear icon in the top-right corner of
- Select “Settings”.
- Next to the email address, click “Edit.”
- In the pop-up window that opens, write your new email twice to confirm the address.
- Enter password.
- Click “Update email.”
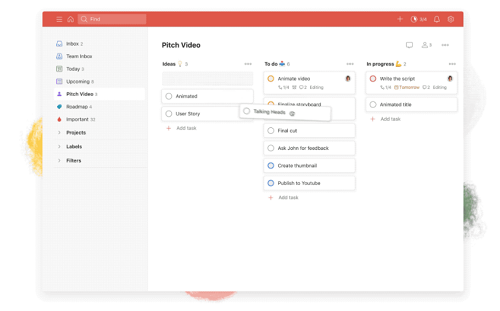
What Are Todoist Boards?
If you often get overwhelmed with all the little tasks you need to complete during the day, and you’re not seeing the bigger picture, you might need Todoist Boards. This powerful new feature allows you to organize new projects and tasks from a strategic point of view. Moreover, you can adjust it to make almost any plan work, from weekly meal prep to a production plan, if you look at it from a bird’s-eye perspective.
How Todoist Boards Work
In essence, boards are an advanced form of to-do lists. With movable task cards that can be moved from one column to the next, you can follow the process and always know what needs to be done and when. Usually, three columns are more than enough to support the process, from a simple “Task” to “In Progress” and “Done.”
You can organize your daily tasks as a freelancer, organize an event, or even schedule posts for your social media account. Board supports any idea and helps you stick to your plan.
How to Make a Board
Once you start a new project, you’ll see an option to have it as a board or a list. With a three-dots icon in the upper right corner, you can change the view from “board” to “list” and vice versa.
When you decide on the project name, you’ll need to organize your columns. Decide what you want to name them, then start making tasks and dragging them to a designated spot on the board. This way, your board will have a clear structure, and you’ll see it as a weekly (or monthly) strategy plan.
How to Add New Sections
After a while, you might notice that you need to rearrange some sections and add a few others. You can add them in different ways, but this one is the easiest:
- At the top right of a project, click the three-dots icon.
- Select the “Add section” option.
- Type the name of your section and click the “Add section.”
Another quick way to add a section is to place your cursor over the line that separates sections. You’ll see the “Add section” option appear. When you click on it, it’ll automatically create as many new sections as you need.
How to Add New Tasks
Creating a new task is something you’ll probably do every day in Todoist. That’s why the process is simplified so that users can do it in a blink of an eye.
If you’re using Todoist on Windows, this is what you need to do:
- Click on the three dots in the upper right corner.
- Select “Add task.”
- Type the name of your task and additional text.
- Click “Add” to create the task.
If you’re adding a new task on iOS, the process looks like this:
- Create a task anywhere in the project.
- Use drag-and-drop to nestle the task under the right section.

Manage Your Every Day
Todoist is a project management tool made for small teams and businesses. It’s versatile enough to be used for everything from your kid’s school assignments to a big social media launch.
Now that you know all there is to know about deleting your account on Todoist and understand the basics of its new board feature, would you use it for work? Or you would rather organize a birthday party with Todoist?
Let us know in the comments section below.