


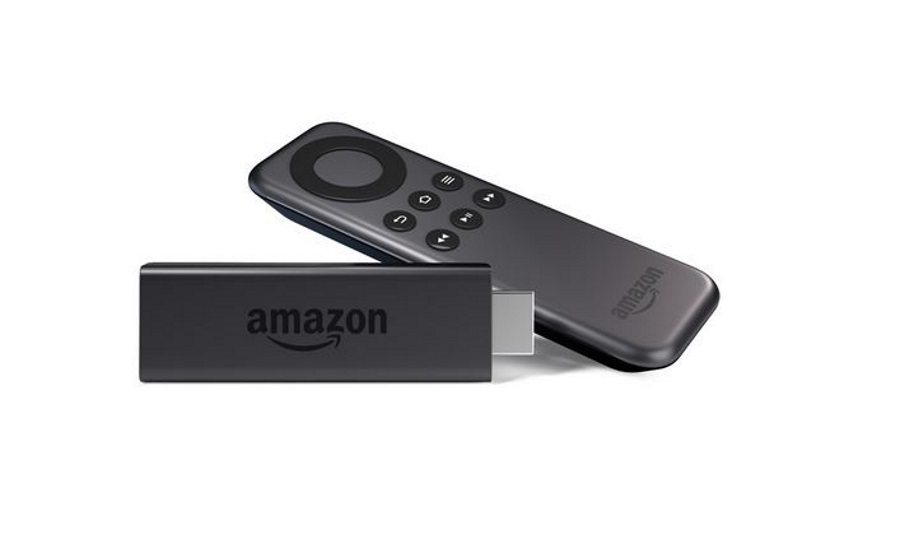
How to Change DNS on Amazon Fire Stick

Amazon Fire Stick is growing in popularity all over the world, but it’s currently supported only in six countries. Also, the content is different from country to country, and it may change depending on your IP address and location.
If you want to bypass this geographical restriction, you need to use either VPN or DNS. A change of DNS is a cheaper choice, but it isn’t always successful.
This article will explain the best way to change your Smart DNS on your Fire TV and/or Fire Stick. Follow the instructions carefully and you should be able to set it up.
First Step – Changing the Country to USA and Finding a Commercial DNS
When it comes to DNS servers, you can use either a commercial DNS service or a public one. The public DNS is usually less effective with Fire Stick, but commercial options require subscription.
The commercial ones like Overplay and SmartyDNS will tell you which DNS servers you should type in your Settings. For the public ones, you’ll have to look around online and hope some will work.
It’s important to set your account country to the USA (if it’s set to another country) before changing the Smart DNS. To do this, you need to go to Amazon’s official website. After that, do the following:
- Sign in to your account.
- Scroll to the bottom of the page.
- Click ‘Manage Your Content and Devices.’
- Select ‘Country Settings.’
- Set your country to ‘United States.’
You should also have a 1-click United States-based address on your Amazon account. This way you might be able to bypass the Fire TV location restrictions without using VPNs bandwidth.
Second Step – Find the Router IP
Before you change Smart DNS, it’s important to find the IP address of your router. To do this, you’ll need to use your computer. Locating the IP can vary depending on your operating system.
Once you find out your IP address, be sure to make a note it somewhere or take a picture with your smartphone, as you’re going to need it later.
Find the Router IP on Windows
If you’re running a recent version of Microsoft Windows, finding your IP address should be a relatively easy task. Follow these steps:
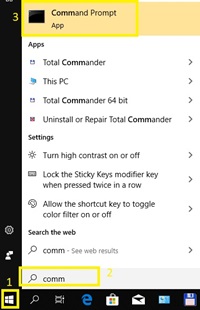
- Press the Start button on the bottom-left of the screen.
- Start typing ‘Command Prompt’ in the search bar until you see the icon.
- Enter the ‘Command Prompt.’

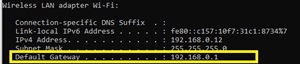
- Type ipconfig in the Command Prompt.
- Press ‘Enter’.
- The IP address next to the ‘Default Gateway’ should be your IP address.

Find the Router IP and Mac OS X
The process is relatively easy for Mac users too. To locate your IP address, you need to:
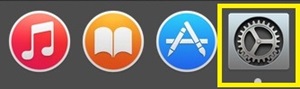
- Go to System Preferences.

- Select ‘Network.’
- Click ‘Advanced.’
- Find the TCP/IP section.
- Write down the IP address.
In some versions of Mac, there won’t be any need for the fourth step. Instead, as soon as you click ‘Network’, your IP address will be displayed in the next dialog box.
Third Step – Writing Down the Network Information
Now that you know your IP, you should write down the rest of your network information. You will need to do this from the Fire TV app. Once you launch Fire TV, proceed with the following steps:
- Navigate to the ‘Settings’ menu.
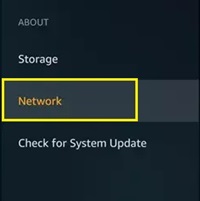
- Open ‘My Fire TV.’
- Go to ‘About.’
- Select ‘Network.’

Before proceeding, make sure to note all the information you see. There’s SSD, Gateway, Subnet Mask, DNS, and MAC Address (Wi-Fi). Therefore, either make a of note it, or take a picture since you may need it later. Especially if you need to return to previous settings.
- Select your Wi-Fi network from the ‘Network’ menu.
- Click the ‘Menu’ button on your remote to forget the network.


Fourth Step – Changing the Smart DNS
Now that you have all the available information, you can change the DNS server. Follow the method from above to view your list of connections. Then, proceed with changing the DNS:
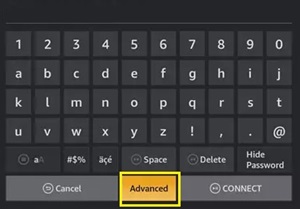
- Click on the network connection once again (the one ‘forgotten’). A new window will pop-up.
- Type your network password here. Look for the combination of numbers and letters below the ‘SSID’ section from the information you’ve written/photographed.
- Click the ‘Advanced’ button (instead of ‘Connect’).

- Now enter your IP address (you should’ve noted it in the first step).
- Select ‘Next.’
- Add ‘Gateway’ values that you’ve also noted.
- When prompted about ‘Subnet Mask’, you should use the Subnet Calculator to add the proper value. Choose your Subnet Mask value from the drop-down menu and copy the value that appears under the ‘Mask Bits.’ For example, if your Subnet Mask is 255.255.255.240, the Mask Bits are 28.
- For the DNS address, you should type the addresses of the DNS servers that you’ve opted for.
DNS or VPN?
It’s better to use VPN if you want to bypass the geographical restrictions and gain access to content you wouldn’t be able to view otherwise. However, since this consumes a lot of bandwidth and VPNs are generally expensive, people turn to DNS.
Changing DNS can help you, but it may only be a temporary measure. The process can also hamper your network settings, which can lead to more complications. On the other hand, it’s still the best and cheapest solution available.
Which option do you prefer – DNS or VPN? And why? Leave your choice in the comments section below.


One thought on “How to Change DNS on Amazon Fire Stick”
teach them how to change their own upsteam DNS