How To Free Up Disk Space on a Mac

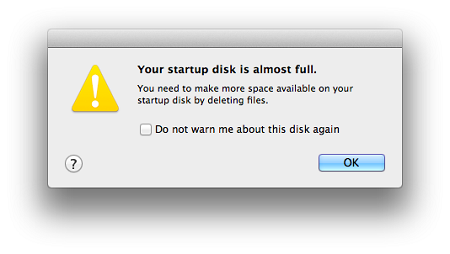
No matter how big the hard drive in your Mac computer is, it will inevitably get filled up at a certain point. You will then be greeted by a message that says your startup disk is full, so you will have to delete some files. Even though you might decide to close it, this message will soon pop up again unless you address the problem properly.
Keep in mind that in most cases your hard drive will get clogged up by large media files such as photos, music, and movies. Read on to learn how to free up disk space on your Mac and be able to use it normally again.
How to Free Up Disk Space?
Even though you can always upgrade to a bigger hard drive or simply buy an external HDD, you should follow these simple steps to make your hard drive breathe much easier.
Step 1 – Checking Available Disk Space
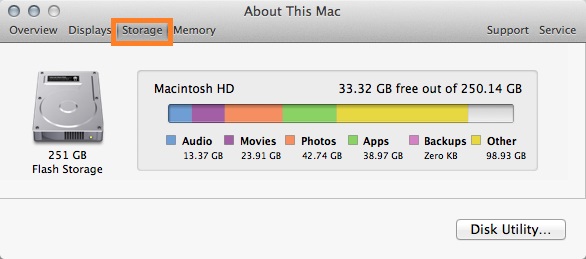
In order to successfully free up some disk space on your Mac, you first need to know what is actually eating up so much precious space.
To do this, click on the Apple menu in the top left corner and then choose the “About This Mac” option. Once you get there, click on the “Storage” tab that’s right in the middle of the tabs bar. Once it calculates everything, the window will show you how much space is taken up by Photos, Apps, Movies, etc.
After this check, you will be able to determine where to search for areas cluttered with things you don’t really need, such as full seasons of TV shows you’ve already watched or perhaps pics from your holiday that you’ve already transferred somewhere else.
Step 2 – Using Finder to Hunt Down Large Files
This is one of the fastest and easiest ways to get rid of unwanted files and free up some disk space on your Mac.
First, open any folder in Mac Finder and then hit Command + F on your keyboard. This will bring up Finder Search. Once it’s open, you will need to change the search parameters to “This Mac” to sift through the entire computer. After this, fiddle with the “File Size” option according to your preferences.

Once you get to all those large files you no longer need, you can easily delete them by typing in Command + Delete or dragging them to the Trash.
Step 3 – Checking the Downloads Folder
Your Downloads folder can often be the place where you accumulate a large number of files that you don’t really need. Sometimes these files will be quite large, especially if we’re talking movies or the latest video games.
This is why you need to go there and sort all the files by size in the list view. If you have a lot of files, you sometimes tend to oversee the large files that serve no purpose. Make sure not to accidentally delete something that you’re not supposed to, such as important updates or installed apps.
Step 4 – Actually Emptying the Trash
Even though this may come off as a bit redundant and obvious, there are a large number of Mac users who just delete the unwanted large files and then just leave them in the Trash. To actually get rid of all those files and free up some space on your hard drive, you will need to empty the Trash as well.
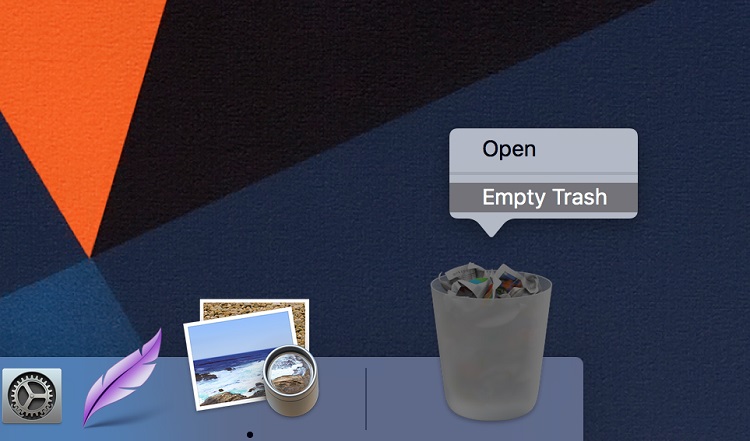
To do so, you will need to right click on the Trash icon located on the bottom right side of your screen and then click on “Empty Trash” in the context menu. Once you do so, you will delete all the unnecessary files and the Trash icon will go from full to empty, too.
Step 5 – The Almighty Restart
After you’ve performed all the previous steps, it might be a good idea to restart your Mac, especially if you haven’t done so in a while. If you’re wondering why, let’s just say that a simple reboot can be quite beneficial for your Mac as it clears out the cached folders and various temporary items that might also clog up your hard drive.
A restart will also clear out all sleep image files and the virtual memory. This is important as these two can also take quite a lot of disk space at times.
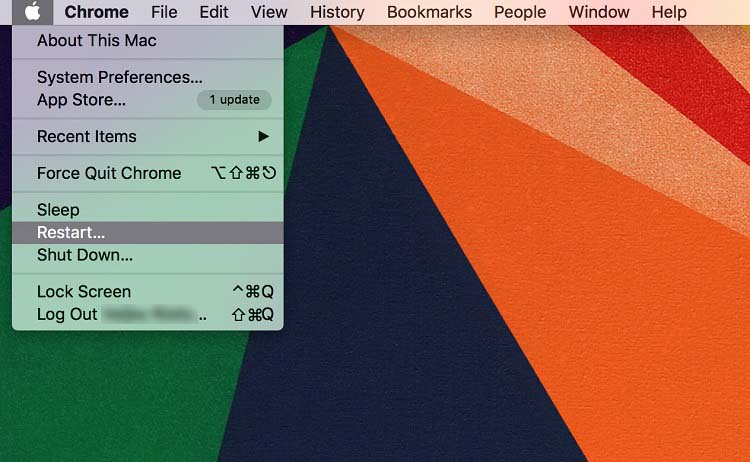
To do this, click on the Apple menu in the top left corner of your screen and then select the “Restart” option from the drop-down menu. When your computer boots up, go back to the Apple menu and then select “About This Mac”. You can now go to the “Storage” tab once again to check the situation.
If you’re not happy with what you’ve found, you might want to repeat the process and remove some more files.
Bonus Tip – Get Rid of the Apps You Don’t Use
To free up even more disk space, you should check all the applications you have installed. Quite often people tend to keep old apps even if they don’t use them anymore, so this may also be why your Mac is so low on disk space.
For example, the often used iPhoto app is 1.1 GB large. If you don’t use it, why not get rid of it?
If you want to delete an app, you just drag its icon to the Trash. The other way to do so is to open the Launchpad where you will find all the apps in one place and then hold down the Option key on your keyboard until all the icons start wiggling.
Just click on the small “X” next to the icon of the app you want to remove and that’s it.
Conclusion
As you can see, freeing some space on your precious Mac is easy and intuitive, but you still need to be careful while doing so. You can’t just go around deleting all large files because your computer may need some of them to work properly. If you’re not fully sure what a particular selected file is, we suggest you don’t delete it because it could cause even more damage.