How to Fix a Faulty Network Adapter in an Imported Virtual Machine

Importing a virtual machine into VMware Workstation or other virtual machine programs doesn’t always carry the network configuration over cleanly. The adapter might show as disconnected, fail to get an IP address, or simply not be on the VM’s device list altogether. This usually comes down to a mismatch between the original network settings and what’s available on the new host, rather than anything being genuinely broken. Here’s what to do with a virtual machine not showing network adapter.
Fix 1 – Check That the Network Adapter Is Enabled for the Virtual Machine Not Showing Network Adapter
The import process can leave the adapter disabled in its configuration settings. This is the simplest thing to check first if you get a “VM missing network adapter” message.
Step 1. Open your virtualization software and select the imported virtual machine without starting it.
Step 2. Open the VM’s settings. In VMware Workstation, this is under “Settings.”
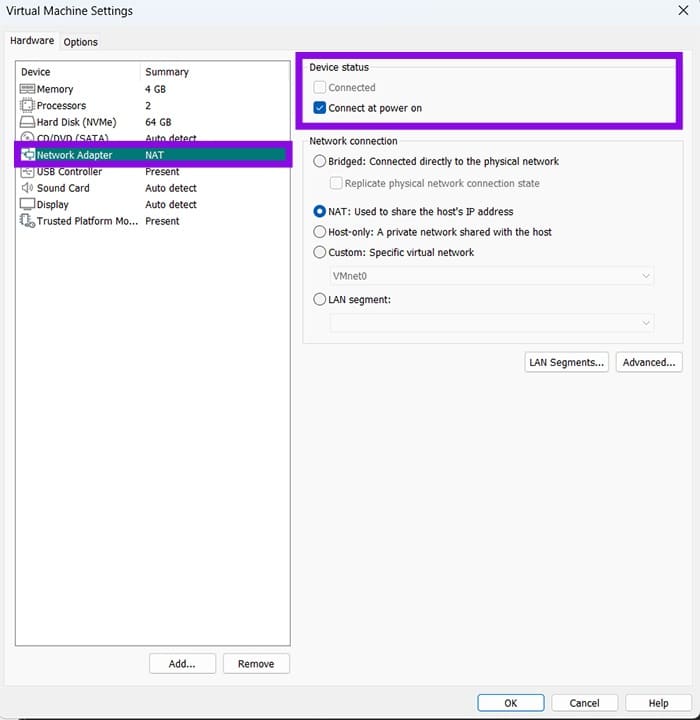
Step 3. Find the Network Adapter entry and make sure the adapter is enabled. For VMware, you need to confirm that “Connect at power on” and “Connected” are both checked. In VirtualBox, the “Enable Network Adapter” checkbox needs to be ticked.
Step 4. Apply the changes, then restart the virtual machine.
Fix 2 – Fix a Faulty Network Adapter by Setting the Correct Network Mode
Even if you find the virtual machine network adapter is enabled, having it set to the wrong mode will prevent connectivity. Host-only mode, for instance, gives the VM no access to the internet at all, and a Bridged adapter that points to a non-existent host interface will also fail silently.
Step 1. Go back into the VM’s network settings.
Step 2. Change the network mode. “NAT” is the most reliable option, while “Bridged” gives the VM its own address on your LAN, which is better if you need other devices to reach the VM. However, the latter also requires you to select the correct host network interface from the dropdown.
Step 3. Save and restart the VM.
Fix 3 – Remove and Re-Add the Network Adapter
If the adapter is tied to a specific virtual switch that doesn’t exist on the new machine, the cleanest fix is to remove it entirely and add a fresh one.
Step 1. Shut down the virtual machine completely.
Step 2. Open the VM settings and navigate to the network adapter section.
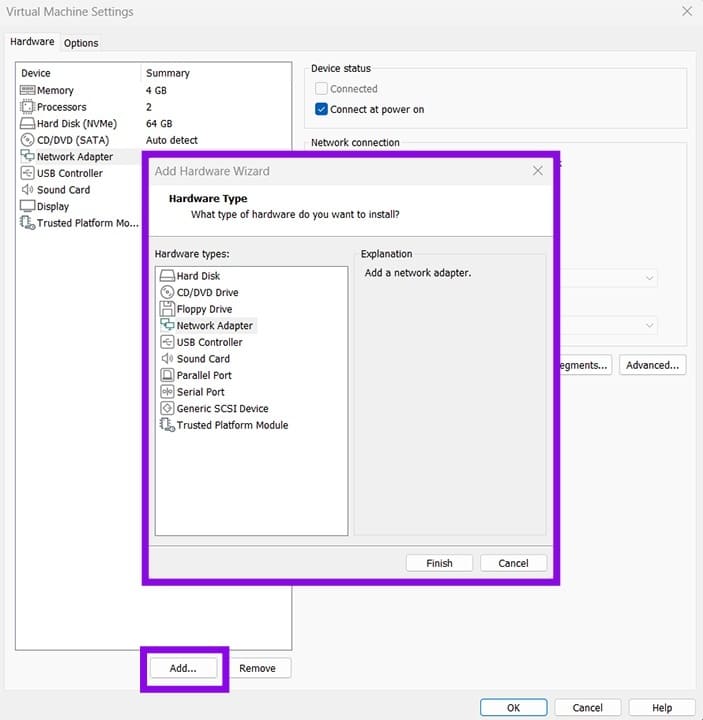
Step 3. Remove the existing network adapter.
Step 4. Add a new network adapter using the “Add” button.
Step 5. Set the new adapter, click on “Apply,” then start the VM.
Fix 4 – Install or Update VM Guest Tools
The virtual operating system also needs the right drivers to communicate with the virtual hardware. Otherwise, the network adapter may show up in Device Manager with a driver error or not show up at all.
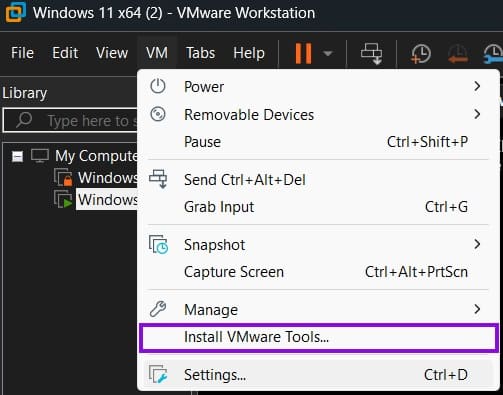
- In VMware, go to “Install VMware Tools” from the menu bar. This mounts an ISO inside the VM that you then run to install the drivers.
- In VirtualBox, go to “Devices” and then to “Insert Guest Additions CD Image” from the menu bar, then run the installer.
- In Hyper-V, integration services are handled through the virtual version of Windows Update. Open the VM, check for updates, and let it install updates.
Restart the VM after installation completes.
Fix 5 – Reset the Network Adapter on the Host
Sometimes the virtual machine network adapter not working isn’t the issue, but rather it’s been configured incorrectly on the host device (the program running the virtual machine).
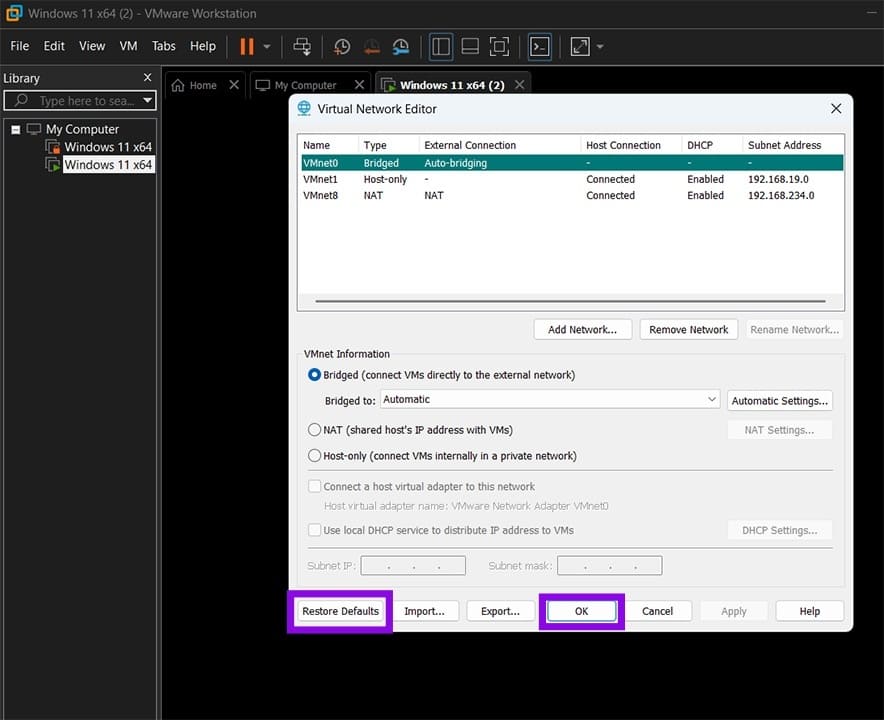
Step 1. In VMware Workstation, go to “Edit,” then to “Virtual Network Editor.”
Step 2. Click “Restore Defaults” at the bottom-right. If the button is grayed out, click “Change Settings” first, then run the virtual machine with admin privileges.
For VirtualBox, you need to go to “File,” then to “Tools,” and then “Network Manager.” From here, you can remove and recreate the adapter settings.
Step 3. Restart the VM and check connectivity again.
Fix 6 – Check the Adapter Status Inside the VM
Even when the virtual hardware is configured correctly, the network adapter inside the guest operating system may be disabled or have a driver issue. This is worth checking directly inside the VM.
Step 1. Start the VM and hit “Win + X,” then select “Device Manager.”
Step 2. Expand the “Network adapters” section. Look for any entry with a yellow warning icon, a red X, or one that’s described as an unknown device.
Step 3. If the adapter is disabled, right-click it and select “Enable device.”
Step 4. If there’s a driver error, right-click the adapter and select “Update driver,” then choose “Search automatically for drivers.”
Fix 7 – Renew the IP Address for the Adapter
After an import, the VM may have an IP configuration that doesn’t match the new virtual network.
Step 1. Inside the VM, open the Command Prompt as administrator.
Step 2. Use the command “ipconfig /release” and hit “Enter.” Wait for the command to complete.
Step 3. Use the command “ipconfig /renew” and wait for the process to complete.
Step 4. Run “ipconfig” to confirm the VM now has a valid IP address in the expected range (this is typically 192.168.x.x).