


How To Map a Network Drive on Mac

Mapping a network drive is the process of linking your Mac to a network-attached storage device. Unlike installed hardware, such as your RAM, macOS does not automatically detect network devices; we need to install them and set them up before we can use them. It’s a slightly inconvenient extra step that many people who are new to macOS won’t be familiar with, so today, we’ll explain how to map a network drive on Mac.
Whether you’re a business or home user, network storage is an excellent resource. For businesses, network storage comes in the form of server storage, SANs (Storage Area Network), NAS (Network Attached Storage), and cloud services (iCloud, Google Drive, etc.). Home users can utilize the same technologies, but would have less use or budget for SANs and are more likely to use NAS or cloud storage.

What is a network drive?
If you’re a computer newbie, we should cover the basics first: What is a network drive? What are SAN and NAS? And what can they do for you?
A network drive is any type of storage connected to an internet router. You can compare network drives to the more familiar flashdrive. These little USB drives hold a fixed amount of storage, say 64GB. You plug them into your computer and suddenly you have an additional 64GB at your disposal. You can move files from your computer to this flashdrive, making it so that you can only access them when the flashdrive is plugged into the computer.
You can purchase larger storage devices in the form of hard drives or SSDs, which can hold several hundred gigabytes or even a few terabytes. But the principle is the same: You plug these drives into your computer so that you can move files back and forth from your computer to the drive, either to back up data or to free up space on your computer.
A network drive is fundamentally the same as these drives – it has a fixed amount of storage and is used to store files. However, rather than plugging directly into your computer, it plugs into your wireless router. This means that you can access the files stored on a network drive any time you’re connected to your network, not just when the device is plugged into your computer. This also means that any device connected to your network can access these files as well. It’s like having your own personal iCloud or Google Drive.
NAS vs SAN
And that’s where NAS and SAN come into play. Network drives are usually made up of computers that act as servers to provide storage, generally in the form of a NAS or SAN device. A NAS device can be as simple as an external hard drive connected to your home router or as complicated as a dedicated NAS device with its own hardware and multiple drives. Either way, the device attaches to your router via ethernet and makes its drives available to authorized users. It’s a great way to have central storage that multiple people can use.
A SAN is essentially a more complicated NAS that can have multiple drives available from within the network. These typically aren’t used in a home setting, considering that they’re typically overkill and not very affordable.
NAS drives are useful to home users for sharing movies, music, files, or games across multiple computers within the same house, apartment block, dorm, etc. Cheap to buy and simple to set up, they are very popular indeed.
Cloud storage is the one most people have heard of it. Your data is stored remotely on servers that are accessed through the internet, and it’s maintained by cloud storage service providers. The storage providers are essentially doing the same thing you can do at home with a NAS but on a much, much, much larger scale. If you’ve ever wondered what the “cloud” is, now you know!
So that’s what you need to know about network drives. Let’s get on with attaching one to your Mac.
How to map a network drive on Mac
Once macOS finds a network drive, you will be able to connect to it and access the resources you have permission to access. We can configure macOS to automatically mount the drive in the future to save having to do this every time you want to access something. “Mounting” is the technical term for opening the drive to use it.
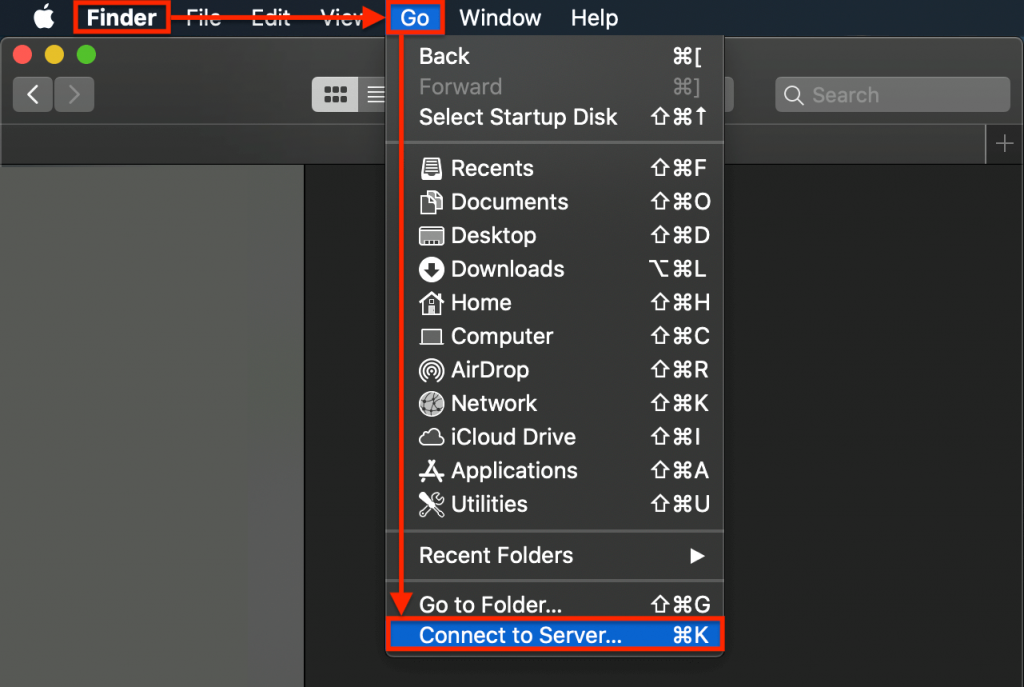
- Open Finder, click Go, and select Connect to Server.

- In the popup that appears, enter the address of the network drive. The format will likely be something like ‘smb://NASdrivename/diskorfoldername’ or ‘smb://192.168.1.15/ diskorfoldername’.
- Select the ‘+’ icon to add it to your favorites list.
- Enter the username and password to access the resource when prompted. Select ‘Remember this password in my keychain’ to avoid having to enter the login every time.
- Select the new icon to access the contents of the network drive.
As you enter the login details of the network drive you should see a new drive icon appear on your desktop. This will be the shared network drive. You can double-click or right-click to access the contents of that drive as you would any other.
If you don’t have the network address on hand, you can do one of two things. Select the little clock icon to reconnect to a previously used network drive or Browse. Browse will perform a quick search of your network to locate the network drive if the drive has been set up for network discovery, which is automatic on most network devices. Once the drive is located, select it and click the ‘+’ icon as above, and then follow the rest of the steps as usual.
Automatically connect to a network drive on Mac
I mentioned earlier that you can configure macOS to automatically mount a network drive every time you start your Mac. This makes it easy to access shared resources with the least amount of effort. Here’s how to do it:
- Perform the above steps to map the network drive.
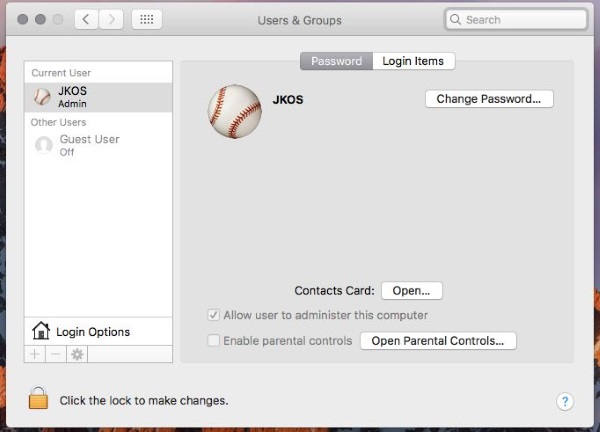
- Open System Preferences (the silver and black icon with the gear in the middle, somewhere around the center of the dock) and select Users & Groups.
- Select Login Items and uncheck the lock icon in the bottom left.
- Drag the network drive icon into the Users & Groups window to link.
- Check Hide next to the drive to stop it opening a window.
From now on, every time you log in or reboot your Mac, the network drive will appear and be available for use the same as your installed drives. Now you should be able to access shared resources on any network you are connected to at the time.
So that’s how to map a network drive on Mac. Simple when you know how to do it, isn’t it?


2 thoughts on “How To Map a Network Drive on Mac”
Is there any solution.