How to Pair Airpods to Windows PCs

The Apple AirPods are among the finest Bluetooth earbuds around. Granted, they’re not the cheapest, but the sound quality and the features they provide have made them hugely popular even outside the Apple camp.
PC owners seem to particularly like them, despite the fact that some advanced features are unavailable to them. Stick around and see how to connect your AirPods to your PC or laptop.
Requirements and Limitations
As it is to be expected, the Apple Airpods work best with Apple devices. However, to remain competitive, Apple has made the popular earbuds universally compatible with all Bluetooth-enabled devices. This includes Windows desktop PCs and laptops.
The main requirement for the Airpods is the Bluetooth generation. Both the 1st-gen and 2nd-gen models are compatible with the 4th generation of the Bluetooth protocol. If you have a device equipped with any of the newer versions, you’re good to go, as well.
If you have the 2nd generation Pods, you can also use Siri through them. However, you can use that feature only if you pair them with other Apple devices. This means that you won’t be able to summon Siri with a double-tap when you pair your Pods with a PC. Also, you won’t be able to pause the music when you take one earbud out.
There’s no official info on Apple’s site regarding Windows compatibility, but it is safe to assume that the currently popular iterations of the OS can be paired with the AirPods. For the purpose of this article, we’ve used a Windows 10 computer.
Finally, if you have a desktop PC, chances are that it isn’t equipped with onboard Bluetooth. If that is the case, you should buy a USB dongle and install it before trying to connect your AirPods. If you have a laptop, make sure it has at least the 4.0 version of Bluetooth.
Setup
The setup process should be identical for both desktop PCs with a Bluetooth dongle installed and laptops. To pair your Apple AirPods with your PC or laptop, follow these steps.
Step 1
First, you should go to the Bluetooth settings on your PC or laptop. On Windows 10, you can access them via the Start menu or the System Tray.
If you opt for the former, click on the Windows logo in the bottom-left corner of the screen and search for “Bluetooth and other devices settings.” Click on the top result.
Alternatively, you can click on the upwards pointing arrow in the System Tray and right-click on Bluetooth. Choose the Add a Bluetooth Device option.
Step 2
Both routes in the previous step will lead you to the same place – Bluetooth & other devices menu. Once the menu opens, you should click on the Add Bluetooth or other device tab at the very top of the menu.
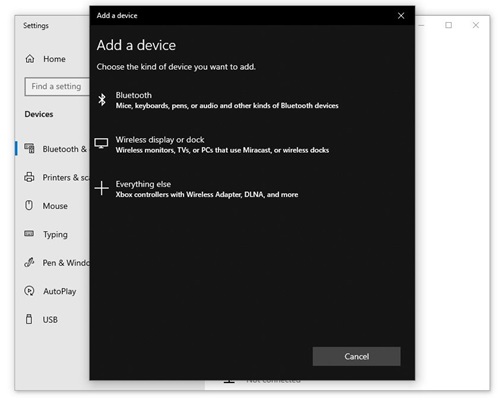
This will open another window with connection options. You will get to choose between Bluetooth, Wireless display or dock, and Everything else.
Step 3
Now, it’s time to get your AirPods in the Pairing mode. Go to the case and open it, but don’t remove the AirPods. Next, press the Pairing button on the back panel. You should hold it for approximately three seconds. You will know your AirPods are ready to connect when the white status light starts flickering.
Step 4
Now, go back to your computer. Since we’re connecting the Apple AirPods which are a Bluetooth device, you should go with the first option on the connections menu – Bluetooth. If everything’s OK and your Bluetooth is functioning properly, you should see a list of devices your computer’s Bluetooth has registered.
Step 5
When the list appears, find your AirPods on it and click on them. Wait for the computer to finish the setup. You should see a notification in the bottom-right corner of the screen on Windows 10.
Step 6
When you want to use the AirPods, go to the Bluetooth & other devices menu and select them from the main page.
Non-Windows Laptops and Computers
If you have a laptop that runs another type of OS, like Chrome OS or Linux, the setup process is very similar. You will have to activate your laptop’s Bluetooth first, then activate your AirPods, and finalize the pairing from the laptop’s Bluetooth menu.
This also goes for laptops running Windows 8, 8.1, and 7 operating systems. Additionally, you can connect your AirPods to a Linux desktop computer the same way, provided it has Bluetooth 4.0 or newer.
Troubleshooting
If, for any reason, your AirPods stop playing, there are several troubleshooting methods you can try. First, you should try to disconnect them from your computer. You can do so from the computer’s Bluetooth menu. Once you’ve disconnected them, you should repeat the pairing process from Step 1.
If the problem persists, you might want to reset your computer’s Bluetooth. You can do so from the Bluetooth menu. On Windows 10, there’s a slider switch near the top of the main window. Toggle it off, wait a few seconds, and then toggle it back on. After that, pair your devices again.

If your AirPods still won’t play music, you should check their battery level. If it’s low, you should disconnect them, put them in the case, and charge them for a while. To be sure, let them charge fully. Once they’re charged, repeat the entire pairing process.
You might want to reboot your computer if your AirPods still refuse to cooperate. This simple but often overlooked solution has fixed far more serious issues than a poor Bluetooth connection.
However, instead of connecting the AirPods, you should try and connect another device. If it connects successfully, it is time to call in the cavalry. Your options include taking your AirPods to the nearest Apple Store or contacting Apple Support.
Enjoy Top-Notch Sound
Regardless of the device they’re paired to, the Apple AirPods deliver great sound. They’re also easy to use and have decent battery life. What’s most important, connecting them to PCs and laptops is a breeze.
Do you use the AirPods with your PC or laptop? If so, what is your experience? If no, would you give them a chance? Let us know in the comments section below.