How to Create an Activity in Seesaw

If you’re new to Seesaw, you may find the platform a bit challenging. However, it’s very intuitive and easy to use. Seesaw allows you to create different activities for your students. They will not only help your students learn new things, but they’ll also keep them motivated.
In this article, we’ll show you how to create your first activity on Seesaw.
Creating an Activity on Seesaw
Here’s our detailed guide on creating a new activity. Just follow these steps, and you’ll be ready to go in a matter of minutes.
- Log in to Seesaw as a teacher.
- Tap on the green Add button at the top right corner.
- Choose “Create or Share Activity.”
- You’ll then enter My Library.
- Tap on Create New Activity.
You now have to add details to describe your new activity. This step is crucial, especially if you’re introducing an activity your students aren’t familiar with. Make sure you add a detailed explanation, especially if you have young students who may not understand.
- In the first field, write the name of the activity.
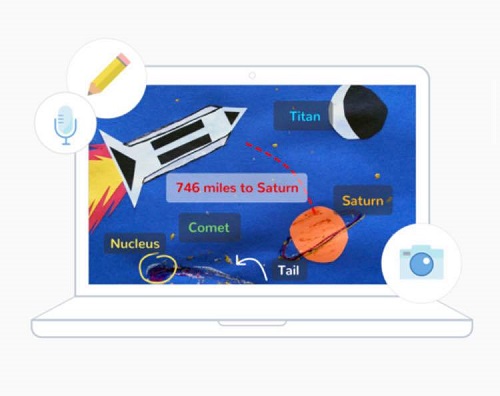
- In the second and largest field, write the instructions for your students. You can also add voice or multimedia instructions, as well as an example. To add them, tap on the Plus sign at the bottom of this field.
- In the third field, add a Template for students’ responses.
- Tap on Save.
When you’ve created the activity, you can share it with your students. However, you don’t have to do it immediately. That’s good news for teachers who like to create their material in advance. Your activity will be saved in My Library, and you can access it any time you want.
When it comes to voice and multimedia instructions, all you have to do is tap on them and then record your voice or add an existing video. Don’t worry because you can listen to your recordings before you upload them.
How to Create a Template or an Example?
Adding an example or a template for students’ responses isn’t obligatory, but we highly recommend it. That way, your students will be sure they’re doing everything right. You can add an example in the second field and a template in the third field. However, they’re both using the same forms, and we’ll now explain how to create them.
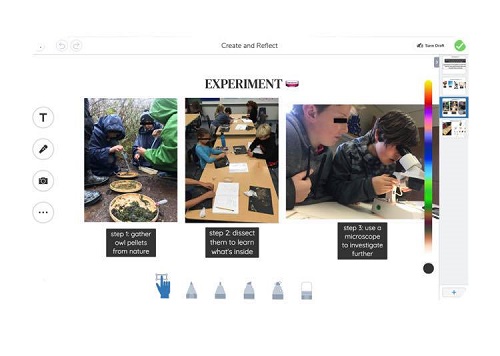
You can create them directly in the Seesaw app, using various tools. When you click on Add Example or Add Template, a new screen will appear. You can then choose from six forms: Photo, Drawing, File, Link, Note, or Video.
You can add an image, or you can draw something yourself. You could also add a link to an existing video that’s explaining the activity. If you already have a file that you’d like to add as a template, even better. Click on Add File and then choose whether you want to add a file from your computer or Google Drive.
There you have it, but don’t forget to hit the Save when you’re done. Seesaw won’t save your changes automatically.
How to Share an Activity with Your Students?
Bear in mind that when you create an activity, Seesaw doesn’t make you share it with your students right away. You can share it right after making it, but we suggest you first check whether the activity and instructions look the way you wanted them to look.
You can do so by clicking on My Library in the top toolbar. There, you can see all the activities you’ve ever created. There’s even a Search feature that can be useful if you’ve been using Seesaw for a while and have a lot of saved activities.
Click on the activity you’ve created and check whether it’s OK or not. If it’s OK, click on the green Share button at the top right corner. You can select the classes with which you’d like to share the activity. You could even assign a particular activity to individual students by creating a new group.
Activity Ideas
Seesaw allows you to create many different activities for all subjects and all levels. If you’re new to Seesaw, here are some suggestions that may help you.
If you’re an English teacher, Seesaw allows you to adjust your approach for kids who love reading, but they don’t like writing. You can give them a short story to read and then ask them to summarize it in a quick voice note. If your students are just learning to read, you can ask them to read a couple of sentences aloud and record them so you can check.
Music and art teachers finally have a platform where they can share the most famous masterpieces or ask students to create something themselves. Science teachers can use the platform to upload videos of experiments that would be difficult to perform in the classroom. You can then ask your students to explain or draw what they’ve just seen.
If you’re a history teacher, you can make your activities more interesting by adding old photos or videos talking about a specific period. Students love interactive content, and their interest in your subject might start to grow!
Of course, everything depends on the age of your students. After all, you know your students better than anyone. We’re sure you’ll find something interesting.
Get Creative!
Seesaw is a great way to create your very own teaching material and activities. Once you’ve learned basics about how it works, you can express your creativity!
Do you enjoy using Seesaw? What type of activities do you usually make? Let us know in the comments section below.