


5 OS X Tips For Former Windows Users
Over the past several months, I’ve worked in an environment composed of both Macs and PCs. The Macs in question have mainly been employed for video work, so a degree of cross-platform usage goes on; video primarily on the Macs, and pretty much everything else on the PCs. There’s no avoiding the Macs since I work with both the IT and AV side of things. As a result, I’ve had to put these machines to use.
Since I’ve always been primarily a Windows user, there are a number of quirks in the OS X environment that take some getting used to once you get past the look & feel of the GUI. In no particular order of annoyance…
1) Reprogramming the Mighty Mouse
The right click mouse button needs no introduction, I’m sure. It’s quite useful in a Windows environment. It’s almost second nature at times. OS X…well…it’s at first maddening to discover that you’re limited to a single button. However, there’s two ways around it.
First, hold down Alt while you click. The typical right-click menu you’re looking for should appear…about 80% of the time. For some odd reason, this does act a bit quirky if you don’t click just right.
The better method is remapping your mouse buttons. This will work on Apple’s Mighty Mouse or any standard USB mouse (for you folks stuck using the infamous Apple “Hockey Puck” Mouse, or the slightly newer Apple Pro Mouse, you’re out of luck here).
So, go ahead and click on the mighty blue apple in the upper left of the screen and click “System Preferences”. Go to the “Mouse and Keyboard” icon and click on the “Mouse” tab. Here is how I configured the buttons:
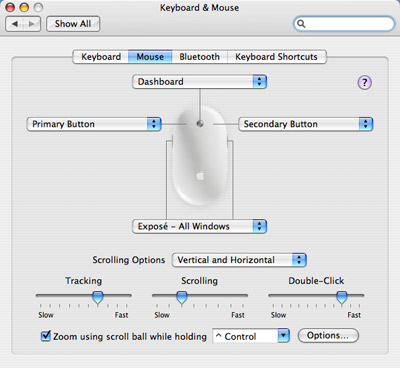
If you do the same thing as I did, pressing the scrollwheel brings up the widgets. Pressing either side of the mouse re-tiles displays all the open windows; either pressing again or clicking on a window gets you out of this. Right and left click act like they would under Windows.
2) File sharing
Since I’m working in a Mac & PC environment, I’m constantly moving files back and forth between the Macs and PCs.
Uploading to and accessing shared folders on PCs is easy. Hold the Command key + K, and in the box that comes up, type smb://thenameofthepc
If it asks you to “mount a share”, it’s just asking which shared folder (or drive) you want to work with. If it asks you to login, use the same username and password as you would normally use to login to that PC. On the PC, just remember to share the folder you want, and make the folder writable if you want to be able to upload files from the Mac to the PC.
Now for the tricky part: making the files on the Mac available to PCs.
If you’re running OS X 10.4 or older, you’re in luck: there’s a neat utility to make file sharing easier called SharePoints. It allows you to specify what users you can log in as, and which users have what permissions to whichever folders you choose to share. This application is fairly straightforward.
If you’re running the new OS X 10.5, unfortunately, enough has changed where SharePoints fails to work. As of the time of writing, there’s been no word yet if the developer of SharePoints is going to update the app for OS X 10.5. So, for the moment, I’m a bit stuck in this regard (especially since I really don’t want to mess with unix-based command line console).
To enable sharing, click on the mighty blue apple in the upper left of the screen and click “System Preferences” and go to the “Sharing” tab. For “Computer Name”, put something easy to remember without any spaces or periods. This will be the name you use to access the Mac from the PC (you can also just use the IP address). Next, tick the check box on the “Services” tab that says “Windows File Sharing”. If you’re not using SharePoints, tick the “Personal File Sharing” as well. This shares the user’s public shared folders and will at least give you one set of folders to share.
Choose the users that can be used to login when you access this Mac’s shared folders from another Mac or PC by clicking the “Accounts” button. Hit “Start” to enable file sharing.
Lastly, if your firewall is on, you’ll have to allow sharing (it’s fairly self-explanatory).
If you run into trouble or can’t find where things are, here’s a good page to take a look at.
So, from a PC, go to Start > Run and type \nameofthemac. You will be prompted to login, so use one of the user accounts that exists on the Mac. If you have everything configured correctly, you should be able to access the shared folders on the Mac.
3) The Home & End Keys
In Windows, I use a good many shortcut keys. The Home and End keys actually get used quite frequently with writing, coding, surfing, etc. For instance, if I hit the Home key, it goes to the start of a line, and then if I hit SHIFT + End, it highlights an entire line. This is useful in text documents when you don’t want to hit CTRL+A to select everything…only a single line; and quickly. Those two keys are also good for navigation, in addition to Page Up and Page Down (although I don’t use those two nearly as often).
Anyway, this little tool addresses that minor annoyance.
4) Why Oh Why Won’t That App Minimize?
Some applications have half a dozen mini windows that populate the entire screen. In the instance that you would like to minimize the app and move on to something else, you have to hit the minimize button on each one of those little windows…if they even have them (off the top of my head, Final Cut had been notorious for this, and I’ve found it quite annoying).
Anyway, here’s a neat tip with wresting with apps that won’t minimize: Hit the Command key and press H. This hides the application (just make sure the “main” windows of the application has focus).
If you want to navigate back to it, it won’t show up on the Dock because you didn’t actually minimize it! Oh no!
Don’t worry, it’s not really lost. Hold the Command key and press Tab. This will cycle through all of the applications you have open. You can press Tab to advance to the next icon, or click on an icon with your mouse. Either way, the selected application will appear front and center. This is pretty much identical to the way the Windows ALT+Tab hotkey works.
5) Where Are The Shortcuts?
In Windows, shortcuts are *everywhere*. Scattered on the desktop; scattered inside folders on the desktop; scattered in My Documents. Why do we have shortcuts? Easy access mainly, plus it avoids having to dig around in program directories for the correct executable file that actually runs the program.
In OS X, pretty much all of the applications you run across get dropped in the “Applications” folder in the “Macintosh HD” (logical, no?). It’s handy to have a few of those apps as either shortcuts on the desktop or icons down on the Dock. Dragging the application down to the Dock usually works fine for creating a shortcut on the Dock. Dragging an application onto the desktop…well…sometimes breaks the application (case in point; office applications with a suite of tools go haywire when you do this)
In OS X, shortcuts aren’t called “shortcuts”. They’re called “aliases”. Sure, the term makes sense in this context, but coming from Windows, you start out having no idea what you’re looking for.
When you want to make a shortcut/alias, simply right click on the application’s icon, and click “Make Alias”. This will always create a shortcut/alias with the word “alias” in the new icon. To create an alias without the word “alias” in it (to avoid renaming it afterwards), hold down the Option and Command keys, then drag the application’s icon to wherever you want the alias/shortcut.
Finally…
I know I said there were going to be 5 tips here, but I can’t resist sharing the following gem. If you’ve been using OS X for even a little while, you may have discovered that the realm of freeware isn’t as vast as it is with the Windows platform. So, you either have to search long and hard, run a dual boot, run a virtual machine, or bite the bullet and spend that $15-$50 on an app that you can easily get for Windows at no charge.
But, there is some freeware available, and you can see a good list of what’s available.
Note that not all the apps may work under OS X 10.5 since it is still fairly new, but given some time, I’m sure most of the more popular ones will be made available for it. The most useful ones for me so far have been VLC, Firefox, Cyberduck, and SharePoints.
And with that, I’ll leave you to exploring the OS X environment. As for me…I’ll continue to plug away with OS X as necessary, but I still feel very much more at home with Windows XP.


14 thoughts on “5 OS X Tips For Former Windows Users”
To skip to the beginning or end of a line, hit the Apple key (command) + left or right arrow key, respectively.
To select text while moving through it using the arrow keys, hold down the Shift key. If you hold down the Apple key at the same time, everything to the left or right on that line will be selected.
To quickly select an entire line, skip to the beginning or end using Apple + left/right arrow, then hit Apple + shift + left/right arrow.
Also, I’m not sure if Windows has anything like this, but OS X supports rectangular text selections by holding down the Option (alt) key. I cannot tell you how often this comes in handy when editing large chunks of similar text, when it’s just too much trouble to write some regex or something to do the job for you! macosxtips.com has a good explanation:
http://www.macosxtips.co.uk/index_files/rectangular-selections.html
Text editors often add their own keyboard shortcuts. For example, TextMate supports selecting the current line by hitting Apple + Shift + L.
I absolutely disagree about the right-mouse button not being useful in OS X. I’ve been a Mac user since 1995 and can’t EVER go back to using a one-button mouse.
Nearly all apps (including the OS) natively support a contextual pop-up menu right under the cursor when right-clicking… and with a good mouse configuration utility (such as “SteerMouse”), you can assign the right-mouse button to many other useful functions on a per application basis (ie, page-grab scrolling in QuarkXPress, copy-dragging of text/graphics/audio, not to mention the necessary second-trigger in numerous games.)
I’m not sure how you figure it takes two hands to use the right-mouse button, but it’s much more efficient to use only a second finger to pull up a contextual menu than two hands (one on the Control key, other on the mouse button).
The one-button mouse/trackpad concept is one area where Steve Jobs really needs to let go of his ego and go with what’s truly functional (at least they kinda got it right with the Mighty Mouse… now what about the damn MacBooks?!?)
Second: file sharing limitations of windows are a windows problem, not a mac problem. The mac doesn’t want to be a closed environment, so Apple tries to make it easy to share any kind of disk from anywhere. Put a FAT16 thumb drive into a Mac, it works. Put an HFS+ thumb drive in a Windows machine… Houston, we have a problem.
But the fact you have to jump through hoops to get sharing to work right in Windows is frustrating. Even from windows machine to windows machine, setting the right workgroup and all that gets annoying. And don’t get me started about trying to set up network printers in Windows compared to a mac, and how the printers get “lost” too routinely. Again, Apple tried to make it easier for EVERYONE with Bonjour, every printer maker has adopted Bonjour (and it works like butter) but, well, MS decided not to include it. Yo can download it for free from Apple, but you’d have to know about it first, and MS ain’t gonna tell ya…
3rd: Home and End are cool. Vestiges of DOS. I wish the Mac had them (of course, considering how they get moved around on PC keyboards, their usefulness diminishes). But Mac has always been a GUI, and has always been about using the mouse. Die hard PC people tend to rely on the crutch of memorizing 100s of keystrokes to do anything, but basically because “that’s the way it always has been” and they aren’t as familiar with how to make the mouse work for them.
Learn to use the mouse a bit better on the mac or the arrow keys for that matter, you’ll find the mac has all sorts of options for text selection. It’s just not exactly the SAME as windows. Try TRIPLE click sometime, or playing with the command and shift keys with arrows to move about text. You’ll find there is little you can’t do. I’ve always found selecting text with keystrokes to be quite clunky, and I’m a writer by trade, but I guess if you are a coder, it’s vital. But especially with laptops, where the majority of the rest of the world does heavy writing work, the proximity of the trackpad makes learning 100 keystrokes seem silly. But hey, if you want to learn all those shortcuts, do it. After all, the mac has some valuable ones too, such as…
4th: Command+H is no secret. It’s been that way for decades. Well, at least 15+ years. Windows minimize was taken from this idea combined with window shade (which is now gone). (just as aliases pre-dated shortcuts in windows)
And Command+Option+H is even nicer. Hides everything but the app you are using, even the Finder.
But frankly, i don’t think either Windows or OS X has this right. There needs to be a new paradigm. Maybe “stacks” and “spaces” is it. Don’t know. But dumping aliases all over and minimizing windows and hiding apps and such still requires a lot of thinking about what is where. There has to be an easier way.
And while I appreciate the tips in this article, most are really about a Windows user just discovering the basics of Mac use (or the limitations of Windows), not about anything really earth shattering. Same thing would happen going the other direction, with Mac users looking for “how can I do this?” answers on Windows.
1. You’re definitely not limited to one button. In fact, virtually any USB-based mouse can be used on a true plug-and-play basis, i.e. no driver installation required for basic functionality including scroll wheel and right-click.
If your machine is equipped with a single-button mouse, contextual menus are displayed by holding down the control (not Alt) button then clicking. And by the way, there’s no “quirkiness” to it at all: If the current context has an associated contextual menu, it will appear.
2. Contrary to your assertion about Mac OS X 10.5 (Leopard) users being out of luck because SharePoints no longer works, the fact is that SharePoints is no longer necessary: You can specify shared folders by user on a drag-and-drop basis directly in the Sharing pane of System Preferences under File Sharing. No third-party utility or command-line voodoo required.
By the way, the Firewall settings will be automatically adjusted when you enable file sharing.
4. On the Mac, applications don’t minimize, windows do. Therefore, instead of tediously minimizing each open window and palette of an application just hide the application (command-h) when you want to get it out of the way. A click on the application’s icon in the Dock will make it and all its windows instantly reappear as the frontmost application.
5. A quicker way to make instant aliases (to anything, not just applications) is to simply drag-and-drop the object while holding down the option-command keys.–instant shortcuts wherever you want.
Finally, your assertion that there’s “some freeware” available for Mac OS X is a bit of an understatement. There are, in fact, many thousands of freeware applications available in addition to even more shareware offerings. As others have mentioned, versiontracker.com is an excellent site as is macupdate.com.
VLC is almost entirely obviated by the simple addition of two QuickTime plug-ins: Flip4Mac and Perian.
Commercial software and hardware products can be found here.
Commercial software and hardware products can be found here.
My experience is that it’s best to learn and use the mindset of each platform. It doesn’t make sense to make Windows act like my Mac, nor, I believe vice-versa.
So for example, forget about right-clicking the mouse on a Mac. The OS doesn’t really use it. It doesn’t take two hands to use a mouse, so learn to use your other hand the way God intended… on the keyboard. All the really nifty Mac tricks are the shortcuts and menus that occur with combined use of Command, Option, and now to a lesser degree, cntrl with that one mouse button. (Don’t you want to keep one hand on the keyboard anyway?)
If you use this mindset, item #5 never existed; making an alias was always just a matter of holding command and option as you drag an icon to wherever you want the alias to be.
As for freeware/shareware, you’re probably right about relative quantities, but VersionTracker is generally the most useful site, and most Mac-Heads use or subscribe to it.
All in all, it’s neat to see how we adapt to something we’re not familiar with!
Thanks! – Paul