




How to Add More Color to Your OneNote

OneNote’s default look is functional but a bit flat, using the same purple-grey palette across every notebook. This is fine at first, but when you have 10 of them open, they all start to blur together. However, learning how to change the color of your OneNote isn’t as simple as a single setting. You’ll need to work in layers, from the notebook icon down to individual words on the page.
Option 1 – How to Change the Color of Your OneNote Notebook
The color block to the left of a notebook’s name in the sidebar isn’t just decorative. It can be changed independently for each notebook, which makes it much easier to tell them apart at a glance. Here’s how:
Step 1. Right-click the notebook name in the left sidebar.
Step 2. Select “Properties” from the context menu.
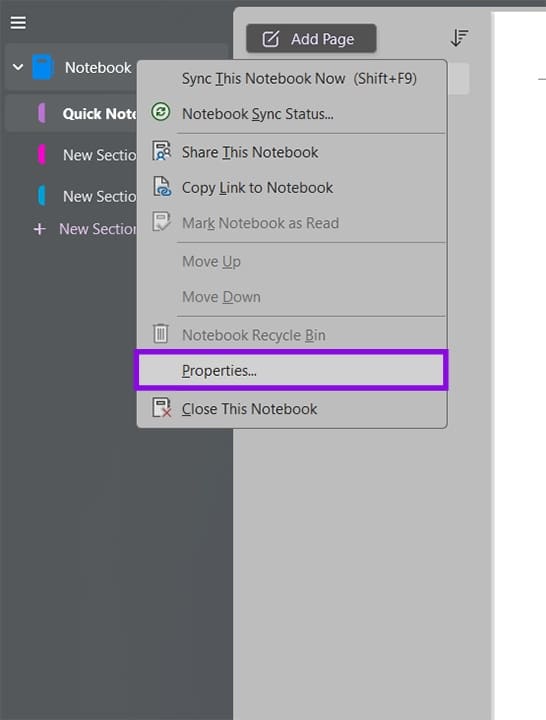
Step 3. In the Properties window, click on the color swatch next to “Notebook color,” then use a color from the palette.
Step 4. Click on “OK” to apply the changes.
This changes the notebook’s icon in the sidebar and in the section tab header bar. Note that OneNote gives you a fixed palette of 20 colors only.
Option 2 – Change a Section Tab’s Color
Section tabs run across the top of the page area and can each have their own color.
Step 1. Right-click the section tab at the top of the notebook or on the sidebar (depending on where you’re accessing OneNote).
Step 2. Hover over “Section color” and choose an option.
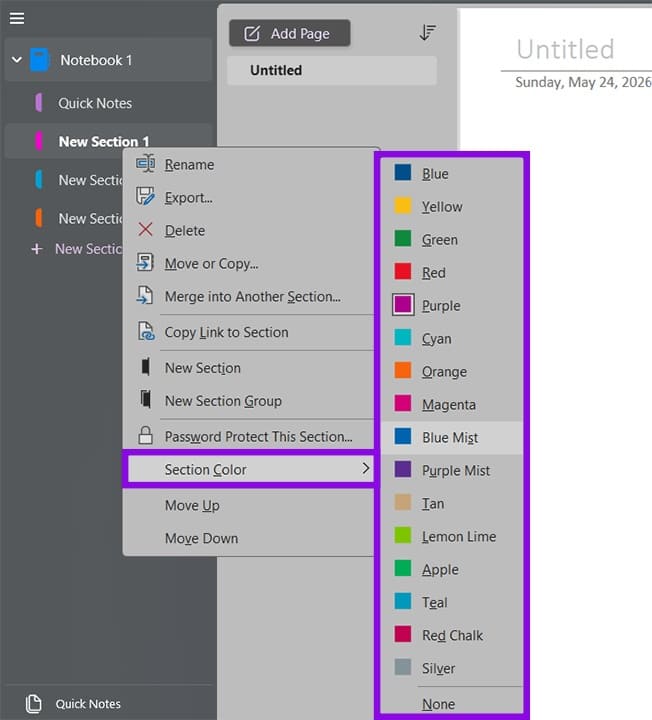
You can assign the same color to multiple sections if you want to group related ones visually, or give every section a unique color for maximum contrast.
To remove a color, go back to the same menu and select “None” at the bottom.
Option 3 – Change the Page Background Color
The page area itself defaults to plain white. You can swap it out for any color OneNote offers through the View tab, which is one of the ways you can learn how to fill color in OneNote.
Step 1. Open the page you want to recolor.
Step 2. Go to the View tab in the ribbon.
Step 3. Click on “Page Color” in the Page Setup group.
Step 4. Select a color from the palette.
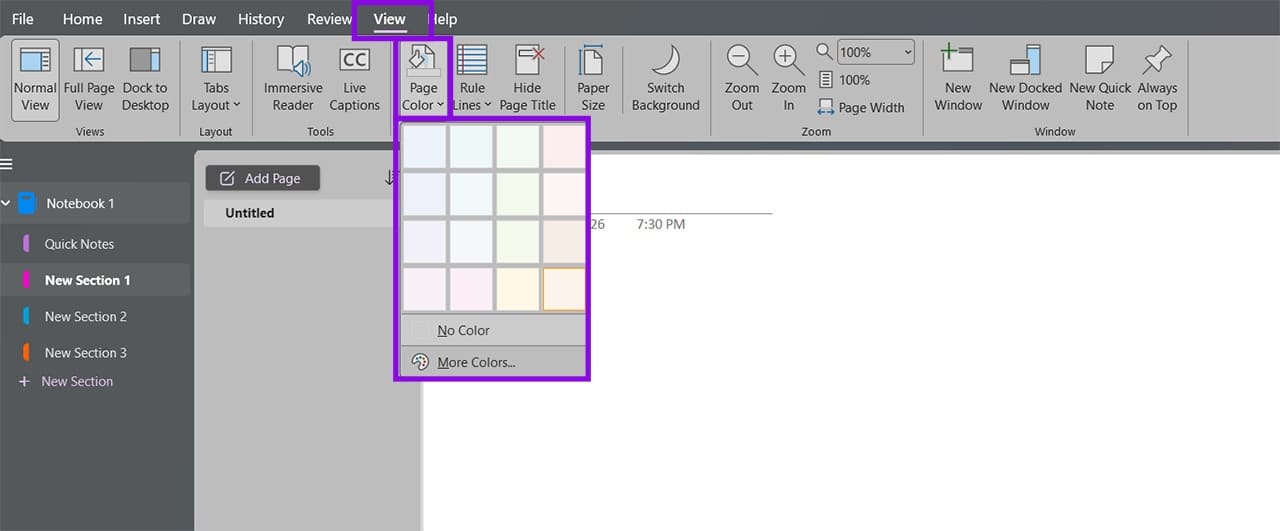
You can use “More Colors” to get a more comprehensive palette at your disposal.
The color applies only to the page you have open. If you want to apply it to multiple pages, you’ll need to set it on each one individually. There’s no way to set a default page color for all new pages, but a template page will apply.
Option 4 – Add Colored Rule Lines or a Grid
You can change the color of the lines themselves, which gives you a bit more control over the visual tone of the page.
Step 1. Go to the View tab.
Step 2. Click on “Rule Lines” in the Page Setup group.
Step 3. Choose from the list of line styles (College Ruled, Wide Ruled, Small Grid, and so on).
Step 4. Click on “Rule Line Color” at the bottom of the same dropdown menu, then choose a color.
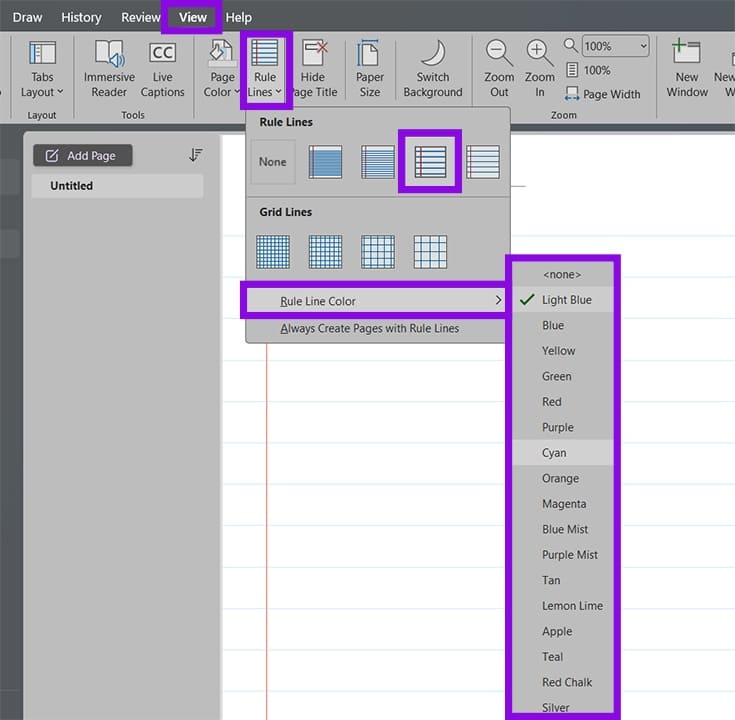
You also have a fixed selection of choices here, but they should provide enough contrast with the basic background colors.
Option 5 – Highlight Text with Color
Text highlighting in OneNote works the same way it does in Word.
Step 1. Select the text you want to highlight.
Step 2. Go to the “Home” tab in the ribbon.
Step 3. Click the dropdown arrow next to the “Text Highlight Color” button (the marker icon in the Basic Text group), then choose a color.
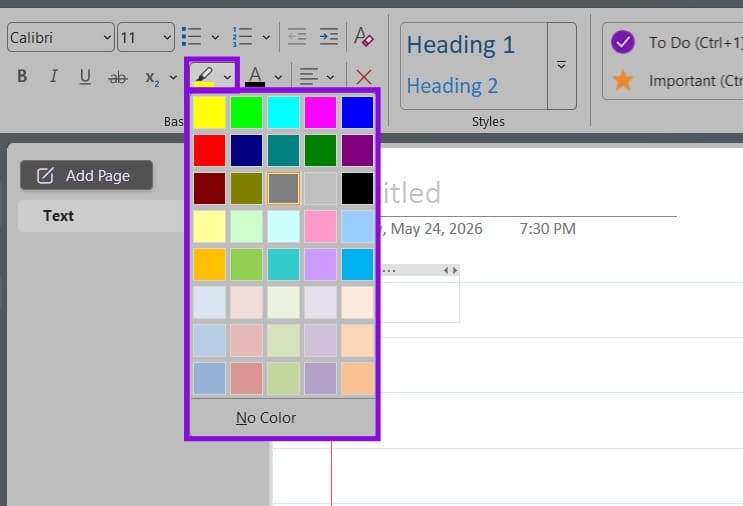
If you want to apply the same highlight repeatedly without reopening the dropdown, click the main body of the button (not the arrow) after you’ve selected a color. It will keep applying the last-used color until you click elsewhere or press “Escape.”
To remove highlighting, select the text and choose “No Color” from the highlight dropdown.
Option 6 – Switch to Dark Mode
You can have Office follow your recommended system settings or choose the Dark Mode manually.
Step 1. Go to “File” and select “Account.”
Step 2. Under “Office Theme,” select “Black” or “Use system settings” for true Dark Mode.
This applies the dark theme across all Office apps.
What Does Google Chrome’s New Bookmark Encryption Mean for Privacy
Read Next