How to Automatically File Emails in Outlook


If you’re not a long-time user of Microsoft Outlook then you might not be familiar with Outlook Rules and what they can do for you.
The best way to describe rules, in Outlook, is as automated actions that get triggered when certain messages meet a set of criteria, predetermined on the user end.
Because of this, rules are what Outlook users use in order to automate various processes such as filtering, filing, and even sending emails.
Setting up multiple Outlook rules can help you reduce the amount of time you spend in your inbox, reduce the amount of manual labor, and, of course, organize the contents of your inbox so that everything is easy on the eye and easy to find.
File Emails in Outlook 2010 & 2007
- Right-click on a message from a sender you want to filter.
- Click on Rules.

- Click on Create Rule
- Select the Move the item to folder option.
- Choose the Select Folder option.
- Highlight the intended destination folder.
- Double click to confirm.
- Check the box next to the “Run this rule now on messages already in the current folder” option.
This will file all emails from that sender into the specified folder.
For Outlook 2007 the first three steps are slightly different but from Step 4 to Step 8 everything remains the same.
- Right-click on a message from a sender you want to filter.
- Click on Create Rule.
- Click on From Sender.
File Emails in Outlook 2013
Doing the same thing in Outlook 2013 is a bit faster:
- Open an email from a sender you want to filter into a specific folder.
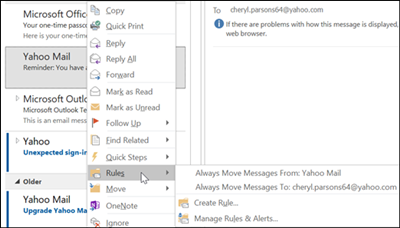
- Go to the Home tab.
- Click on the Rules option.
- Select the Always Move Messages From Sender option.
- Highlight the new folder you want them moved in.
- Select Ok.
File Emails in Outlook 2016 & 2019
You can also send existing and future incoming messages from specific senders into dedicated folders in the newer Outlook versions too.
- First, open an email from the target sender.
- Go to the message tab.
- Click the Rules option.
- Click on the Create Rule option.
- Select the From Sender check box.
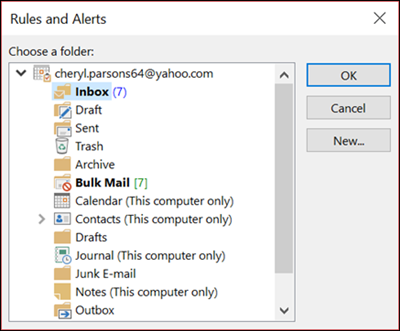
- When in the Do the following section, click on the Move the item to folder option.
- Select a new folder from under the Rules and Alerts dialog box.

- Alternatively, click on New to create a new folder for that specific sender.
- Click the OK button when done.
File Emails in Outlook 365
If you’re using the browser version of Outlook, the steps required to set a unique folder destination for incoming mail from specific senders is a bit different than those used in desktop versions of Outlook.
- Click on the gear icon in the top right corner of the Outlook 365 interface.
- From the Settings menu, select the View all Outlook settings option.
- Go to the Mail tab.
- Click on the Rules option.
- Click on the Add new rule option.
- Type in a name for your new rule.
- Click on the Add a condition option.
- Click on From.
- Enter the email address of the sender you want to filter out.
- Click on the Add an action option.
- Click on the Move to option.
- Select a destination folder or create a new one.
- Click on the Save button.
This will automatically transfer existing and incoming emails from that sender to the folder of your choosing.
Additional Filing Notes
Note that even though the steps may differ slightly from one version of Outlook to another, the process is essentially the same. Even better, there’s no need to understand the complexities of Outlook rules in order to create a simple filing system.
There’s also nothing preventing you from sending mail from multiple senders into the same target folder. However, you won’t be able to filter multiple senders simultaneously in all versions of Outlook.
In most cases, you’ll have to manually add rules to individual senders.
Filing Emails into Folders by Keywords
You can categorize all incoming emails based on certain keywords or phrases, also by using rules. Doing this can save a lot of time, as opposed to filtering or filing email from individual senders.
This can be very helpful if you want to, for example, filter and categorize your work email, personal emails, promotional emails, etc.
Add Category Rule in Desktop Outlook
By following the next few steps, with minor variations, you’ll be able to set rules and categorize email based on set conditions, in all desktop versions of Microsoft Outlook.
- Launch Microsoft Outlook.
- Navigate to the Home tab.
- Under the Home tab, click the Rules option.
- Click on the Create Rule action.
- Select the Advanced Options option from the dialog box.
- Choose a condition that you want from the list in the Rules Wizard.
- Click the Next button.
- Click the check box next to the Assign it to the category option.
- Click on the blue category link.
- From the new Color Categories dialog box, select the desired category for that type of email.
- Click the OK button.
- Click the Finish button in the Rules Wizard menu.
Add Category Rule in Outlook 365
As always, the navigation of Outlook 365 is slightly different than that in the desktop app. However, this doesn’t limit your ability to categorize emails.
- Sign into your Outlook account.
- Go to the Settings menu.
- Select the View all Outlook settings option to expand.
- Click on the Mail option from the Settings dialog box.
- Click on the Rules option.
- Click on the Add new rule action.
- Name your rule in the Name your rule text box.
- Click on Add a condition.
- Select a condition you agree with for the purpose of filtering incoming and existing emails.
- Click on Add an action.
- Click on the Categorize button.
- Choose a fitting category for the filtered emails.
- Click on the Save button to finish the process.
Outlook – An Oldie but Goodie
Some say that Outlook is a bit too hard to use. That said, those that don’t probably just disagree with its pay-to-use service. In reality, Outlook is very versatile and well-put together. it’s capable of complex actions but can be used as a basic email service like Gmail, if you want.
Let us know if these tips and tricks helped you organize your inbox, highlight important emails, and if it improved your productivity at work.