


How To Build Your Own NAS With Raspberry Pi And Linux
Network Attached Storage(NAS) is a great way to make files accessible anywhere on your home network. Those files could be documents, pictures, or even media that you want to stream to multiple rooms at once. A NAS server acts like a regular hard drive, so the possibilities are really endless.
There are plenty of off-the-shelf NAS products out there, but most are ridiculously expensive for what they are. You can build a simple NAS for your home network with just a Raspberry Pi and an external hard drive, and reap all of the benefits of a NAS without the crazy price tag.
What You Need
Before you get started, there are some things that you need in order to set up your NAS.
- Raspberry Pi 3
- Class 10 MicroSD card(16GB+ preferred)
- Raspberry Pi case
- Micro USB charger w/ AC adapter
- Mouse, Keyboard, and Monitor(For Setup Only)
- SD/MicroSD card reader with adapter if needed
- USB External Hard Drive
OR
- USB Hard Drive Enclosure and Internal Hard Drive(s)
A Note On Speed
Remember that this is a Raspberry Pi. It’s a tiny single-board computer running an ARM CPU. It was never intended to handle a lot of volume or function as your business server. It’s a simple little thing that only supports USB 2.0 and has a 10/100Mb/s Ethernet port. That means that you will reach a bottleneck if you try to load it with too much.
Does that mean that your NAS will perform like junk? No. USB 2.0 supports transfer rates of up to 480Mb/s and the Ethernet is capable of 100Mb/s. Practically speaking, transferring a huge file will go around 5-7MB/s(that’s Megabytes not Megabits). It’s not blazing fast, but for your home and family, it’ll get the job done just fine. You can also definitely stream videos from your Raspberry Pi NAS without an issue. Just be realistic with your expectations here. It’s not a local drive, and it does have limitations.
Flash Your MicroSD
NAS systems are servers, so Linux is probably the best operating system to choose. It doesn’t hurt that Linux and the Raspberry Pi have gone hand-in-hand since day one either.
The default operating system image for the Raspberry Pi is called Raspbian. It’s essentially the Debian Linux distribution ported and pre-configured for the Pi.
Download the latest version of Raspbian Lite. The image comes in a rather large Zip archive, so it’ll take a few minutes. Unzip the archive however is most convenient when the download completes.
After you unzip, you’re left with a disk image. You’ll need to flash that image onto your MicroSD card. Connect your card reader to your computer and insert the card. Make sure that your computer recognizes it.
If you’re already on Linux, and you want to use dd to flash the image, you can.
For everyone else, download Etcher, and install it on your computer. Etcher is available for Windows, Mac, and Linux.
Open Etcher and select the .img that you just extracted. Then, locate your MicroSD card. When you’re absolutely sure that you have everything selected right, click “Flash!” Tis will erase everything from the SD card and write the image directly onto it.
After Etcher finishes, you can remove your MicroSD.
Connect Everything
With the image set up and ready to boot, you can connect up your hardware. Put the Pi in its case, and insert the SD card. Connect it up to the mouse, keyboard, and monitor. Plug in your hard drive to one of the Pi’s USB ports too.
After everything else is connected, you can plug the Raspberry Pi in. The Pi doesn’t have a power switch by default, so you’re going to need to plug it in to turn it on.
Set Up Raspbian
As soon as your Rasberry Pi boots, it’ll be ready to use. The Raspbian image is a complete headless Debian install. No, headless doesn’t mean incomplete, or that you’ll be running around like a headless chicken trying to figure it out. It just means that there is not graphical desktop. You don’t need one. Your NAS is a server, after all.
The Raspberry Pi Configuration
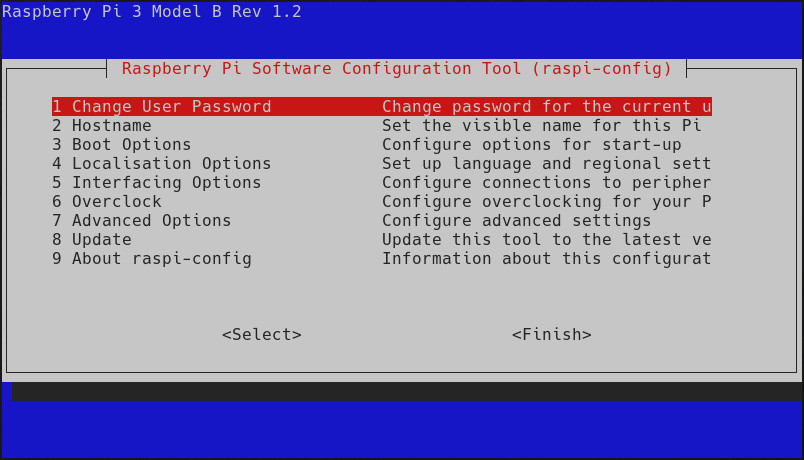
The first thing that you should do on your Raspberry Pi is change some of the default settings, like your user password and timezone. To access these, the Raspberry Pi has a specific menu. Open it with the following command.
$ sudo raspi-config
The interface is fairly self-explanatory, so have a look around and set the option that fit your. Before you go, go to “Interfacing Options” and select “SSH.” When it asks you if you want SSH enabled, select “Yes.”
Connect To WiFi
So, a wired connection is best. It’s faster and more reliable. If you insist on WiFi, you’re going to need to set that up.
Start by finding your wireless interface. Run ip a to list the available network interfaces. Your wireless one is probably wlan0.
Next, you’re going to need to add your network information to the wpa_supplicant configuration. Don’t worry, this is going to be easy.
$ sudo wpa_passphrase "network name" "password" >> /etc/wpa_supplicant/wpa_supplicant.conf
You can manually double check that it worked.
You’re going to need to restart networking on the Pi for the changes to take effect. Go ahead and do that.
$ sudo systemctl restart networking
Check that it worked by running ip a again. If you don’t see an IP address next to your wireless interface, restart the Pi with $ sudo shutdown -r now. Sometimes networking just doesn’t restart properly.
Connecting Over SSH
You don’t necessarily need to do this part, but it’s a lot more convenient than sitting over your temporary setup. You can remotely access your Raspberry Pi over SSH from your regular computer. If you’re on Linux or Mac, you can connect with:
$ ssh pi@192.168.1.110
Use the IP address that was assigned to your Pi.
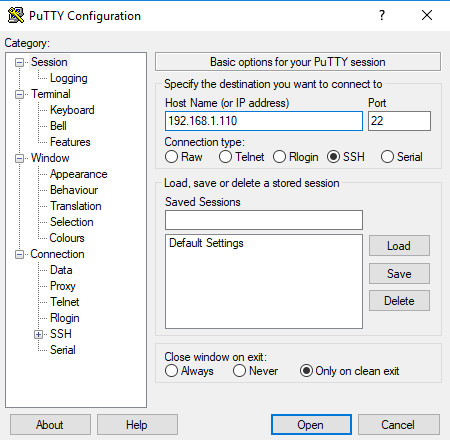
Windows users are going to need another way to connect. There’s an SSH client for Windows called PuTTY that you can download to connect. Plug the information for your Pi into PuTTY and connect like your on a Unix system.

The Hard Drive
I’d be pretty terrible to have to manually mount the external hard drive on your NAS every time you need to restart it. So, to have the system automatically mount the drive, you’ll need to configure it to do so.
First, find out where your hard drive is located on the Pi.
$ sudo fdisk -l
Find your hard drive in the output. Each drive is assigned an identifying location, like /dev/sda. Each partition on the drive is designated by a number after, like /dev/sda1. Don’t worry if your drive isn’t partitioned. The next section will cover that.
If you need to partition your drive, there’s a tool called cfdisk that you can use to set it up.
$ sudo cfdisk /dev/sdb
It’s a simple command line tool. Select the free space and enter in the size of your partition. Then, select the partition and use the left and right arrows to set the “Type.” If you’re going to be using it for Linux alone, select a Linux type. If you have Windows anywhere on your network, go with NTFS.
When you have everything the way you want, navigate to and select “Write.” This will erase the drive and set the new partition scheme. When it’s done, quit.
Now, if you created only one partition on /dev/sdb Debian will recognize it at /dev/sdb1. You can always double-check with fdisk -l.
Next, format the partition. Linux users should use EXT4. If you’ve got Windows on your network, select NTFS.
$ sudo mkfs.ext4 /dev/sdb1
$ sudo mkfs.ntfs /dev/sdb1
After the format finishes, you need to find the partition’s UUID. The UUID is a unique identifier for the partition, separate from /dev/, and it doesn’t change. The UUID is the best way to identify the partition when mounting it.
$ sudo blkid /dev/sdb1
Make note of the UUID.
Auto-mounting hard drives is handled by the /etc/fstab file. It already contains the default configuration for your system partitions. Open up the file and add a line that looks like the one below.
UUID=YOURDRIVEUUID /media/storage ntfs defaults,user,exec 0 0
Plug in your drive’s UUID and replace ntfs with ext4 if that’s what you’re using.
Finally, create the /media/storage folder and mount the drive.
$ sudo mkdir /media/storage
$ sudo mount -a
To prevent weird permission issues, change ownership of the directory, to nobody.
$ sudo chown -R nobody:nogroup /media/storage
Configure NFS
NFS is a way for Unix systems to share networked files. It is supported under Windows in some cases, but it’s mainly for Mac, Linux, and BSD. If the rest of your network is Windows-only, don’t bother with this part. Skip down to Samba.
For everyone else, NFS is much easier to use and configure than Samba. It provides and excellent way for Unix-based systems to interact with a NAS.
Install the NFS packages on the Pi.
$ sudo apt install nfs-common nfs-kernel-server
After it finishes open /etc/exports with your text editor.
nano /etc/exports
In this file, you can list the directories that you want to make available over your network and which computers you want to make them accessible to. If you don’t want to spend a lot of time messing with it, add the line below to make your external drive accessible to all computers on your network.
/media/storage 192.168.1.0/24(rw,sync,no_subtree_check)
Save the file and exit. Then, restart the NFS server.
$ sudo systemctl restart nfs-kernel-server
Configure Samba
Samba is an open source reimplementation of Windows file sharing protocols. It allows Linux to “speak Windows’ language,” so they can transfer files. It’s much easier to get Linux to be compatible with Windows technologies than it is to get Windows to play nice with Linux. That’s why everything so far has been geared towards catering to Windows if there are Windows machines on your network. Samba is no different.
Begin by installing Samba on the Raspberry Pi.
$ sudo apt install samba
The install will provide you with a default Samba configuration at /etc/samba/smb.conf.
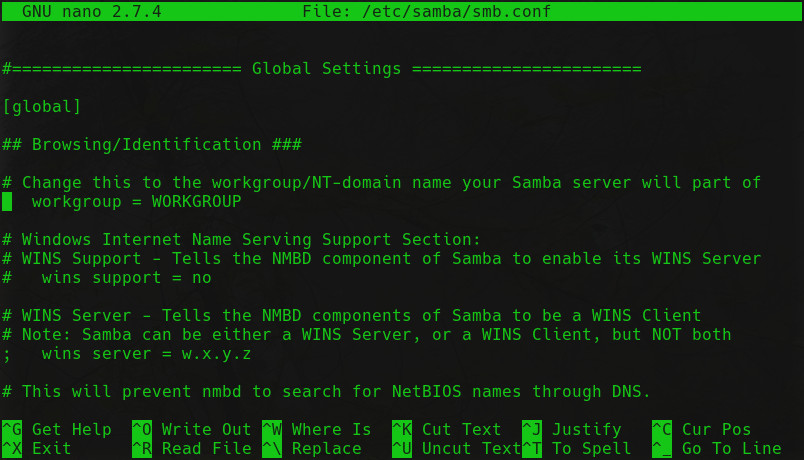
The file will look intimidating when you first open it up. Don’t worry. You won’t need to touch most of it. The only thing that you’ll need to alter in the main configuration is the workgroup. Find the line below and set it equal to your actual Windows worgroup.
workgroup = WORKGROUP
Samba handles shares in blocks. You can see some of the default blocks at the end of the configuration file. You need to create a new block for your Samba share.
Set it up like this:
[storage]
   comment = NAS
   read only = no
   locking = no
   path = /media/storage
   guest ok = yes
You have two main options when it comes to allowing access to Samba shares. You can allow guests, which grants access to anyone on the network, or you can restrict access to people who have an account on the server. Since this server is just a NAS, allowing guests is easiest.
Restart the Samba service to load your changes.
$ sudo systemctl restart smbd
Connect To Your NAS
You NAS isn’t any good if the computers on your network can’t connect to it, right? Well, if you’ve been following along, and you’ve set everything up right, connecting will be a breeze.
The process to connect is different for different computers. It’s also different for NFS and Samba, so use the right configuration for your computer.
NFS
There are graphical ways to connect to NFS. Some are good. Others really aren’t. Open up your file manager on Linux to to see if your NFS share is available. It would usually show up under a “Network” section. If not, don’t worry. As long as you have NFS support installed on the client, you can connect.
First, make sure that you do have NFS support installed. On Debian and Ubuntu the package is nfs-common. Then, you can mount the NFS drive wherever you choose with root privileges.
$ sudo mount 192.168.1.110:/media/storage /media/nfs
If you want to make that permanent, you can follow the steps for /etc/fstab above, but use the network address of the share instead of the UUID. On some systems, you’ll need to specify nfs as the filsystem type instead of ext4 too.
Samba
Samba is pretty simple to handle graphically on both Windows and Linux. In either case, you can access your share through your normal file manager.
Windows
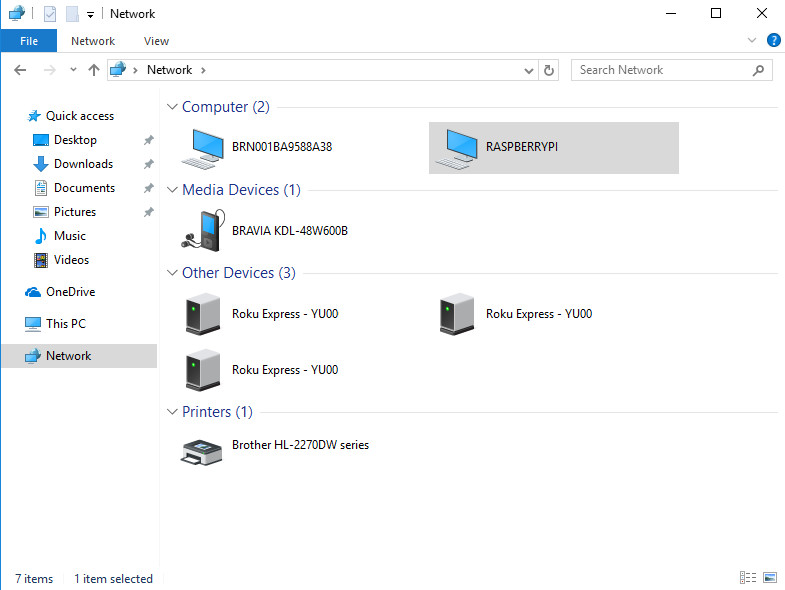
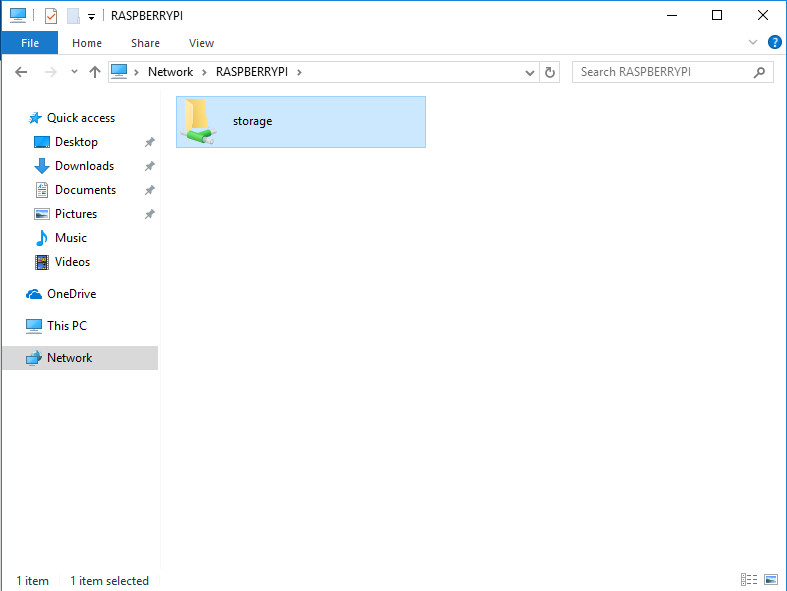
Open up Windows Explorer. On the side bar, you’ll see a “Network” section. When you click on it, you’ll see it populate with the devices on the same network as you. Under the “Computers” section, you’ll see the Raspberry Pi listed under the name that you gave it during the configuration. Click on the Pi, and you’ll see the shares that you set up. Click on them, and you’ll be able to access and use the files like you would if they existed locally on your computer.
Linux
Before you try to connect to Samba on Linux, you need to make sure that the Samba client is installed on your system. A lot of Linux distributions ship it by default, but if you want to make sure by installing it, the package is samba-client on Debian and Ubuntu.
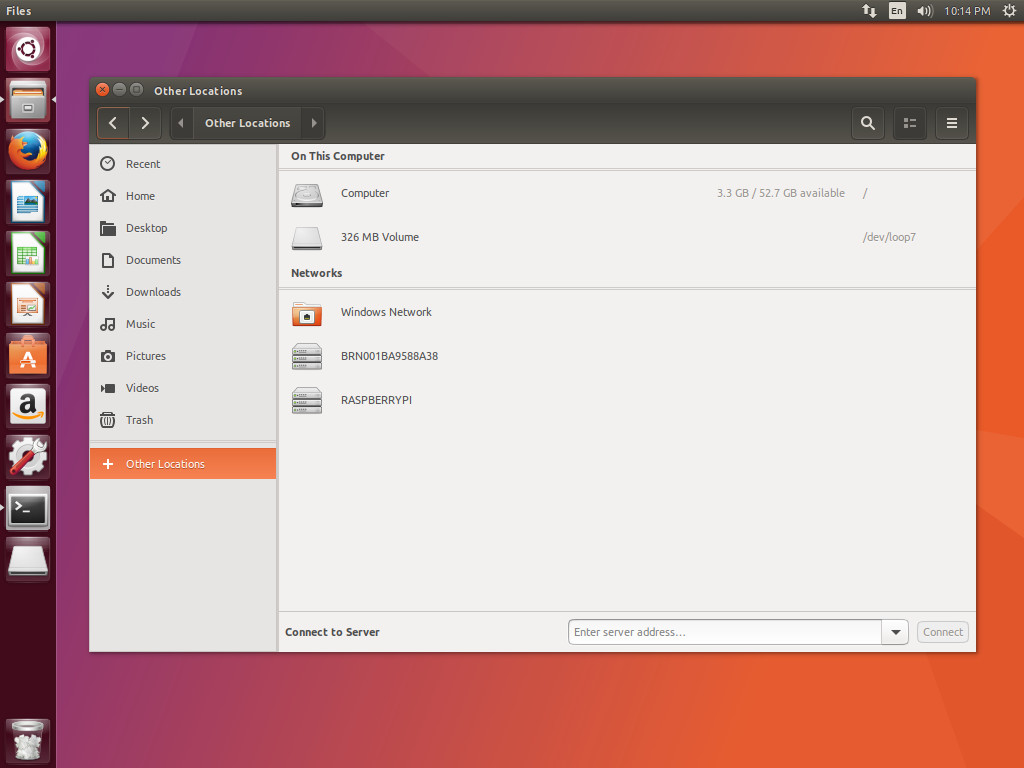
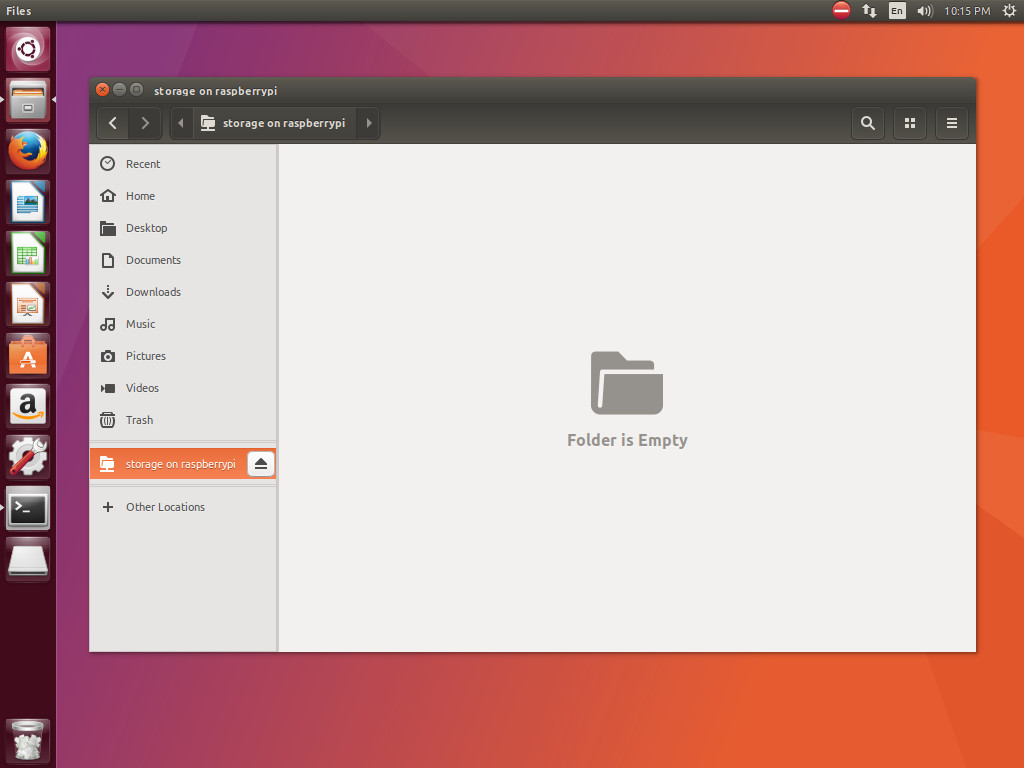
On Ubuntu, you can access the Samba share in your file manager under “Other Locations.” The share will appear under the “Networks” subheading. Click on the device, then the share. The Samba share will be mounted like any other drive on your computer.
Closing Thoughts
That’s it! You have your very own Network Attached Storage at a fraction of the price of commercial solutions. You can add more storage any time you choose too, once you outgrow your current hard drive.
Debian is super stable, so you won’t have to worry about restarting your NAS or having it crash. You may want to run an update every so often, though. You can do that through SSH now too, so there’s no need to connect it to a keyboard, mouse, or monitor anymore.


One thought on “How To Build Your Own NAS With Raspberry Pi And Linux”