


Build The Ultimate Media PC With Kodi And Linux

Media PCs, or HTPCs, are an excellent way to take control of your all of the media content that you enjoy. It doesn’t matter if you have a ton of files stored locally or you love Netflix, you’ll be able able to make the most of either or both with the right configuration.
HTPCs have a few distinct advantages over an off-the-shelf streaming media device. First, you can customize everything about your device. You can build in as much or as little power as you want or need. You’re also in control of software and updates. It’s not all too uncommon for a device manufacturer to drop support for an older device when they release a new one. It’s also not uncommon for a manufacturer to have a falling out with a service provider and drop their app suddenly, leaving you without a service.
With an HTPC, you can keep it continually up-to-date, and ensure that you have access to all of your favorite services. You can also change out and upgrade hardware whenever you choose. Plus, you can customize the look of your PC and make it stand out in your media center.
Hardware
The hardware that you choose is entirely up to you. You don’t need a whole lot of power to play videos, even in 4k. There are some things to consider, though.
Think about the form factor. The motherboard you use should probably be an mini-itx. The small form factor will take up less room near your TV.
Next, consider something with strong integrated graphics and open source drivers for Linux. That will ensure that you’ll get the best performance for your money, and you won’t need to worry about managing proprietary drivers. Just keep the system updated, and the drivers will be too. AMD’s APUs make an excellent platform for HTPCs. They have the best integrated graphics available at a relatively low price, and the AMD open source drivers for Linux are continually improving.
Intel is a good option too. Some of Intel’s embedded solutions are fairly good for the price. Intel’s unlocked Pentium CPUs are also a great option here, especially the ones with the latest integrated GPU.
A small solid state drive isn’t necessary, but it’s also nice to have. You don’t need something top of the line. Anything that can run the operating system and cut down on load times will do.
In total, the hardware that you will need is as follows:
- CPU
- Compatible Motherboard
- Min 4GB Compatible RAM
- Hard Drive(pref. SSD)
- Power Supply(500w should be fine)
- A Case you don’t mind looking at
- Bluetooth Keyboard/Mouse(get one with a dongle if your motherboard doesn’t have it built in)
*USB Flash drive(for the install)
Download Lubuntu
You can do this with just about any Linux distribution. This guide is going to work with Lubuntu. It’s a lighter weight version of Ubuntu with a more minimal desktop, since you’re not going to need the desktop much beyond the initial setup.
Grab the latest desktop release from Lubuntu’s download page. The 64bit release is probably best, unless you know you only have a 32bit system.
If you’ve never made a bootable USB drive before, you can use a tool like Etcher to set one up easily.
Install Lubuntu
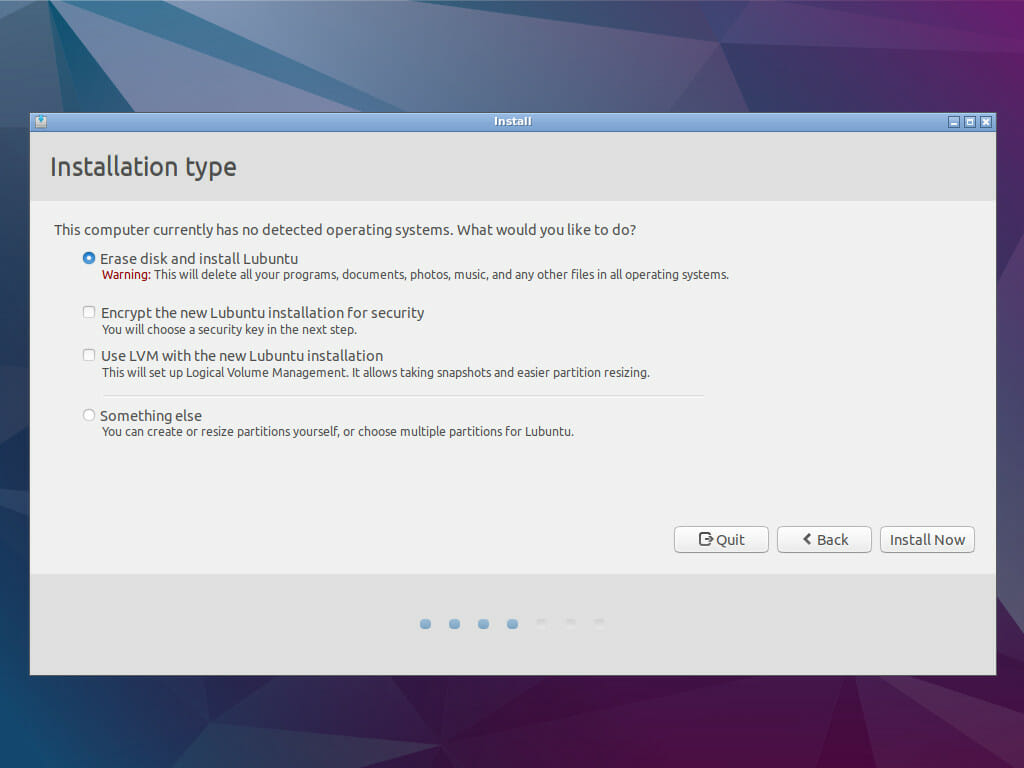
Plug your USB drive into your newly-built PC, and boot it up.
After a few seconds, you should be greeted by the Lubuntu installer. If you’ve never installed Ubuntu before, it’s a dead simple graphical installer. It will walk you through all of the steps. If you’re not comfortable messing with things, don’t worry. The defaults will work just fine.
At the end, you’ll be asked to remove the USB and reboot. That may or may not work well. If it hangs, just do a hard reset.
Install The Software
After the reboot, you’ll be able to log in to your new Lubuntu desktop. Of course, that’s not really what you’re after, but it does let you start configuring everything to turn this Linux install into a media PC.
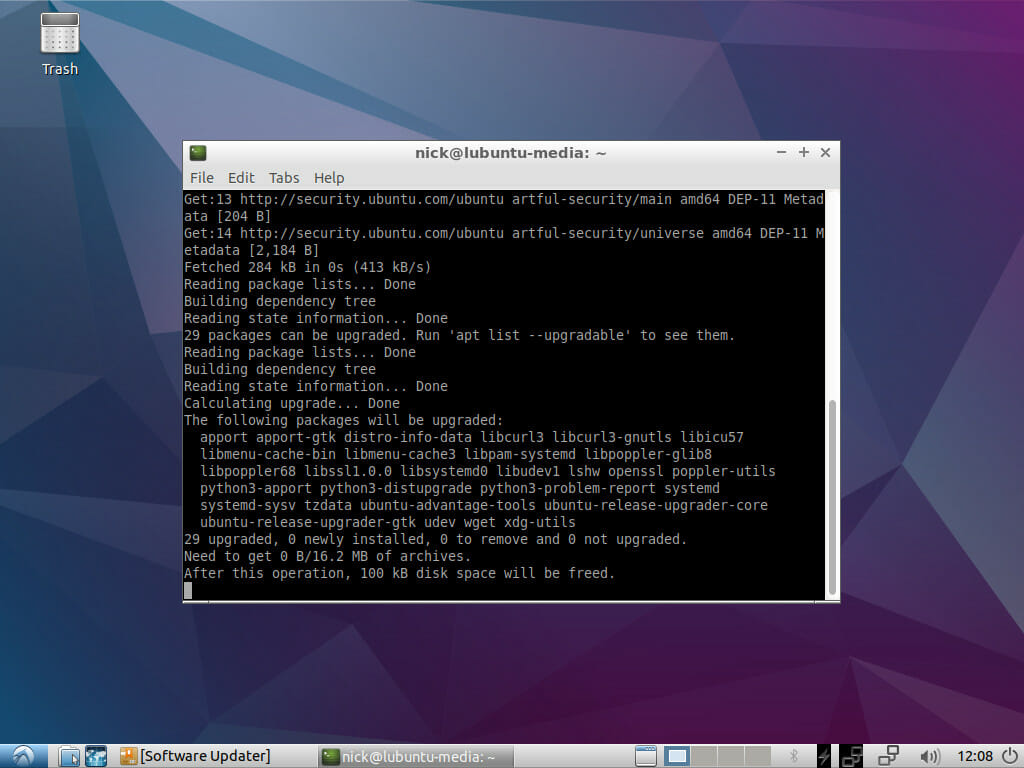
Begin by opening up a terminal and running the command below to update the system.
$ sudo apt update && sudo apt -y upgrade
You may need to restart after the update. If you don’t, it’s alright.
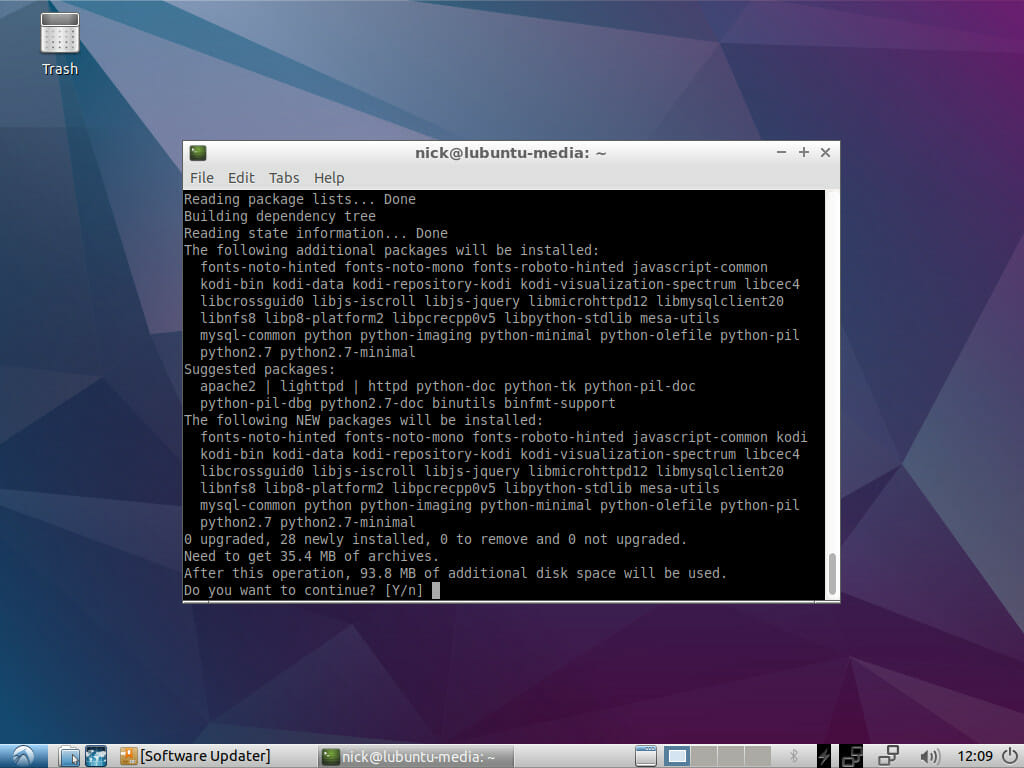
Install Kodi next. In the same terminal, run this:
$ sudo apt install kodi
When that install finishes, you’re ready to grab Chrome.
Google Chrome
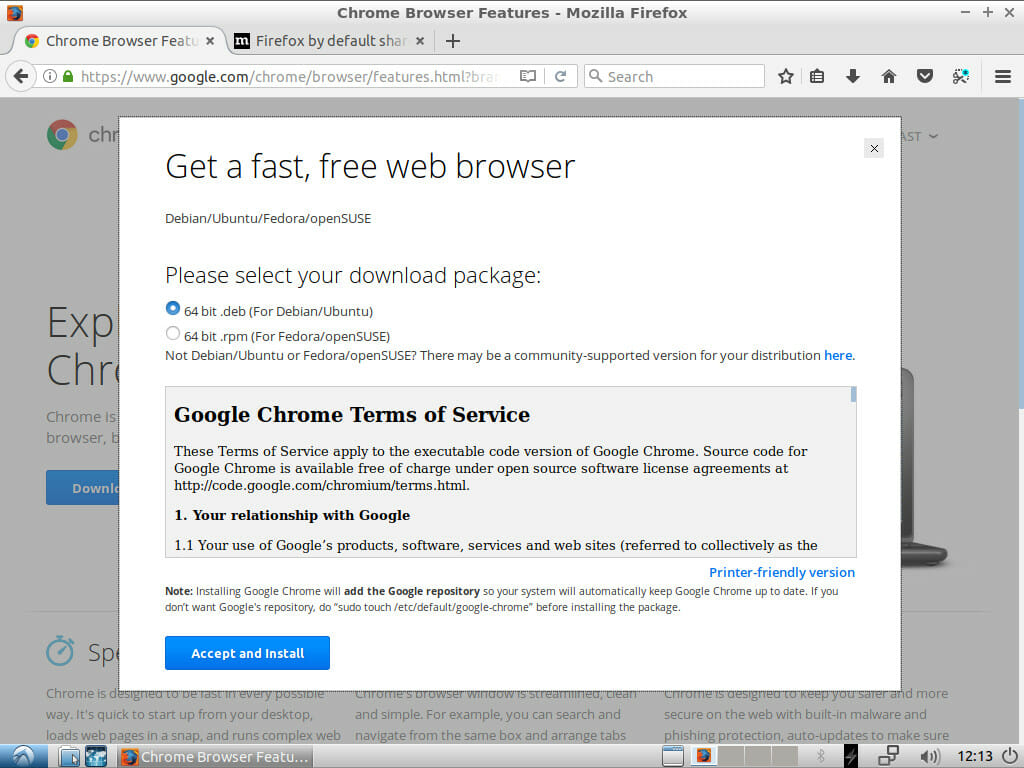
The best way to get Chrome is directly from Google. Go to the Chrome download page using Firefox and download Chrome. Select the 64bit .deb option for Debian and Ubuntu. When you’re asked which program to open it with, select the graphical package installer.
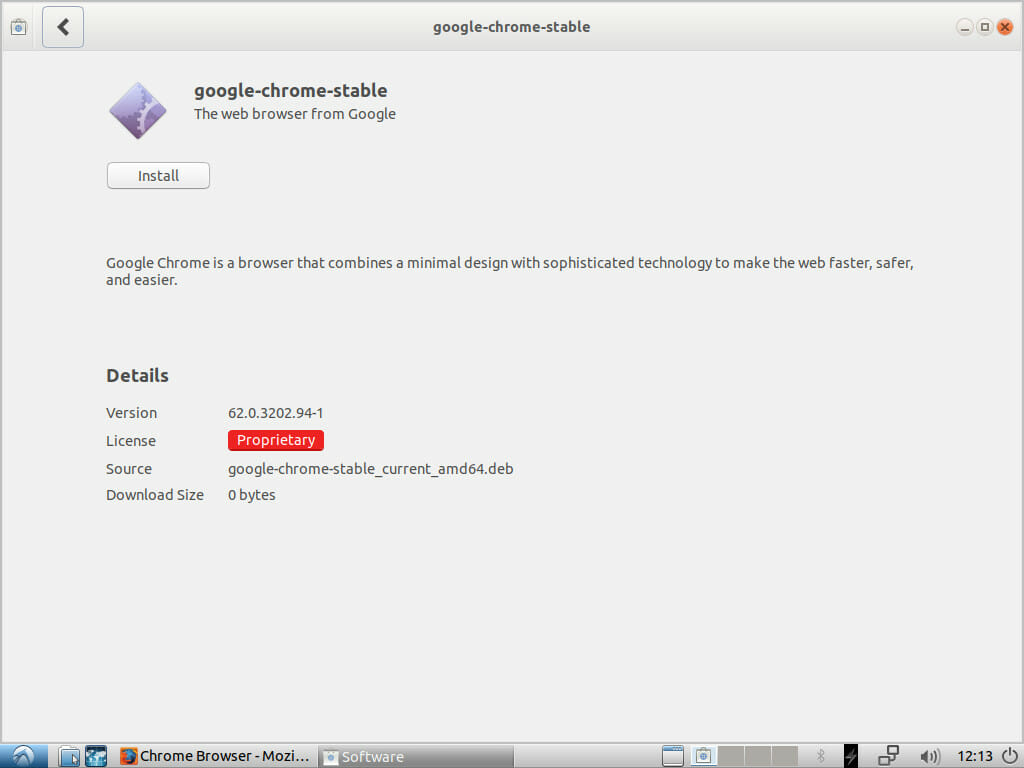
A window will pop up asking if you want to install Chrome. Confirm, and let the installer run. It’ll only take a few seconds to install.
Spoof Windows
Now that you have Chrome, you need to make Chrome look like it’s running on Windows. A lot of streaming services don’t support Linux. They do a check of your browser agent to make sure that you’re on either Windows or a Mac.
You’re going to need the agent string from Windows. That’s not too hard to get if you have a Windows PC running Chrome. Right click anywhere and click on “Inspect” in the menu that pops up. The developer tools will open. Then, click on the “Console” tab in the developer tools. In the console, run the following command.
navigator.userAgent
That bit of JavaScript will print out your agent string.
If you’re lazy or just don’t have Windows, use this one.
Mozilla/5.0 (Windows NT 10.0; Win64; x64) AppleWebKit/537.36 (KHTML, like Gecko) Chrome/62.0.3202.94 Safari/537.36
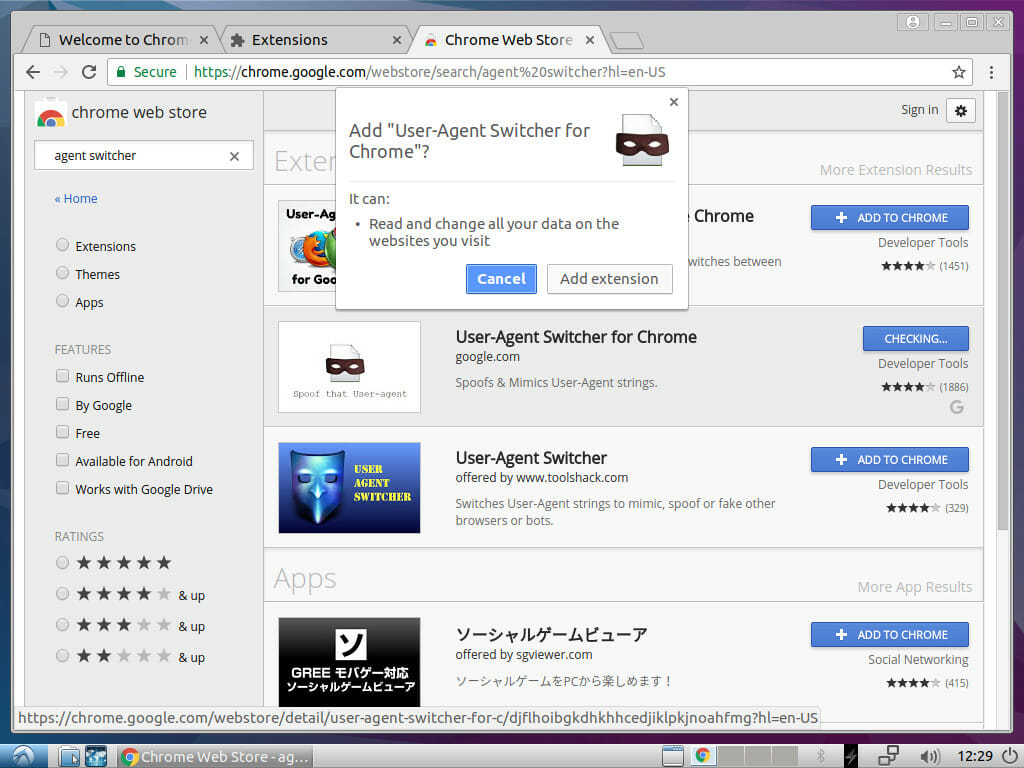
Now that you have that, you’ll need to spoof it in Lubuntu. Open up the menu in Chrome and navigate to “More Tools” and “Extensions.” Find the option to add more extensions on the bottom to open up the Chrome store. Once there, search for User-Agent Switcher. That’s Google’s official extension. Install it.
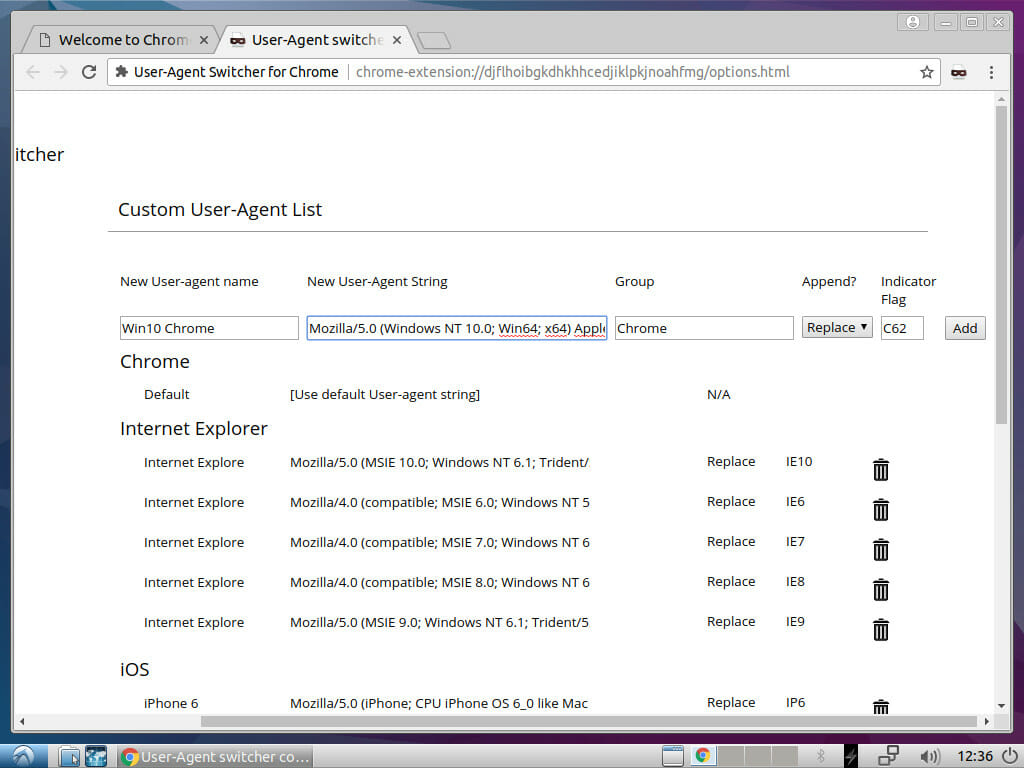
After the installation completes, right click on your new extension icon, and navigate to the “Options.” There, you’ll be able to add in your new user agent string from Windows. Plug in all of the information, including the agent string and click the “Add” button. Then, go up to the icon again, and select your new string from the options. If you did it right, it should be under the “Chrome” category.
From now on, Chrome will launch with your spoofed string.
Kodi
Once you have Chrome set up, you can open Kodi up and start configuring the main bulk of the media center.
Install SuperRepo
The default Kodi add-on repositories are fairly limited. They don’t contain the Chrome launcher that you’ll need to access a lot of the streaming services. If you want to make use of the Chrome launcher, you’ll need to install SuperRepo
SuperRepo is a gigantic Kodi repository with just about anything you can think of. Yes, anything. That also means that it’s not all that well regulated. Be careful if you start exploring and installing other things from SuperRepo.

Click on the gear icon on the Kodi home screen. Find the “System Settings” option, and click that too. Then, go to the “Add-ons” tab and flip the switch to allow unknown sources.
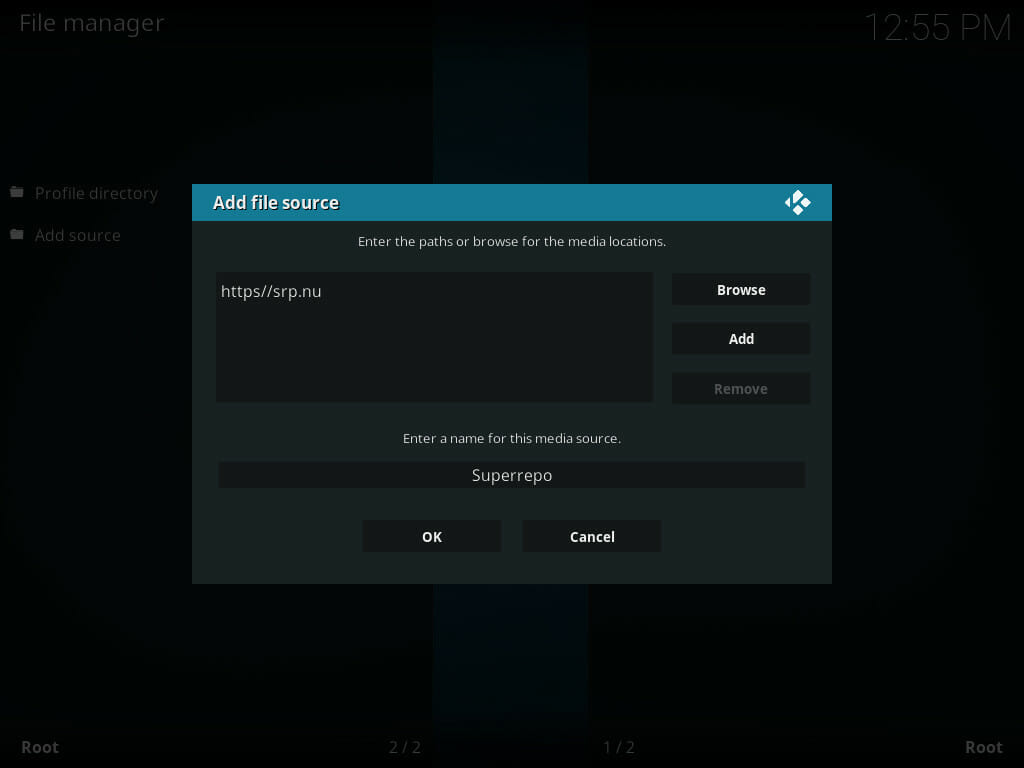
Return up one level to the main settings menu. Click on the “File Manager,” and click “Add Source.” Select where it says “” and type in the following address.
http://srp.nu/
Enter in a name, and click the “OK” button.
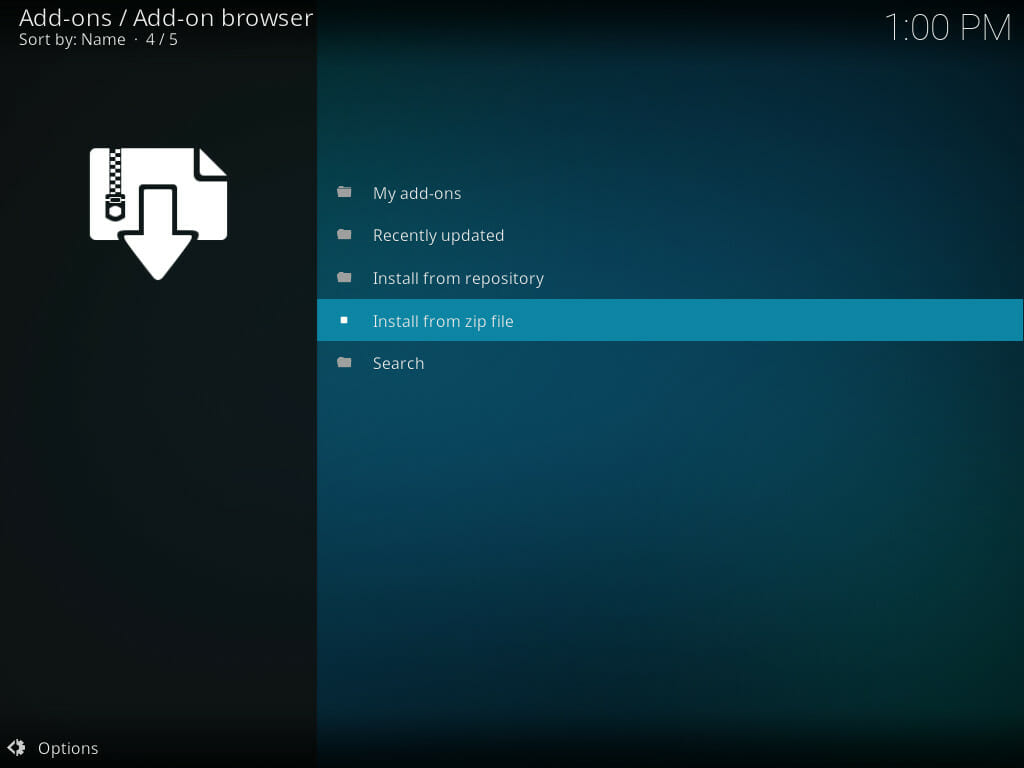
Return to the main screen, and select the “Add-ons” tab. Click on the open box icon on the top left. In the resulting menu, select the option to install from a .zip file. Then, select the SuperRepo source that you just set up. Next, select “Krypton,” followed by “repositories” and “superrepo.” There, you’ll find the latest .zip. Select it, and install.
Install Chrome Launcher
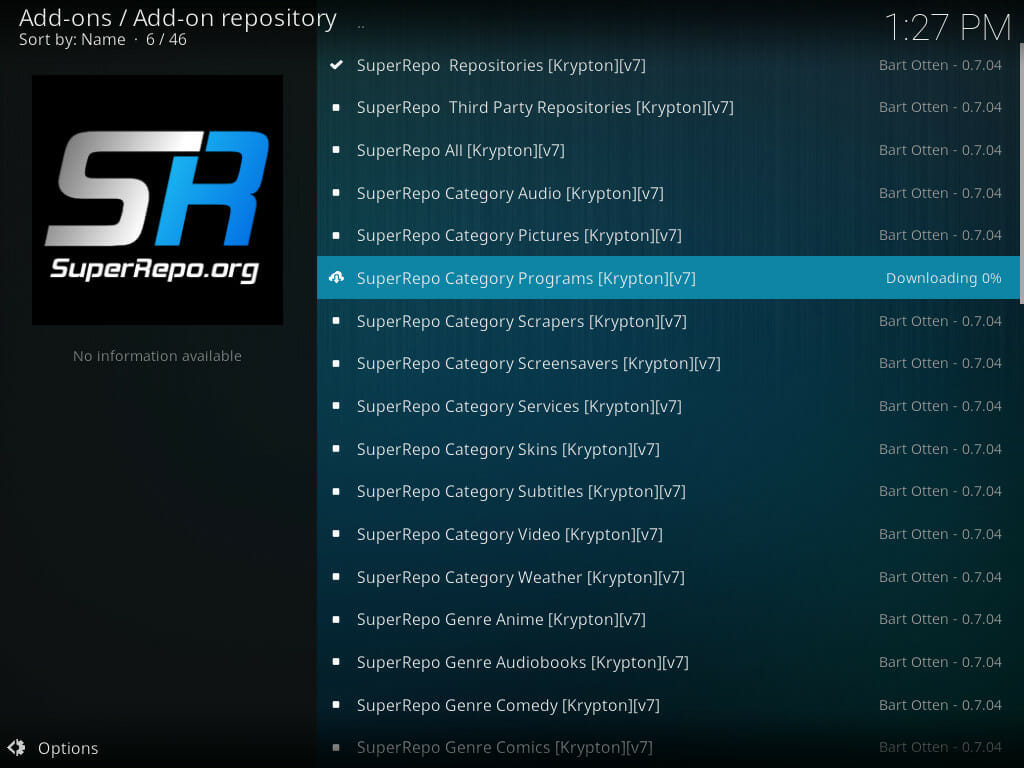
Go back up one level within the add-on box menu. Find “Install from Repository,” and select SuperRepo. Find the repository for the programs category, and install that one. Wait for it to finish, and return to the main “Add-ons” main menu.
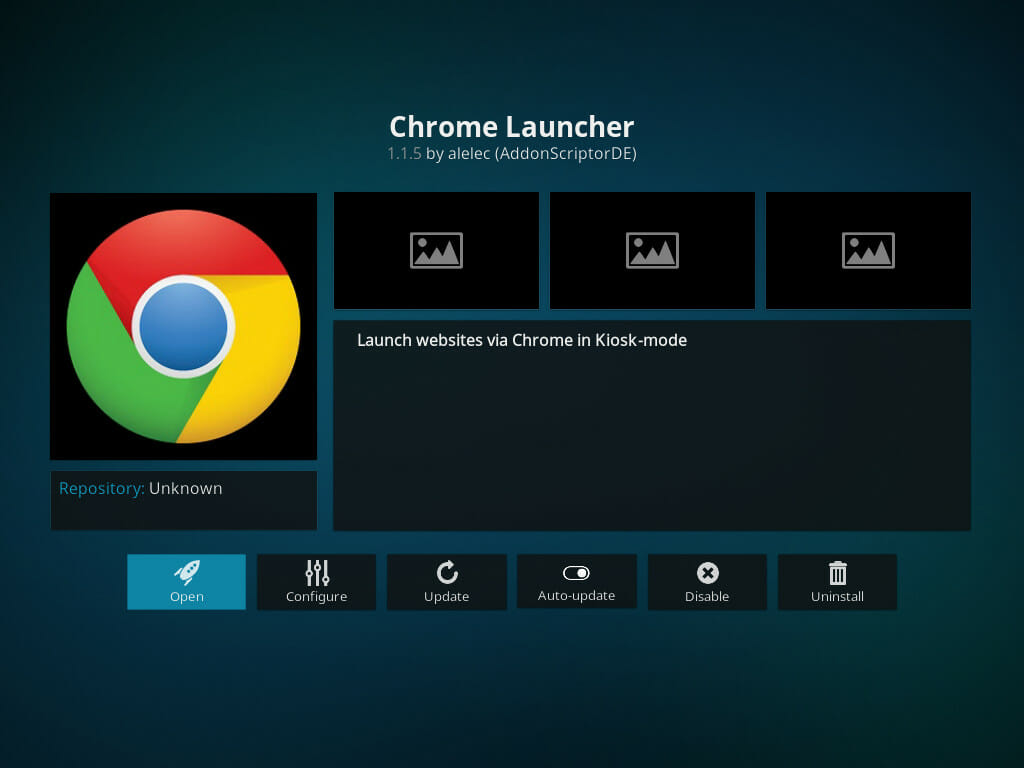
Click on the “Download” tab, and find the section for program add-ons. Locate the Chrome Launcher, and install it.
Set Up Launchers
Go back to the main Add-ons menu, and select the “Programs” tab. You should see the Chrome Launcher there now. Click on it.
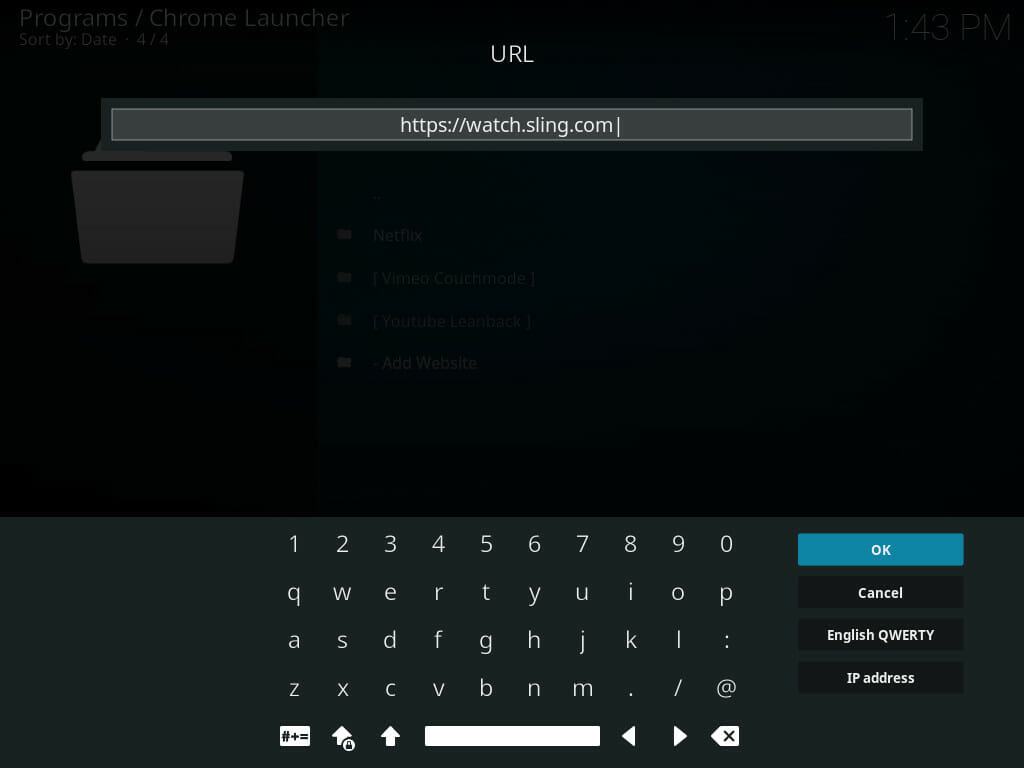
By default, you’ll see a couple of launchers already there for YouTube and Vimeo. Below them, you’ll see the option to add your own. Enter the name that you want to appear in the menu, then the URL of the site that you want launched. Spam through the next settings, the defaults are good. On the other end, you’ll see your new launcher listed. Click on it to open the site.
You can now navigate around the full website as though you were on a normal desktop and watch your favorite streaming content. When you’re ready to close, Alt+F4 is probably best. It’ll return you to the Chrome Launcher menu.
Local Streaming
If you have an NFS or a computer set up to share files, you can pick them up and play them with Kodi.
Return to the Kodi main menu. Click on the Videos tab, and select “files.” The only option available should allow you to add files. Click on that. The window that pops up should look familiar. It’s basically the same one you used to add SuperRepo. This time, click on the “Browse” button to the right. That will allow you to search around for sources. If you’ve got a NFS or you’re sharing from a Linux machine, you probably want the NFS option. If you have a Windows computer doing the sharing, or you set up a Samba share, click on that option instead.

From there, Kodi will list out all of the shares that it found. Select yours to add. When you have the right folder, select it. After the source was added, Kodi will ask you what the folder contains so it can scan it and add the data to your library. You can do this or hit the “Cancel” button. You won’t get nice artwork or proper video titles if you cancel, but you can still play your videos.
From that point forward, you can access that share over your network via the Videos section of Kodi.
Launch Kodi By Default
Since this is a media PC, you probably don’t want to boot into the regular Lubuntu desktop anymore by default. You can configure the system to boot up directly into Kodi.
Exit Kodi to return to the regular desktop.
It’s probably best to install SSH on the machine first to ensure that you’ll have a convenient way to access the computer remotely for updates and changes. That doesn’t require much work. Open up a terminal, and run the following command.
$ sudo apt install openssh-server
Now, you’ll be able to access the media PC remotely over SSH or using PuTTY.
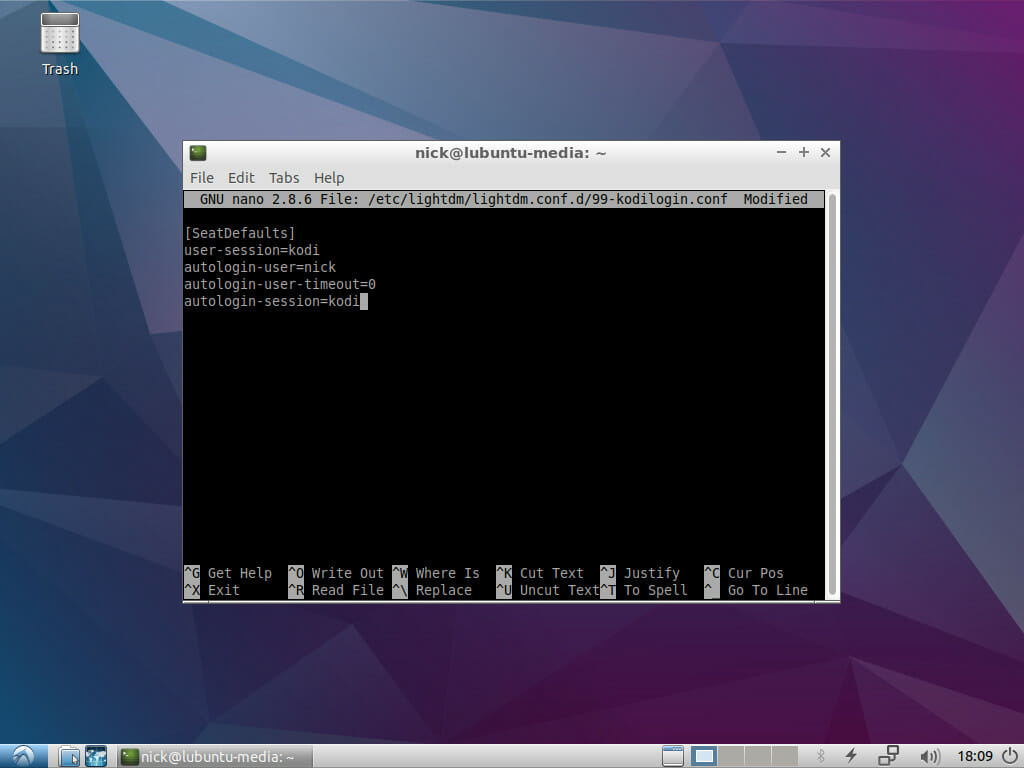
With the terminal still open, create a file at /etc/lightdm/lightdm.conf.d/99-kodiautologin.conf using the sudo command and the text editor of your choice. Set the file up to look like the example below. Use your user name instead of the example.
[SeatDefaults]
user-session=kodi
autologin-user=user
autologin-user-timeout=0
autologin-session=kodi
Save the file and exit when you’re done. The next time you boot up the HTPC, it will immediately open up Kodi.
Closing Thoughts
That’s all there is… well, not really. You can do a lot with this setup. Being a regular Linux system, it’s insanely flexible. If you built the system with an adequate GPU, you can even configure it to switch between Kodi and Steam for living room gaming. Kodi and SuperRepo also open up some other options too. SuperRepo is the gateway to a lot of streaming content, even if some of it falls into a legal gray area.
Because of the concerns and restrictions surrounding streaming content, you can also set up a VPN with this system. It’s ultimately still Ubuntu. Any VPN that works with Linux or OpenVPN will work with it. Getting a VPN is a great idea if you decide to delve into SuperRepo or if you’re outside the US and trying to access localized streaming content.
This is not a system that will restrict you, at all. Do as much or as little with it as you like, and take some serious control of your media.


