


How to Change Your Kindle Fire Lock Screen

Changing the Lock Screen is one of the quickest and easiest ways to personalize your Kindle Fire. Not only that, but you can also tweak the Lock Screen settings to suit your needs. Plus, there’s an option to remove Amazon’s special promotions and ads.
This article features all the tips and tricks to make the Lock Screen of your Kindle Fire more appealing. There are also sections that help make the screen more streamlined, so grab your Fire and let’s start making changes.
Customizing the Lock Screen Background
Eye-catching graphics or a family photo, these can make the Fire’s Lock Screen pop. You can also set the device to automatically go through all the backgrounds every day. This is what you need to do.
Step 1
Access the Kindle Fire Settings and select the Lock Screen option. Choose “Select a Lock Screen scene” under the Lock Screen menu.
Step 2
Once inside the Lock Screen menu, you’ll be presented with an assortment of default screens. Browse through them to find the one you like and tap on an image to see how it would look on the screen. To use one of your images, select Your Photo and choose an image from the gallery.
Step 3
Checkmark an image/scene to confirm your choice or you can hit the “x” icon to ditch the image and look for another one.
Enabling/Disabling Rotate Scene Daily
The Kindle Fire is set to rotate through the scenes by default. But if you’d like to have only one image tap the button next to “Rotate Scene Daily” to toggle off the option. Your Lock Screen will be fixed to the image you’ve selected.
Important Consideration: When you’re running low on battery, Kindle Fire disables movement for Dynamic Perspective Lock Screens. This is an automatic feature to conserve battery that’s restored back to normal once the battery is full.
Setting up a Lock Screen PIN
To keep your apps and data from prying eyes, it’s advisable to set a Lock Screen PIN on your Kindle Fire. Check out the necessary steps below.
Step 1
Go to the Lock Screen menu and choose the “Security & Privacy” option, the following window gives you the option to “Change Passcode”. Tap on that option and set a combination of special characters, letters, and/or numbers. There’s also a PIN option that allows you to choose a four-digit code to unlock the device.
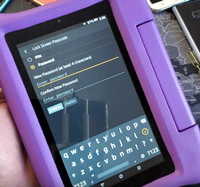
Step 2
Type your password or PIN, re-enter the combination, and select Finish to confirm.
Expert Tip: Choose a password that’s easy for you to remember. But you should avoid the combination that can be easily cracked like your birthday, for example.
Lock Screen Menu Trick
The Lock Screen settings allow you to disable or enable the Lock Screen notifications. You can also choose the time it takes for the device to automatically lock itself. Feel free to keep the auto-lock under thirty seconds to prevent someone from accessing your device when left unattended.
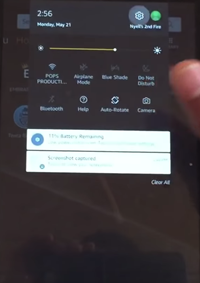
Disabling Lock Screen Notifications
If you want to keep the Fire’s Lock Screen clutter-free, you can turn off Lock Screen notifications. Of course, your notifications will still be available in the quick access menu when you swipe down from the top of the screen.
Step 1
Open the Settings app, swipe down to Apps & Notifications, and select “On the Lock Screen”. By default, this option is set to “Show all notifications content”.

Step 2
Enter the menu and chose the option to disable all Lock Screen notifications. The limitation is that you can’t keep Lock Screen notifications for specific apps, but rather disable/enable all or none.
Removing Ads and Special Promotions
At the start, Amazon ads and promotions couldn’t be removed, but you’re now only a few clicks away from the ads-free Locks Screen. If this is something you need to do from your Amazon account via a browser.
Step 1
Launch a browser and log into your Amazon account, then navigate to the “Manage Your Content and Devices” section. Find your Kindle Fire and select the Actions button for more options.
Step 2
A pop-up window appears and you need to choose Edit next to Subscribed. Another window pops up and you need to choose “Unsubscribe now with 1-Click button” and confirm your choice by clicking on OK.
Notes
There’s a small fee when you disable special promotions and ads on Kindle Fire. You also get a notification that the action has been successful.
The menus’ layout and verbiage might differ depending on the Kindle Fire model you’re using. The same goes for different software versions, but the actions are pretty much the same so you shouldn’t struggle to make the changes.
Get Your Lock Screen on Fire
Whichever way you look at it, changing your Kindle Fire Lock Screen is super easy. The only annoying thing is that you need to pay to remove the ads. But when you think about it, a similar principle applies to other software that features commercials.
What kind of image or screen do you use on the Kindle Fire? Do you keep the Rotate Screen Daily on? Share your thoughts with the rest of the TechJunkie community in the comments section below.

![what is the newest kindle fire [november 2019]](https://www.techjunkie.com/wp-content/uploads/2019/11/what-is-the-newest-kindle-fire-november-2019.jpg)


3 thoughts on “How to Change Your Kindle Fire Lock Screen”