How to Connect Todoist to Google Drive

File sharing is one of the must-have tools for workflow management apps. Since Todoist wants to be an all-encompassing location for files and documents, it has good integration with the best platforms for file storing – Drive and Dropbox.
Discover in this article all you need to know about connecting your Todoist projects to Google Drive to improve your team’s file management.
What Are the Benefits of Using Google Drive with Todoist?
Setting up Drive and connecting it to Todoist will make your work easier for sure.
However, task and project comments are currently enabled only for Premium users’ solo projects and shared projects with free accounts. Members with free accounts can access uploaded project files but can’t upload any files.
How to Upload Files from Google Drive?
With the integration of Drive and Todoist, you’ll be able to save all your files as they’ll be directly connected to Todoist tasks. There’s a comment section for uploading project-related content, adding remarks, ideas, or notes. If you want to upload a file from Drive, here’s how to do it:
- Find a task and tap the comments icon that will appear to its name.
- Tap on the icon, decide what kind of file you need and from where (Drive or Dropbox).
- Browse through files and tap on the file that you want to attach.

How to Add Comments and Files to Tasks?
You can add files and comments to Todoist tasks the same way you can add them to projects. This is what you need to do:
- Click on a task to view comments.
- Type your comment into the comment field on the right side.
- Click on the paperclip icon and attach the file.
- If you’re in a shared project, you can change who you’d like to notify about any comments or changes made.
- Once you’re finished, click “Send.”
How to Add Comments and Files to Projects?
Todoist allows you to attach comments to projects to have all valuable information organized in one place. This option is useful as it keeps everyone on the same page regarding project requirements, progress, and development.
Here’s how to add project comments and files:
- Once you open your project view, you’ll see the comments icon in the top-right corner.
- If you want to see or add comments or upload files, you need to click on the icon.
- Tap “Add comment” and tap the submit arrow to save a new comment.
How to Share Projects?
Shared projects are one of the things that Todoist does well. After sharing your project with collaborators, you can start sending them comments or assigning specific tasks.
Free users are able to work together with up to five people, premium users in teams with no more than 25 members, and business memberships can have as many as 50 members in their team. Regardless of the team size, here’s how sharing works:
- Right-click on the project you want to share.
- Select the “Share project” option from the menu.
- Type the names of the people that you want in the project. If they don’t have a Todoist account, type their emails and they’ll receive project invites.
- Click “Invite” to send all the invitations.
How to Invite People to Shared Projects?
Once you invite someone to participate in your project, you’ll be able to send them comments, share project information, and assign tasks. If you want to share a project with someone, here’s how to do it:
- Click on the project you want to share.
- Click on the person icon in the top right corner of your project.
- Type the name of the person that you want to share the project with. If you’ve never invited this person on a project before, you’ll need to enter their email. If they don’t have a Todoist account, you need to type in their email and they’ll get an invite.
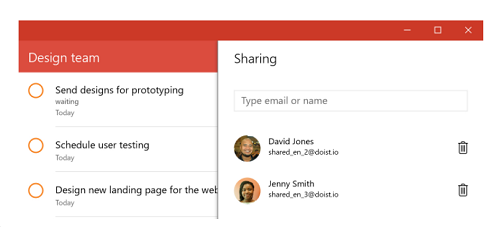
How to Remove People from Shared Projects?
As a project team may change, it’s necessary to review the collaborators list from time to time. Here’s how to reassign collaborators if you’re using Windows:
- Go to your shared project.
- Click on the member icon in your project view.
- Click the trash bin that appears next to the name.
And here’s how to do it if you’re using iOS:
- Right-click on the shared project.
- Select “Share project,” and you’ll see a list of collaborators.
- Bring the cursor over the name that you want to remove and click on the trash bin on the right.

To Share Is to Grow
If you’re looking for an app that’ll let your geek out while organizing projects – Todoist is the one for you. With more than 60 integration partners, it’s easy to work on various projects with the help of tools.
Knowing how to connect Todoist and Google Drive, manage and upload files, you and your team should now have everything in one place.
Have you tried using Drive on Todoist? What other apps would you like to see integrated into Todoist?
Don’t forget to share with the community in the comments section below.