How to Fake Golden Hour on Picsart

There’s an hour of the day that works magic with your photos. Pictures taken just before dusk tend to look way better than those created at any other time. Luckily, in the 21st century, you don’t have to wait all day to take the perfect photo.
Picsart lets you infuse the golden hour effect into just about any picture – whether it’s taken in the morning or at noon, outdoors or in a studio. In this article, we’ll guide you through the process of adding the perfect golden hour glow to your photos.
Use Picsart to Create the Golden Hour Effect
There’s a couple of ways to fake golden hour by inserting stickers and applying filters on Picsart. Let’s start with one that works great on most photos. Here’s what you need to do:
- Upload the photo you’d like to edit.
- Tap on Add Stickers.
- Type “golden hour” into the search box and pick a sticker that’s most appropriate for your photo.
- Adjust the size of the sticker. Stretch it across the photo or just one area.
- Click “Blend” then choose “Multiply”.
- Play with the options to find the perfect one for your image. In our example below, we used “Color Burn”.
- When you’re happy with the new look of your photo, you can download it.
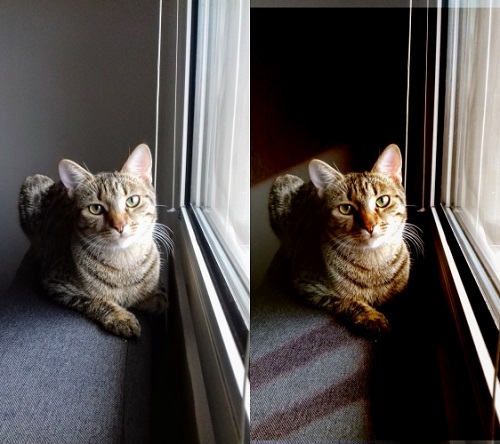
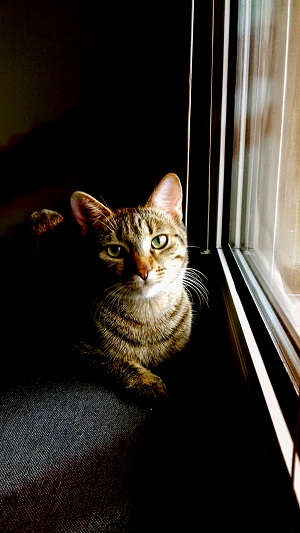
The cat picture on the left was taken in the morning. The image edited with Picsart is on the right.
You can return to editing and click Adjust to add some extra brightness – or reduce it if you’d prefer (that’s what we did here). You can still change the position of the sticker. As a result, you may get something like this:
Use PicsArt Filters to Fake Golden Hour
Stickers are cool but there are more ways to add the warm glow of golden hour to your photos. For instance, you can use filters to combine them with the FX effects. In particular, your Instagram followers will love these types of pics.
If you’d like your photo to look warm and romantic, like in a movie, follow these steps:
- From the navigation bar, go to Effects.
- Look for the FLTRS and select SUN FLTRS.
- Now go to FX and choose Noise FX
- Download your photo or play some more.
For a Polaroid effect, try this:
- From the navigation bar, go to Effects.
- Look for the FLTRS and select SUN FLTRS.
- Now select PLRD FLTR
- Download your photo or continue editing.
If you’ve taken a photo in nature – or the city – on a gloomy day, and now you’d like to add some sunlight to it, here’s what you need to do:
- From the navigation bar, go to Effects.
- Look for the FLTRS and select SUN FLTRS.
- Go to MASKS and choose BOKEH MASKS.
- Choose a mask that fits perfectly.
- Download your photo or keep experimenting.
For a perfect selfie, try this:
- From the navigation bar, go to Effects.
- Look for the FLTRS and select SUN FLTRS.
- Go to MASKS and choose LIGHT MASKS.
- Choose the mask that suits your posture and surroundings.
- Download your photo or continue editing.
What Else You Can Do with Picsart?
Apart from faking golden hour, you can use Picsart stickers, filters, overlays, and other editing tools to make your photos stunning.
If you’d like to create the dispersion effect, do the following:
- Take or upload a photo.
- Under Tools, tap Dispersion.
- Choose the size of the brush.
- Chose the area in your photo that you’d like to experiment with and draw a line or two.
- Click on the arrow.
- Try moving the Stretch button.
- When you’re done, click “Apply”.
To change the background color, try the Colorize filter:
- Take or upload a photo.
- Select the background (only the background; make sure that the main part of the photo is not selected) with the eraser tool.
- Under Effects, choose the Colorize effect.
- Pick the color hue.
- When you’re happy with it, click “Apply”.
If you’d like to try out different stickers:
- Take or upload a photo.
- Go to Stickers and choose one that suits your photo.
- Resize the sticker by dragging the arrows at the corners.
- Adjust the color hue and opacity of the sticker.
- Use the eraser tool to remove any unwanted parts of the sticker.
- Apply and download your photo.
For those who prefer free drawing, follow these steps:
- Take or upload a photo.
- Under Tools, pick the Drawing tool.
- Choose your brush.
- Adjust opacity, hardness, and color hue.
- Draw and enjoy.
To change the background on a portrait, try Cutout:
- Take or upload a photo.
- Click Cutout and select the person icon.
- Use the eraser and brush to redefine shapes.
- Click Save, and the person on the photo will become a new sticker.
- Open a picture that has a background that you like.
- Under My Stickers, find and select the person from the first picture.
- Blend and adjust the details, as shown above.
Make Your Pictures More Attractive
Among so many photo editor apps, Picsart stands out with its numerous effects. Just use a decent camera to take pictures, and let PicsArt do the rest. This app is easy-to-use and it will surprise you with so many different options. Even though it’s not 100% free, you can take a free trial to test out all the effects, filters and more.
Have you ever tried to fake the golden hour effect on a photo? Did you use Picsart? Tell us about it in the comments section below.