


How to Turn Face Recognition On in Google Photos

Face Recognition is one of the coolest features of Google Photos. It allows the software to pick up on faces in your images, tag people, and give you the option to search for photos by the person’s name. However, this feature may not be turned on by default.
Turning on Face Recognition is super simple and you don’t need to be tech-savvy to do it. That said, certain countries may have a very strict privacy policy and the Face Recognition option won’t even appear on Google Photos. Don’t worry. We’ll help you work around this.
Set up Face Recognition upon Installation
When you install the Google Photos app, Face Recognition is one of the first options that pops up. To turn it on right away, tap on Allow. Again, don’t worry. You can always go back later and select Don’t Allow if necessary.
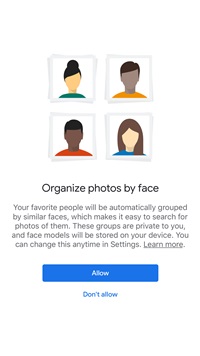
If you choose Allow, the app scans and analyzes your images to create face models, which are then used to generate face groups. In simple terms, it merges clusters of images with the same person/people in them. Plus, you get to create custom names for the people in the images themselves.
Interesting Fact
Google is very good at connecting a very old photo of a person to a brand-new one. Let’s say you upload a black and white photo when your grandpa was thirty and a current image of him today. The software literally connects the dots and puts the two images together.
There is a confirmation window to tell Google Photos it’s correct. From then on, the new and old images remain together. On the other hand, this is one of the things that has been causing controversy in regard to the amount of personal information Google collects.
According to the company, you’re the only person who can access images grouped by the face stored on your smartphone/tablet. But Google Photos does employ advanced face mapping, which is one of the reasons the software figures out the old photo is your grandpa.
Set up Face Recognition after Installation
The great thing is that you can easily turn the option off/on from the app Settings. Launch the Google Photos app, hit the hamburger icon (three horizontal dots in the upper left corner), and tap “Group similar faces.”
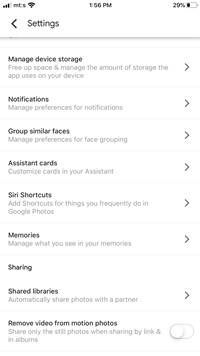
Tap the buttons next to “Face grouping” and “Show pets with people” to toggle the features on/off. That’s right; the app is good at recognizing your canine or feline friend, but Face Recognition also works fine without “Show pets with people.”

Neat Trick: Should you allow Google Photos to sync with your contacts, the app might be able to guess the name of the person in an image. This applies if that person has a Google account featuring a personal photograph.
Things to Consider
If you’re using the browser version of Google Photos, Face Recognition might not be available. Go to Settings (hamburger icon again) and check the list of options. This is usually the case in countries with strict privacy protection laws.
It’s also important to note that the images are categorized by the date taken, not the date uploaded. When you turn off Face Recognition, the software removes all the face models, groups, and labels/names you’ve created.
Troubleshooting Face Recognition
If you’re using the latest version of the Google Photos app in the US, there shouldn’t be any problem with Face Recognition. As indicated, the only reason the option might not be available is your location.
To work around this, choose a VPN service to spoof your IP address, relaunch Google Photos, and enable “Face grouping.” This applies to both the app and the desktop/browser version of Google Photos.
Tweaking Face Group Settings
With the Face Recognition on, you can make changes to the groups and individual images to improve search results and automatic categorization. For example, you can merge different groups by changing their name.
Label two face groups with one name/nickname, confirm your decision in the pop-up window, and you’re good to go. Google Photos also provides suggestions to merge different groups. Then, you just need to hit Yes and the groups are connected.
There is also an option to hide a face group from Google Photos search. Here’s how to do it.
- Tap/click the Search bar in the app and select the arrow next to people’s faces.
- Launch the More menu by tapping/clicking on three vertical dots.
- Select “Hide/Show people” and choose the faces you wish to remove.
- Once you finish, hit Done in the upper right corner.
A similar method allows you to remove a particular item from a group. You just need to select “Remove results” instead of “Hide/Show people” and chose one or more photos/videos to hide.
Note: None of these actions deletes a photo, it just removes/hides it from the groups. You’ll be able to find the removed item in the Google Photos library.
Face off, Face on
Facial recognition software is here to stay, despite the fact that some countries forbid Google from using it. It can really streamline image sharing, especially if you set up Shared Albums on Google Photos.
Do you like using Google Photos? Is there anything about the app that bothers you? Drop us a comment in the section below and share your thoughts with other TechJunkies.


One thought on “How to Turn Face Recognition On in Google Photos”