


How To Fix Play Store Error df-dla-15
Though Android allows you to access, download, and install APKs from outside sources, the majority of Android users rely on Google’s Play Store every day to install new apps and update old ones. It makes sense—the Play Store comes installed on all Android phones outside of China, and Apple’s App Store on the iPhone have trained most users to rely on the included store with their phones for all their app-related needs. But as with any online store interface, the Play Store isn’t perfect. It can run into any number of issues, problems, and errors, often designated by a generic message and a alphanumerical code that doesn’t mean anything to consumers outside of Google’s own development team.
One of the most potentially irritating errors is “df-dla-15,” a code that appears while trying to download or update an app through the Play Store. Google only gives a generic error message for this, stating the app can’t be downloaded, and refers to an error retrieving information from the server. To most people, this might seem like jargon—what server? Why can’t your phone retrieve this information? Rest assured, however, there’s an easy fix for this. Let’s take a look at some solutions.
Clear Google Play’s App Cache
As with most modern operating systems and applications, Android uses a cache system to keep your phone running fast and smooth. Both your device and your installed apps both contain their own cache allotments, which your apps access to keep certain data and storage ready at the go to reduce load times and stuttering. Unfortunately, using cache isn’t without its own problems. We’ve seen a number of problems where cached data can cause problems with apps on Android, and the Google Play Store is no stranger to these faults. No matter your error message—whether it read df-dla-15 or any other error code—the most reliable method for fixing the problem is to head into your settings menu and clear the app’s cache. Let’s take a look.
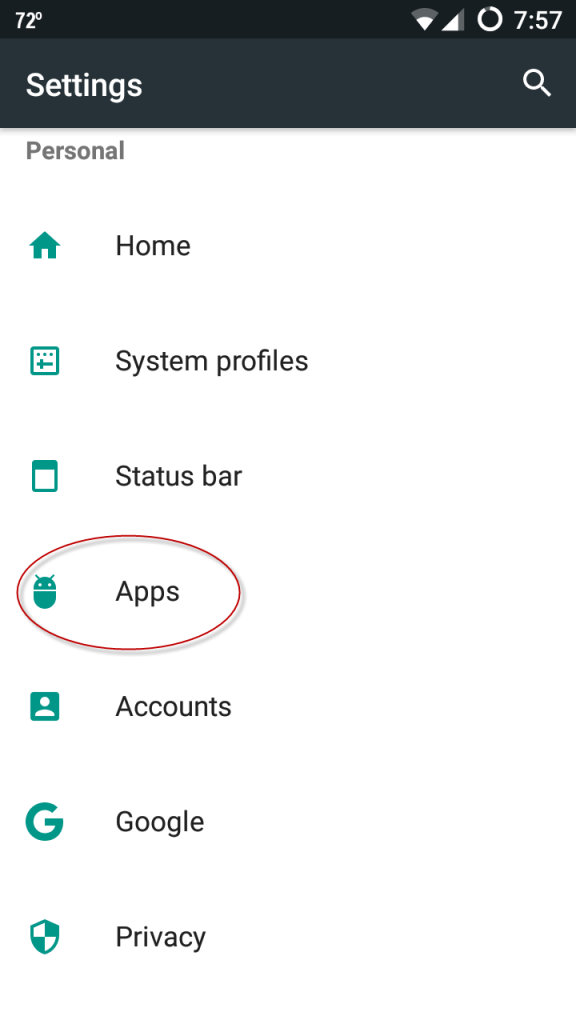
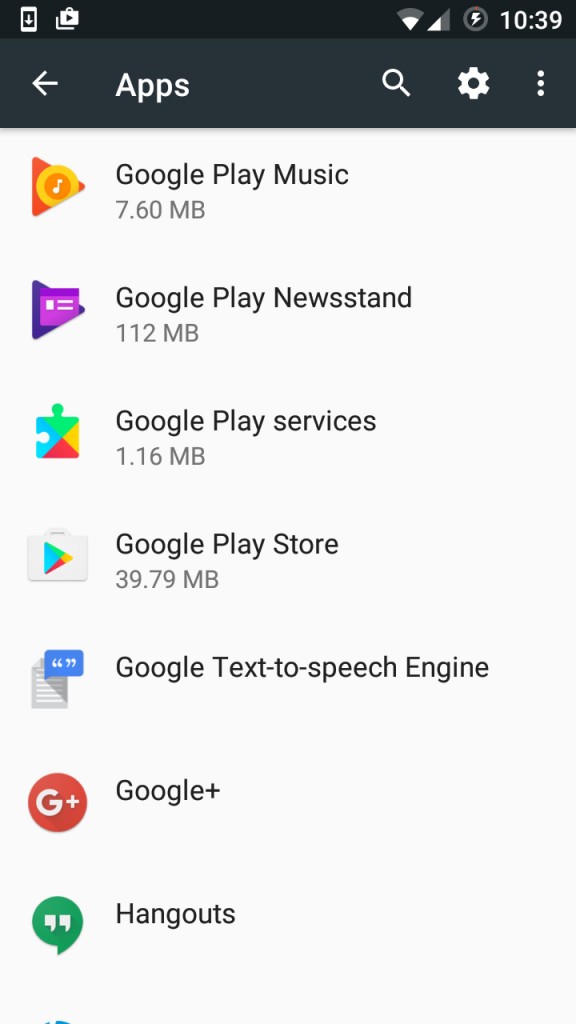
Open up your settings menu on your phone, either by using the icon inside your app drawer or by hitting the shortcut on top of your quick settings. Once you’re inside settings, scroll down until you find the Apps menu inside your preferences. The order and organization of your settings menu will largely matter based on what version of Android you’re using (not to mention what skin your manufacturer has placed on top of Android. Most Android settings menu have Apps under the “Personal” category, though your experience may vary—for example, Samsung’s phones keep the Apps menu under “Phone.” If prompted, tap on the “Application Manager” menu—again, not every Android phone has this. Once you’re looking at your list of installed apps, scroll through the list to find the Google Play Store listing. Tap on the Play Store to view the app’s settings.
Once you’ve opened up the application info for the Play Store, tap on “Storage” within the app’s settings. Older versions of Android may display the Clear Cache button right on this display, but Android 6.0 Marshmallow and above show a basic “Usage Info” display you’ll have to click through to see your storage and cache information.
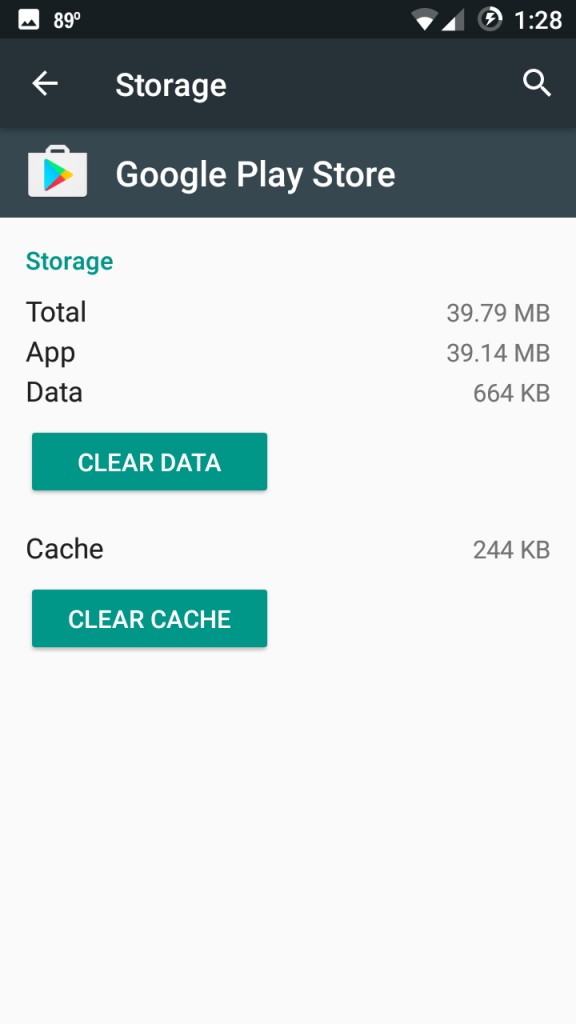
Inside of the Storage menu, you’ll see two separate options: Clear Data and Clear Cache. Clear Data will refresh the entire app, leading you to log back into your account, whereas the Clear Cache option will simply refresh the app’s cached data. Tap on Clear Cache and you’ll see the stored cache data number drop to zero bytes. There’s no prompt or link, because clear an app’s cache isn’t as risky as clearing an app’s data, so don’t worry about losing apps or information this way.
Once you’ve cleared your app’s data, head back into the Play Store and try to download the app or app update that gave you the error message. Because you just cleared the app’s cache, and not its data, you won’t have to log back into Google Play with your email—just use the search or update function to find the app you were trying to install previously. For most users, this should clear the issue immediately. If you’re still receiving the same error code, head back into settings and this time, clear your app’s cache and data. You’ll have to log back into Google Play when the prompt presents itself, but otherwise, you won’t lose any data off your phone. Finally, restart your phone and retest Google Play to see if a new error message appears.
Uninstall Google Play Store Updates
If you’re still having difficulties with Google Play after clearing both the app cache and data, you aren’t out of options yet. It’s possible the device wasn’t caused by an error inside your app’s cached data, but rather a problem with a recent update. If you know the Play Store recently updated on your phone, and you’ve been experiencing that error ever since, you’ll want to uninstall the update to the app from your phone. Unlike other operating systems, Android makes it really easy to roll back problematic updates on your device right inside the settings menu. Let’s take a look.
Start by heading into your settings menu as we described earlier, either by using your app drawer or the shortcut above quick settings. Head back into the same Apps menu we mentioned earlier, and tap on Application Manager if prompted. Once inside the apps menu, find Google Play Store once more and open the application info menu we visited in the previous step. This time, instead of opening the Storage display to clear the app’s cache and data, tap on the triple-dotted menu button in the top-right corner of the display. On most phones, this should only display one option: Uninstall Updates, allowing you to return to the version of the Play Store that initially shipped within your phone’s software.
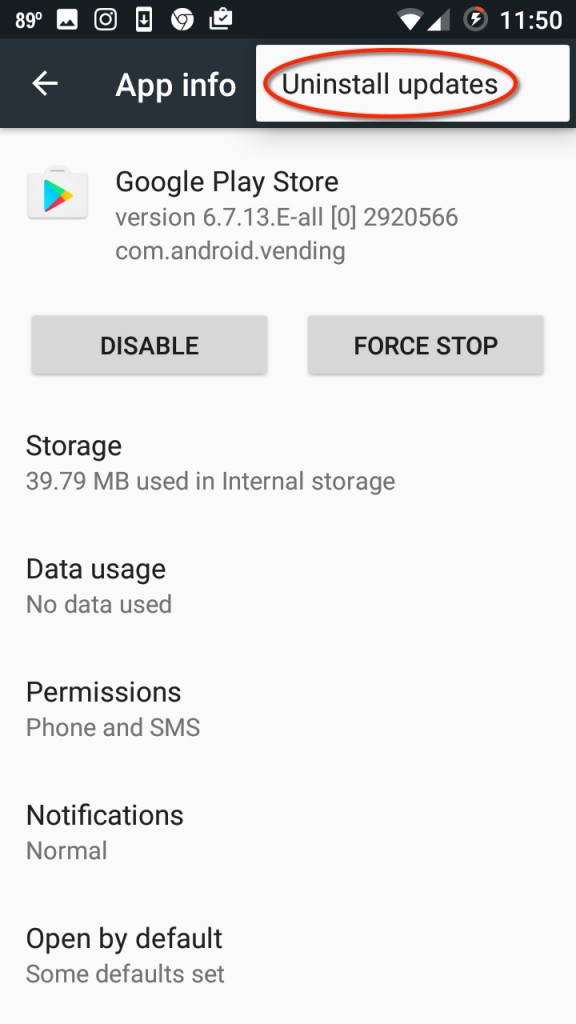
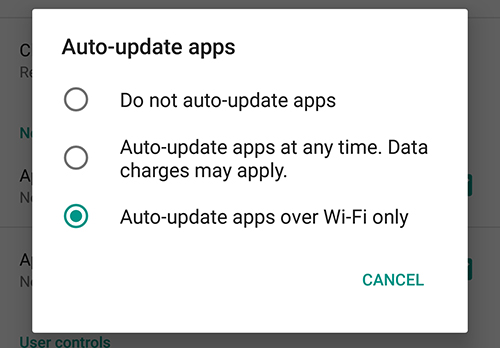
Tap this option and click “Uninstall” on any following prompts that appear on your phone. This will return the Play Store to an earlier state. From here, we recommend restarting your phone, just to ensure you’re opening the Play Store with as much of a blank state as you possibly can. Once your phone has been restarted, open up the Play Store and ignore any prompts to update the app if any appear. Head back to the app you were originally trying to update or install and test the application. If it installs on your device without issue, we recommend keeping your Play Store on the current version until a fix for the app rolls out in a future update. To disable auto-updates for the Play Store, head into the settings menu of Google Play Store and change “Auto-update apps over Wi-Fi only” to “Do not auto-update apps.” Eventually, Google Play may force the Store to update; by then, however, an update for the Play Store itself should’ve already fixed your error message.
Reset Your Google Account
If you’ve tried uninstalling updates to the Play Store and you’re still having difficulty installing or updating apps on your Android device, we still have a few tricks left up our sleeve to try. Whether you’re receiving a df-dla-15 error message, or some other generic error, removing your Google account from your Android device can help restore issues to Google Play. Though not as sure of a fix as what we’ve seen from some of the above steps, resetting your Google account on your device can help fix several different issues both related and unrelated to Google Play, including solving any sync errors that may be causing problems on your device.
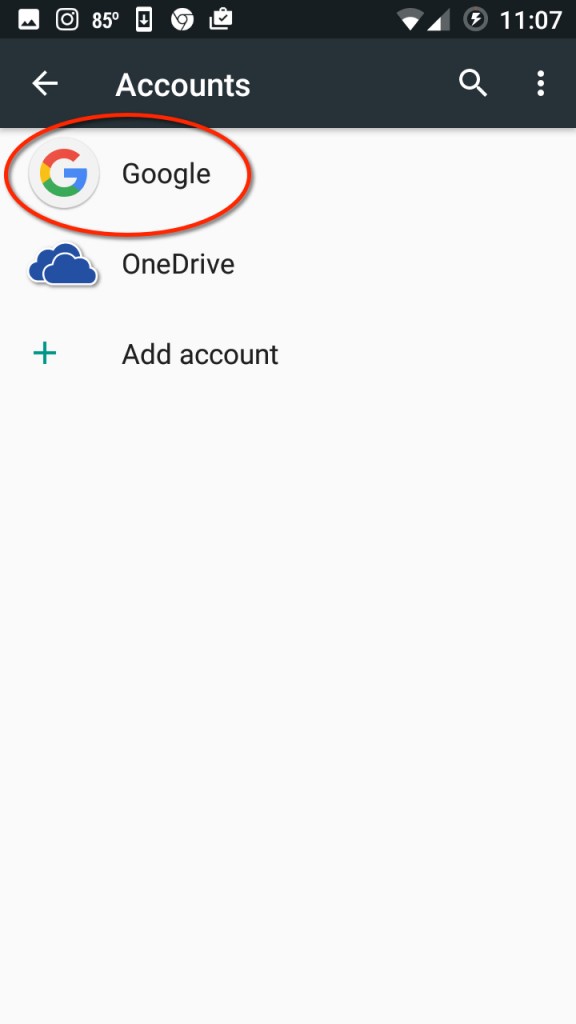
To do it, start by opening the settings menu on your Android device as we described above. This time, instead of tapping on the Apps menu, find the “Accounts” tab underneath the “Personal” category. This will load a list of every account synced with your phone. Depending on how many apps and accounts you’ve loaded on your device, you may find this list to be extensive or short based on your own device usage. In any case, the list is sorted by alphabetical order, so find Google and tap the option. On the next display, you’ll see all Google accounts synced with your device. For most users, you’ll find this to be just a single account, the one you use with your Android device to sync contacts, calendar appointments, and apps. Other users may have secondary accounts for work or school. Either way, tap on the account associated with your Android apps (typically the primary Google account) and tap on that name. This will load a list of everything that your phone syncs to your Google account.
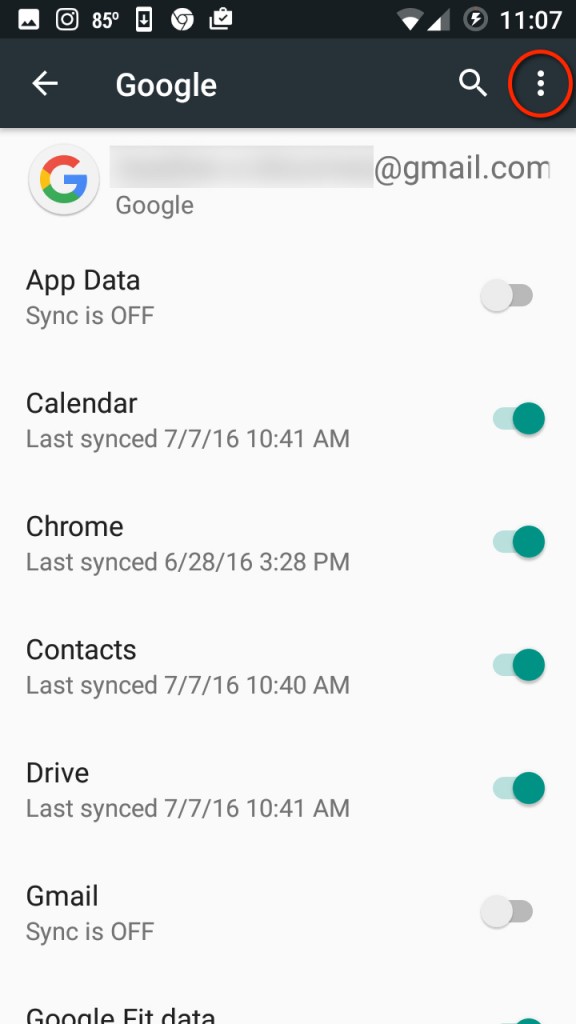
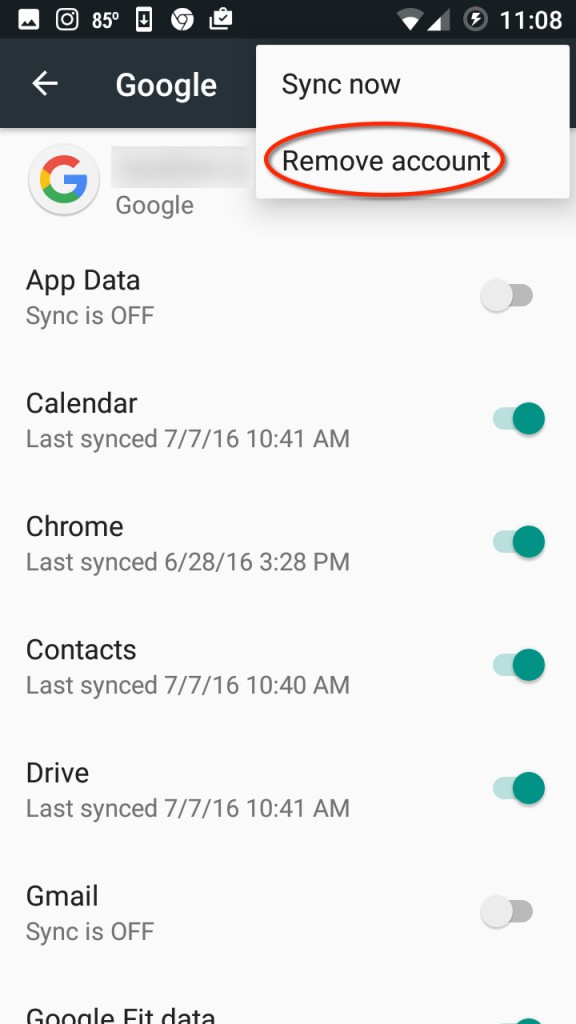
In the upper-right hand corner of the display, tap the triple-dotted menu button to open the menu for your account. Tap on the “Remove Account” option. This will remove the account entirely from your device, leaving you either without a synced Google account or with your alternate accounts only. After this, head into the Apps menu inside your settings, find the app info page for Google Play Store, and force stop the app. Clear your cache and data from the app, and head back to your list of apps. Open the Google Services Framework app info page, and clear its cache and data, then restart your phone or tablet.
When your device finishes rebooting, head back into your settings and open Accounts.” From here, tap the “Add New” button at the bottom of Accounts. This will load a list of accounts you can add; select Google from the list and enter your Google credentials. Following this, open the Play Store and allow the app to update if necessary. After a few minutes, try to download or update the app previously giving you an error message, and check to see if the error message persists. If it does, continue on through this guide to our next troubleshooting tip.
SD Card & Payment Option
If your device has a microSD card slot, some users have reported that unmounting and remounting the SD card in your device helped solve their df-dla-15 error message. This will only work on devices that have an SD card slot, however, so if you’re using a phone like Google’s Pixel or a Samsung Galaxy Note 5, skip to the bottom of this guide to learn about fixing your payment method with Google Play to fix your device’s Play Store error message.
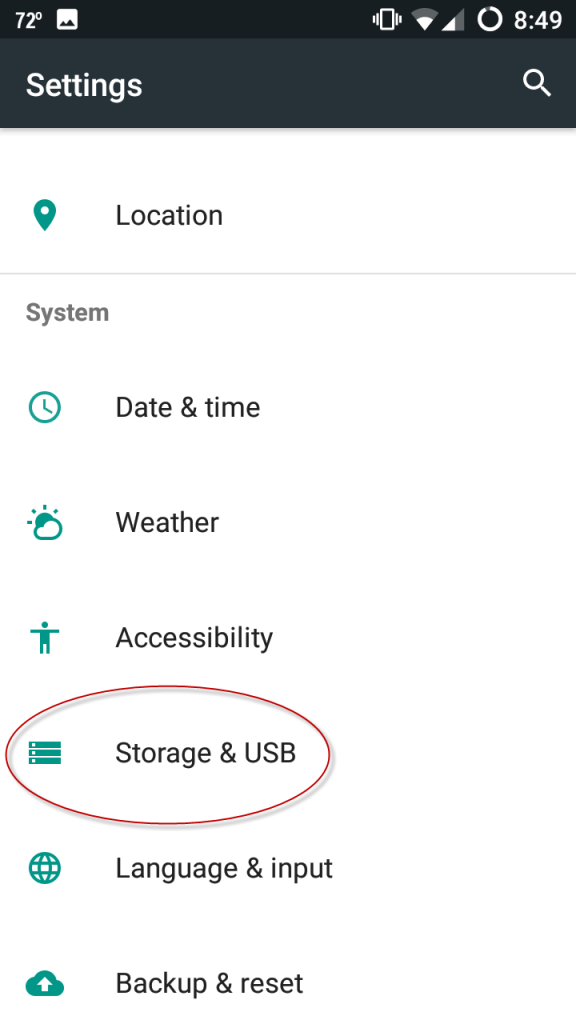
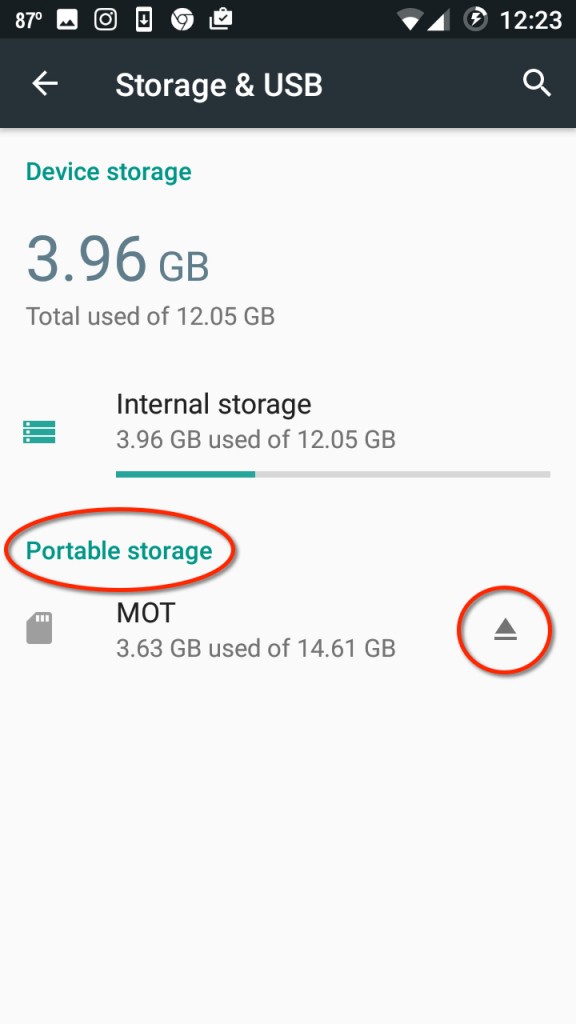
Start by opening your settings menu on your device and finding the “Storage” or “Storage and USB” option inside your menu. On Google’s standard menu, this is found under “System,” whereas on Samsung’s menu system, you’ll find it under “Phone.” Here you can view the storage on your phone, both for your internal storage and the SD card installed inside your device. Under “Portable Storage,” you’ll see your microSD card appear below the menu. Next to the storage display for your SD card is an eject button. Tap this icon to unmount your SD card from your phone, allowing you to safely remove the card from the inside of your device.
After you’ve ejected your SD card, head into your app settings and clear the cache and data for the Google Play Store. Once you’ve finished clearing your device, you can remount your SD card from the same Storage menu above. Just head back into the menu and allow your device to use the SD card again. If your SD card is no longer listed in storage, simply physically remove and reinsert the SD card into your device to reactivate the card.
The other method some users have reported working is to add payment information to the Google Play Store. If you already have a payment method saved inside of the Play Store, removing and readding this information to verify it’s correct may also help “unstick” this error message from your applications. Start by opening the Play Store and tapping on the triple-lined menu button in the top-left corner of the display. Find the “Account” menu button and open it to view your account information inside the Play Store. At the top of that list, you’ll see “Payment methods” listed, along with an option to add a new payment method. Click this option to open your payment methods list, including all debit and credit cards, your Google Play balance, and any PayPal account you’ve linked up to the Google store.

Ignore these options and add a new card to your account. There’s two ways to do this: first, you can tap “Add credit or debit card” at the bottom of your display, which will bring up a prompt for you to enter your new account information. The other option is to select “More payment methods” at the bottom of this screen, which will load your Google account information in your device’s default browser. Simply reenter your debit or credit card info and save it as your default payment method. Typically, this will solve any remaining issues with error messages associated with your account.
Extreme Measures
If you’ve followed the steps detailed above and you’re still having difficulty using the Google Play Store to download or update your apps, you aren’t out of luck. After ensuring that all other outside sources—network connections, etc.—it’s time to begin what we like to call “extreme measures.” These two tips will help solve most technical problems on your phone, and are typically considered last resorts when attempting to troubleshoot an error message on your device. Essentially, we’ll be doing two things: clearing your device’s cache partition, which involves booting your phone into recovery mode, and wiping your phone clean. Clearing your device’s cache doesn’t result in lost data, and is often a good idea if you’re experiencing random slowdowns and error messages on your device. Wiping your phone, of course, requires setting your phone back to its factory default setting, which means you’ll want to save this step as a last resort for your device. Let’s take a look at how to do both procedures.
Clearing Your Cache Partition
First, we’re going to boot into Android’s recovery mode to wipe the cache partition. This is a fairly-technical procedure, so if you’ve never done this, proceed with caution. This isn’t necessarily a dangerous operation, but wiping the cache partition from your phone does require a bit of patience. As mentioned above, clearing your phone’s cache won’t wipe any data or applications from your device like a factory data reset would; rather, the cache partition holds any and all temporary data saved by the applications and system software on your phone. This allows your phone to load application data faster, but it can also can occasionally turn a bit screwy and require a full clear to fix any potential issues with the phone. Think of this like a massive flush of the app cache we were talking about earlier.

Start by powering your phone or tablet completely off. After your device has powered off, you’ll want to use a combination of buttons to boot your device into recovery mode. Unfortunately, there’s no standard setting for what these buttons should be, and some phones use different combinations. Here’s some popular phones and their specific key combinations to boot into recovery mode:
- Nexus and Pixel devices: Press and hold the Power and Volume Down Key until you see an Android icon with its body open. Hit the Volume Down key twice until the red Recovery Mode icon is displayed at the top of your screen, and use your Power key to select that icon. Your display will show a white Android icon with “No Command” written underneath. Now press and hold the Power and Volume Up key for three seconds, then let go of the Volume Up key only. Keep holding the Power key. After a few moments, your device should load into recovery.
- Samsung Devices Prior to the S8 and S8+: This includes devices like the Galaxy S6, S7, and their respective spin-offs, as well as any other Samsung device that retains its physical home key at the bottom of the display. Press and hold the Power, Volume Up, and Home keys together. When the Samsung logo appears on screen, along with “Recovery Booting,” let go of these buttons. A blue scree will display “Installing System Update” for up to thirty seconds, and then alert you the update has failed. Wait a few seconds, and then recovery will load.
- LG G6 and other LG devices: Press and hold the Power and Volume Down key together. When the LG logo appears, let go of the Power key and press it down again, all while continuing to hold down the Volume Down key.
- Other devices: You’ll want to use your search engine of choice to search “[your phone model] boot into recovery,” and then follow the steps listed there. There’s simply too many Android phones for us to list every option on the market.
Once you reach recovery mode (seen in the photo above), use the volume keys to move your selector up and down, move down to “Wipe Cache Partition” on the menu. In the picture above, it’s below the highlighted blue line—don’t select that option unless you want to wipe your entire phone. Once you’ve highlighted “Wipe Cache Partition,” press the Power key to select the option, then use the Volume keys to highlight “Yes” and the Power key once more to confirm. Your phone will begin wiping the cache partition, which will take a few moments. Hold tight while the process continues. Once it’s complete, select “Reboot device now” if it isn’t already selected and press your Power key to confirm. Once your device has rebooted, head back into the Play Store and try to download or update your failed applications. If you’re still experiencing problems with your apps after following through every step listed above, there’s one last step we can use—unfortunately, it requires factory resetting your device.
Factory Resetting Your Device
Yes, as with most problems with modern technology, factory resetting your device is often the final solution to fix software-related errors with your device. Obviously, no one likes to do this, but occasionally, it can be the only solution for your solving error messages with your device. If you’ve tried everything else on this list and you’re still experiencing a server error with your Play Store—and you’ve determined it’s your device, not your internet connection or your router—then you should move forward with resetting your device.
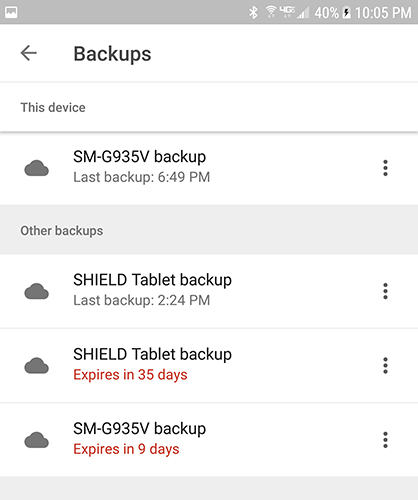
Start by backing up your phone to the cloud service of your choice—whether that be Google Drive, Samsung Cloud, or another third-party service is up to you. You can use other apps, like SMS Backup and Restore or Google Photos, to backup text messages, phone call logs, and photos respectively. Once your phone is backed up (or you’ve moved your important files to an SD card or separate computer), you can begin the factory reset process.

Head into your settings menu and find the “Backup and Reset” menu inside your preferences. Typically, this is found near the bottom of the settings menu, though this may depend on what software your phone is running. Our screenshots here are from a Galaxy S7 edge, but Pixel or Nexus users may see a slightly different display. Open your settings menu and select “Backup and Reset,” which is found under “Personal” in the standard settings menu and under “General management” on the simplified display. Select the third reset option, “Factory data reset.” This will open a menu that shows every account you’ve signed into on your phone, along with a warning that everything on your device will be wiped. Your SD card will not be reset unless you choose to select the “Format SD card” option at the bottom of your menu; whether you want to do so is up to you, but it isn’t necessary for this process. Before selecting “Reset phone” at the bottom of this menu, make sure your phone is either plugged-in or fully charged. A factory reset can use a decent amount of power and can take upwards of half an hour, so you don’t want your phone dying during the process.

Once you’ve ensured your device is charging or charged, hit “Reset phone” and enter your PIN or password for security verification. After you’ve done this, your phone will begin to reset. Let the device sit and complete the process. Once the reset is complete—which, again, can take thirty minutes or more—you’ll be prompted to set your phone up. During this process, you’ll have to reconnect to your WiFi network and resign into your Google account. Once you’ve completed setup, try downloading an app from Google Play (if they aren’t already downloading from a backup). If you still are having difficulties downloading apps to your phone, you may need to contact your carrier or phone manufacturer for further assistance or a replacement device using a warranty claim.
***
Android isn’t a perfect operating system, and though error messages and problems using the device are rare, it can be troublesome when server errors and other issues hit your device. Luckily, there are a ton of fixes for solving problems with Google Play for your device, and the above covers just about everything we’ve heard about to resolve and fix the “df-dla-15” error associated with the Google Play Store. One of these fixes should work for you, should you run into this known—but fixable—error. Good luck. Let us know if something not listed here worked for you instead!


5 thoughts on “How To Fix Play Store Error df-dla-15”
I am done everything but whatsaap not installed .sir please help me