


How To Turn Off Autocorrect on the iPhone
Auto-Correction seems to be one of those iOS features that people either love or they hate. When the feature is clicking on all cylinders and working well, it can save a ton of time when it comes to texting, writing notes or sending emails. Because, as you know, going back and fixing all the simple spelling mistakes and grammatical errors can take some time.
However, the feature doesn’t always work the way we want it to. In fact, Auto-correction being on can sometimes waste more time than it saves. If I had a dollar for every time auto-correction fixed something I didn’t want it to, I’d be rich. Going back to fix them is not only annoying, but often takes a few tries before the auto-correct recognizes what you are trying to say.
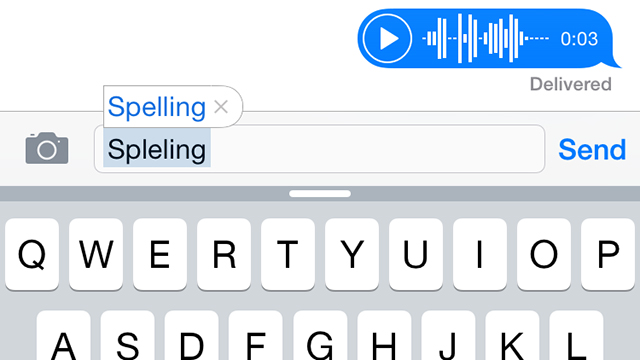
One of the most notorious mistakes I see continuously is the feature confusing “he’ll” and “hell”. A few more are things like “I’ll” and “ill” and “we’ll” and “well”. These are very annoying and can easily be missed when sending a text, which can leave your recipient very confused about what you were trying to say.
If you find yourself fed up with all the mistakes auto-correct is making and the time it is wasting, this article is for you. This article will show you a simple, step-by-step guide to turning off the auto-correct feature on your iPhone. Being as the operating systems are the exact same, you can use this same process on your iPad or any other iOS device you may have. But thankfully, like most features and settings on the iPhone, it can quickly be changed back if you want it.
However, before completely getting rid of auto-correct, there is something else you could do. If you only struggle with a few different words that it always seems to get wrong, you can actually reset the autocorrect dictionary or even “train” your autocorrect. You can train the autocorrect by typing in a word into the Search bar in Safari. Once you type the word out and search it, it seems that it will now be recognized by autocorrect even if it is not a conventional word.
If you still want to follow through and completely disable the autocorrect function, here is the step by step guide to do so in no time at all!
Step 1: Open the Settings App. This is the standard first step when making a change to a feature, so you should be used to this app.
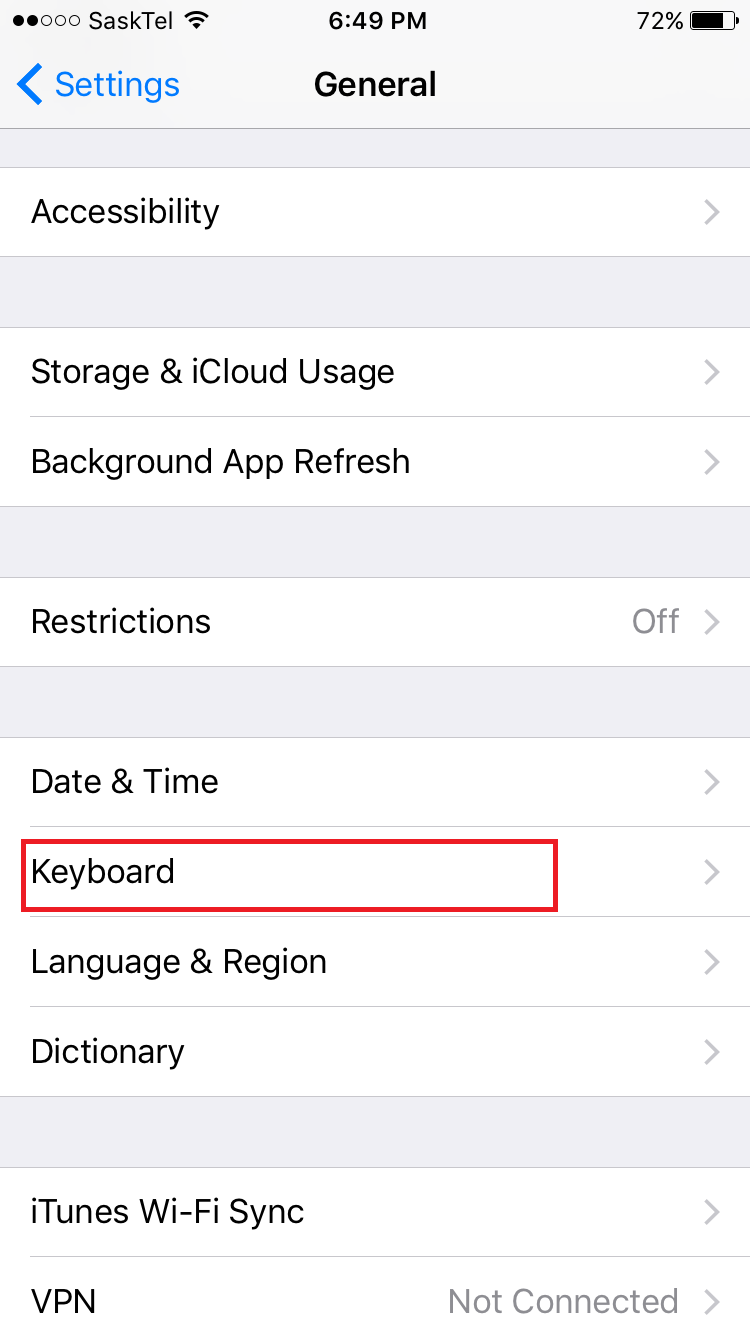
Step 2: In the Settings app, you want to locate the “General” button and then click it.
Step 3: Once you hit that button, you will be provided with a lot of potential buttons to touch. Scroll down until you see “Keyboard” and press it.
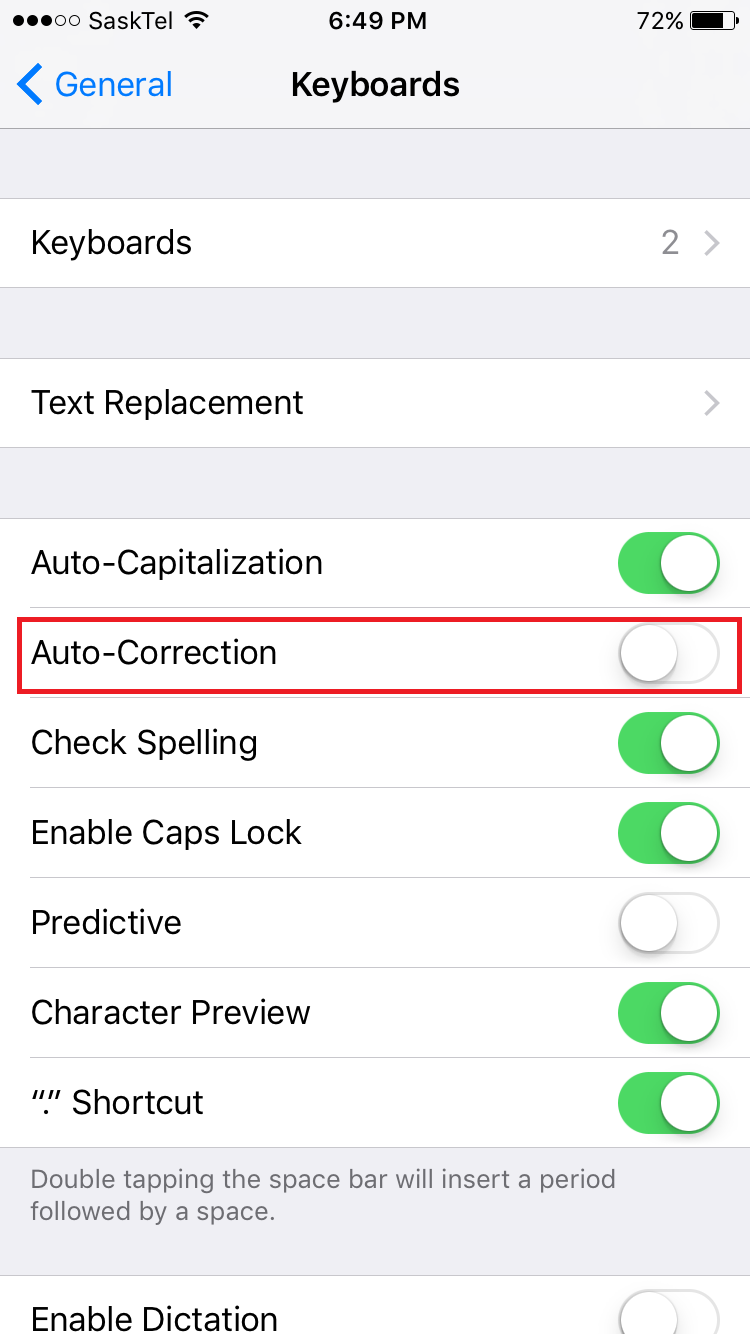
Step 4: Once there, find the “Auto-Correction” button and make sure to switch the toggle to the off position, so it is no longer green.
Step 5: From then on, exit the Settings app as normal and return to your messages. You will now see that Auto-Correction is now disabled, and whatever your fingers hit is the message that gets written in the text box.
One great thing to note here that many people might not know is that you can actually keep spell check on when disabling autocorrect. For many people, this is a happy medium as it will still alert you of potential spelling mistakes but won’t make the fix automatically.
Also, you can see there are a lot of other keyboard adjustments you can make in the “Keyboard” menu. You can do everything from turning auto-capitalization off to even enabling dictation if that is something you are into. The iPhone allows for a fair amount of customization when it comes to messaging.
So there you have it, in a matter of seconds, you can finally be freed from the grips of the auto-correct and can make some other keyboard changes too if you please. But let’s say you experiment without it and realize that you actually really miss autocorrect? Well, thankfully, it can be changed back just as easily as it was disabled, as mentioned earlier in the article.
Personally, I keep autocorrect on as I can type relatively quickly, knowing that it will fix any words that I might have gotten a letter wrong on. However, I can also totally see how some people may prefer to have it off. If you are a very accurate texter on the iPhone, it makes total sense to have it turned off, as it is only likely to cause you problems.
Also, if you use a third party keyboard and not the standard iOS offering, you will have to likely dig through its own settings and disable it. However, the standard iOS keyboard seems good enough for most.
Whether you use autocorrect or not, it is nice that they give you the option to quickly and easily disable it (and re-enable it, if you so choose) in under a minute.


One thought on “How To Turn Off Autocorrect on the iPhone”