


How to Update the BIOS on a Motherboard

If your computer isn’t working correctly, you may require a BIOS update. The Basic Input Output System (BIOS) is a low-level interface between your motherboard, the components plugged into it, and your operating system (OS). Sometimes, a non-updated version can cause issues on your PC.
Regardless of whether you’re looking for the best gaming CPU or trying to figure out what’s causing your system to crash, updating your PC’s basic firmware is a good place to start. Keep on reading to learn how you can update your BIOS.
Identify Your Motherboard
Your motherboard’s make and model are critical. The model name can be found on the board itself in most cases. This is crucial because there are often subtle differences between versions, and each one may have a unique BIOS. Additionally, it would be best to note the revision number as it may use a particular BIOS file to previous revisions.

Check Your Current Bios Version
Finding out which version of BIOS you’re running is a quick process. Here’s how:
- Press “Windows” key + “R” to open the Run command prompt.
- Type “
msinfo32.” - Select “System summary” on the left side.
- Look for BIOS Version/Date on the right in the “System Information” window that appears.
Your motherboard’s BIOS Mode setting can also be found here. UEFI is ideal for more modern PCs.
Download the update
Look for a support link on the motherboard or laptop manufacturer’s website. Once you enter the model number, you should be presented with a list of downloads, including manuals and drivers.
Check the numbers and see if a BIOS update is included. If one is, verify that this new version is more recent than your current one. If so, check if the update addresses your problem.


Earlier BIOS downloads included a flash program that ran from the USB drive when a command was entered at the prompt, but it is now common for modern motherboards to come pre-installed with a utility for updating the BIOS, so you will only need to download the BIOS update and a text file with release notes.
Taking a look at the manufacturer’s website for instructions on how to update your BIOS is a good idea as well. To begin the process, you may need to disable secure boot modes and fast boot modes, but most of the time, all you need to do is extract the zip file and copy them to a USB drive.
Update
It’s a good idea to have a copy of all of your important files before you begin. If you have a backup of your files on a removable drive, you will be able to continue working with them on another computer even if your BIOS update fails. Additionally, you should make a copy of your BIOS. In some cases, the updating process will take care of this for you, but if not, make sure you don’t skip it.
Here are the general steps to update BIOS both in Legacy and UEFI mode:
- Make a copy of the downloaded file on a USB flash drive by unzipping it.
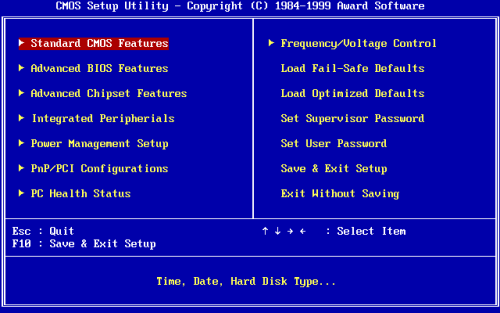
- Restart your computer and go into the BIOS / UEFI menu to get into the system settings.
- Use the on-screen menus to complete the update.
MSI BIOS
Menus are similar to the ones above, but there are some differences. Here’s how to perform an MSI BIOS update:
- Download the latest BIOS version from the MSI website.
- Pressing the “DEL” key repeatedly after restarting your computer will bring you to the BIOS.
- Using M-Flash, select the option to restart the system in Flash mode and click on the “OK” button.
- Choose the USB drive containing the extracted BIOS file.
- Pick the BIOS file.
- Accept the inquiry.
- Restart your computer and re-enter all of your preferences.
GIGABYTE BIOS
If you’re looking for a Gigabyte BIOS update, follow these steps:
- Go to the Gigabyte website and get the corresponding BIOS update for your specific motherboard model.
- When your computer restarts, press the “DEL” key. Also, pressing the “END” key during startup on most Gigabyte boards will take you directly to Q-Flash, Gigabyte’s BIOS flash utility.
- In the BIOS, look for the Q-Flash shortcut and press the ALT key to bring it up.
- Select the option to update the BIOS.
- Your storage drive’s BIOS can be selected from the options.
- Permit the BIOS update by pressing the “Enter” key.
- Allow your PC to complete the update without interfering.
- Make sure you’ve updated your settings.
ASUS BIOS
Motherboards made by different Asus brands have slight differences. However, there is essentially no difference in how things are done. To update the BIOS on a PC with an Asus motherboard, follow these steps:
- Visit the Asus site and download the update.
- After restarting your computer, repeatedly press the “DEL” key.
- Open “advanced mode” by pressing “F7.”
- Go to the “Tools” menu.
- Start Asus EZ Flash 3.
- When a storage device list appears, select the USB stick containing the BIOS file that was extracted from it.
- Choose the BIOS file and confirm that you want to read it.
- Verify that you want to perform a BIOS update.
- Wait for the update to finish. Please wait until you are absolutely certain that the update has been completed before shutting down your computer.
Consider if Your BIOS Needs an Update
Consider whether or not you truly need to update the BIOS on your motherboard, regardless of what standard version of BIOS your device is running.
Your computer may become unusable if the BIOS update goes wrong and may not start up at all if there is a power outage or the computer is turned off while it is updating. It’s a long shot, but it’s not impossible.
It is recommended to check the release notes of the most recent version and previous versions on the manufacturer’s website to see if it includes new features or fixes a problem or vulnerability that you’re currently experiencing. If this is the case, there may be no point in updating.


