How to Make Small Photos Big Enough to Print (Without Losing Quality)
Have you ever printed a photo you loved, only to be disappointed by the result?
It’s a very common problem. Many people are only used to seeing photos on their phones or computer screens and don’t think about the actual size of the file behind them.
So, if a photo looks sharp on screen, it’s easy to assume it will look just as good on paper.
And sometimes that’s true. Especially if it was taken with a modern device on high resolution, or if you’re looking for a small postcard-size print. However, this isn’t always the case.
Maybe the photo was taken with an older phone, saved at a lower quality to use less storage space, or compressed for sending via a messaging app.
Whatever the reason, if the original file is too small for the print size you want, the final result will be blurry or pixelated rather than something you can proudly frame and hang on your wall.
The good news is that fixing this is super easy. In this article, I’ll show you how to upscale a photo in just a few clicks using Photoshop online – no software installation or advanced editing skills required.
And if you want to understand a little more about why photos look low quality when enlarged, plus a few simple settings that can improve your prints, you’ll find that in here as well.
So, let’s get started.
Why Do Small Photos Look Bad When Printed?
A photo that looks perfectly good on your phone or a social media feed may appear blurry or pixelated when you print it.
This is because digital images are made out of small squares called pixels – hence the adjective, pixelated.
When an image is small, it doesn’t have many pixels, but this isn’t a problem on a small screen or even when printing, as long as the print is small enough to keep those pixels packed tightly together.
![]()
However, once you try to print it at a larger size, the same number of pixels needs to cover a larger area, and that’s when the pixels become noticeable, edges become jagged instead of smooth, textures lose detail, etc.
To fix this problem, you can upscale your photos using Photoshop. In other words, you get the software to make up new information so that the bigger image has more pixels instead of simply stretching the ones it already has.
Modern upscaling tools use generative AI to create these new pixels, achieving natural-looking results.
AI analyses the entire scene, considering shapes, textures, lighting, color, etc., unlike traditional methods that only consider the surrounding pixels.
Adobe Photoshop offers various tools to upscale your photos, but the fastest and handiest way to do it is to use Photoshop online. This allows you to work on any computer without installing Photoshop.
In the next section, I’ll show you how easy it is to make small photos big enough to print using Generative Upscale.
Having said this, let me clarify that using Photoshop on your desktop also has Generative Upscale, and it won’t cost you any credits. Also, you have another handy tool called Super Zoom.
So, you may prefer the desktop version of Photoshop if you’re working on your own computer.
How to Make a Small Photo Bigger Using Photoshop Online?
Photoshop is a robust photo-editing software that can seem daunting because of its steep learning curve, even if you’re only looking to do a simple task like upscaling an image.
This is where Photoshop online comes in. This is a lighter, beginner-friendly version of Photoshop that delivers the same high-quality results.
That’s why I consider Photoshop online one of the easiest options if you’re looking to enlarge small images for printing without losing quality.
Since it runs directly in your browser, you can upscale images on any computer without worrying about storage space, system requirements, or other constraints.
Also, Photoshop online is much easier to navigate. So you don’t need to spend time finding the right tool or learning advanced editing techniques.
This is how to upscale images in Photoshop online so you can print them in high quality.
Step 1
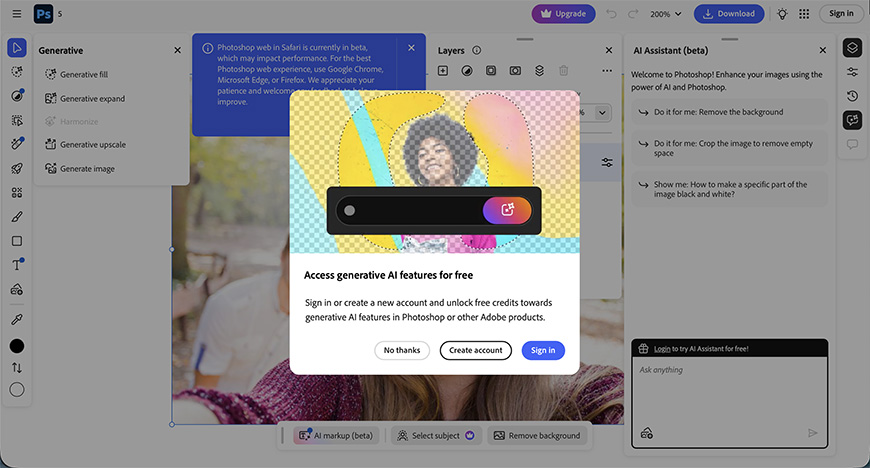
Start by opening Photoshop online and signing in. If you don’t have an account yet, you can create a free one and get complimentary credits to try the AI features.
Step 2
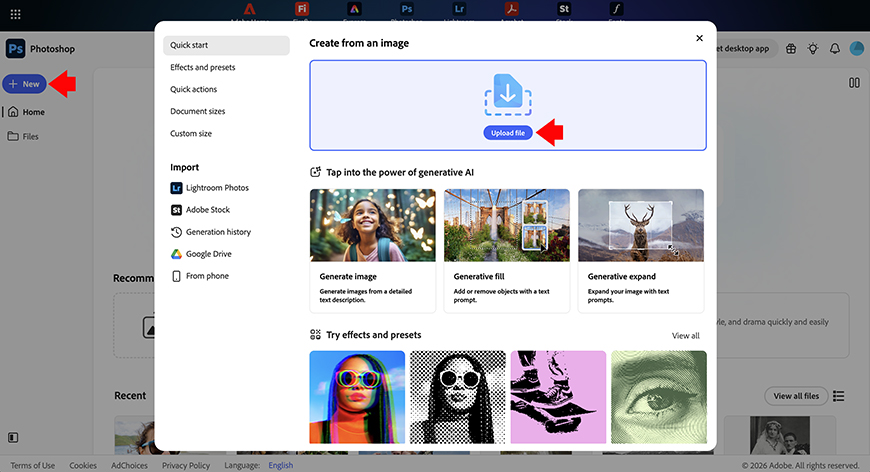
Next, drag and drop your photo into the editor, or use the New button to browse your hard drive and upload your photo. If you choose the latter, you’ll find the New button on the top left – it’s marked with a plus icon.
Once the image loads, you can edit it.
Step 3
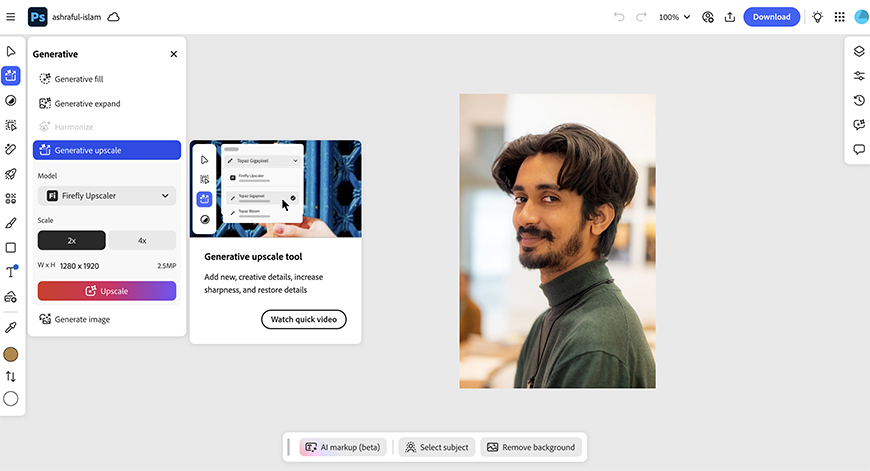
To resize your image, open the Generative tools on the toolbar at the left side of the screen. Locate Generative Upscale and click on it.
Choose between a 2x and a 4x upscale. The right option depends on how much bigger you’ll need your image – try not to upscale more than necessary.
Then, select the AI model you want. By default, it will be set to Firefly, which is developed by Adobe and uses fewer credits.
If you choose partner models, you’ll get more credits deducted from your account. However, you’ll have more features at your disposal, such as Face Recovery or a Creativity slider.
When you hover over the Upscale button, you’ll see how many credits your preferences cost. If you’re OK with it, click the button to start the process.
Step 4
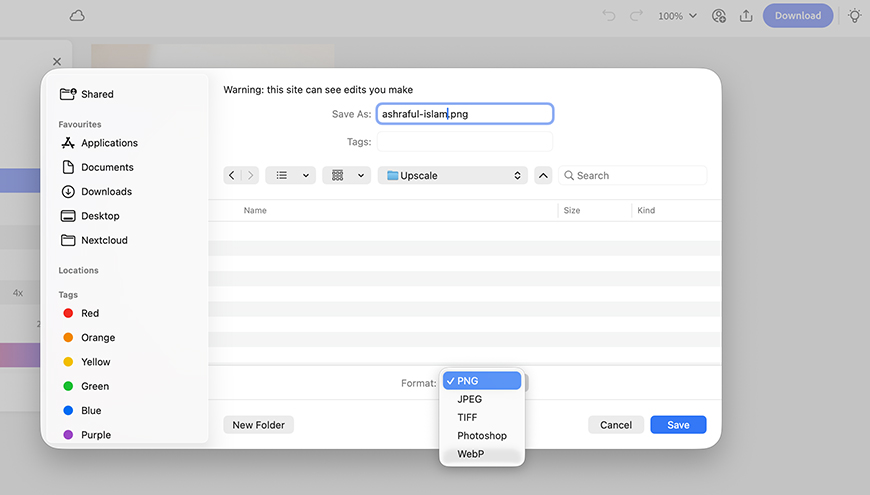
That’s it! Once the image is bigger, you can download it to your phone or computer and send it out to print with your preferred photo service.
You can repeat the process if you need the image to be even larger.
Best Settings for Printing Enlarged Photos
If you’re upscaling your photo to print, a few simple settings can make a huge difference in how clean and sharp it looks on paper. Here are some basic things to keep in mind.
Don’t overdo it
I know that generative AI makes you think that everything is possible. However, every technology has its limitations.
Remember that using Generative Upscale, you’re asking the system to generate information that isn’t there. The more you do it, the more likely your image will look less natural. So, don’t upscale more than it’s necessary.
Consider the aspect ratio
Not all digital photos match the size of standard printing papers. For example, smartphones often take photos in a 9:16 aspect ratio, which doesn’t naturally fit an 8X10 print.
This means you’ll need to decide whether to crop the image to fill the paper or keep the full photo and leave white borders on the sides. It’s always best to choose for yourself and set it up beforehand, rather than letting the printer decide and be disappointed.
Mind the resolution
Resolution is a complex concept that can refer to both how many pixels an image has and how closely they’re spaced.
So, make sure your photo is the right size and has a 300 dpi resolution for a high-quality print. If this isn’t possible, many printing services require at least 150 dpi.
Don’t forget about the file format
To preserve the quality of your photo, save the file as a PNG to avoid compression.
If the printing service you’re using doesn’t support this file format, then save the photo as JPEG, but make sure you keep the highest quality.