


How to Use a Green Screen on Pixlr

Have you ever wanted to pair separate elements in a picture? Maybe something that you wouldn’t see naturally?
You may luck out and happen upon an element casually strolling through Times Square. But the odds of that happening in real life? Not so much.
It doesn’t mean that you need to give up your dream on an incredible photo, though.
You can do it all through the wonders of green screen images on Pixlr.
Pixlr provides free editing software online for all of your photo needs, from sweet to bizarre, you can make it happen with this app.
Using a Green Screen Image
Let’s say that you want that elephant strolling through an urban landscape to become a reality. Here are a few simple steps to make it happen:
Step 1 – Open the Pixlr App
Head on over to the Pixlr website and click on the “Advanced Pixlr E” button to start using a green screen image. Or, go directly to the program at www.pixlr.com/e.
Step 2 – Find Your Background Image and Save It
First, you need to find a background image. You may already have one in mind and have it saved to your computer, or you know the URL for it. If that’s the case, you can move on to the next step.
If you still need to look for a background image, you can do a “Stock Search” on Pixlr E, from the left-hand panel. Use the search bar near the top of the screen to narrow down your image search.
Most of the images are royalty-free from third-party websites, like Unsplash. Once you find one that you like, click on it to open it and then save it to your desktop.

Step 3 – Search for Green Screen Image and Save It
Some websites offer royalty-free green screen images. But the odds are that you’re using one that you already have. If that’s the case, you can move on to Step 4.
If you don’t have an image already, you can find one from a royalty-free third-party website. Or you can make your own.
Step 4 – Putting It All Together
Go to the Main Menu for Pixlr E. Click on “Create New” from the left-hand panel to start putting your images together.
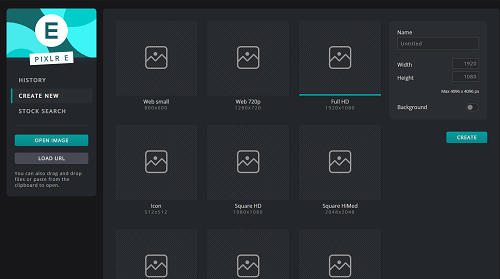
There are a variety of sizes you can work with:
- Web small 800×600
- Web 720p 1280×720
- Full HD 1920×1080
- Icon 512×512
- Square HD 1080×1080
There are even sizes available specifically for social media use:
- Instagram 1080×1080
- Instagram story 1080×1920
- Facebook cover 828×465
Once you select the size, you can name your new project and then click the “Create” button.
The next screen you’ll see is a wall of black and grey pixels. Don’t panic. This is where your photo layers come in.
First, retrieve the background layer. Go to the “Layer” drop-down menu near the top of the screen. Scroll down and click on “Add Image as Layer..” This allows you to choose the background photo from your desktop.
Alternatively, you can also click on “Add URL as Layer..” to enter in the image address.
You should see your background layer in the canvas area.
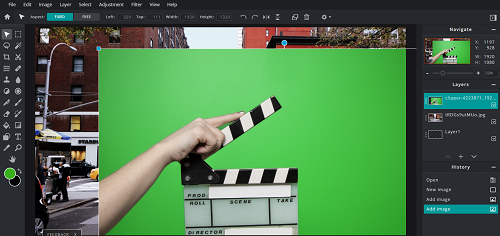
Next, it’s time to retrieve your green screen image.
Go to the “Layer” drop-down menu and select “Add Image as Layer..” or “Add URL as Layer..” to add the green screen image. The new image will overlap the bottom one, but you can drag it to the side to see them both.
Step 5 – Free Transform
If your green screen image is bigger than the canvas, you’re going to need to do an additional step.
Go to the “Edit” drop-down menu and click on “Free Transform.” Hold down the Shift button and drag the corner of the green screen image until you get it to the desired size. You can also move the image around by placing the cursor in the middle of the image and dragging it to the desired location.
Press “Enter” when you’re satisfied with the sizing and placement.
Step 6 – Cutting Out the Green Screen Image
Now it’s time to get rid of that green background.
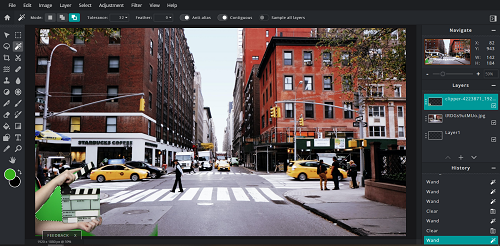
Go to your toolbar on the left-hand side of the screen and click on the Magic Wand icon. It’s the second one from the top on the right-hand side.
Once you have the Magic Wand selected, click on the green area of your image. You should see the Wand highlight all the green in the image. Press the delete key on your keyboard to get rid of the green highlighted areas.
Don’t worry if you have to do this a few times. Some images are more complicated than others and require a little more detailed work to erase the green.
Go to “Select” in the main header and choose “Deselect” when you’re done with the Magic Wand.
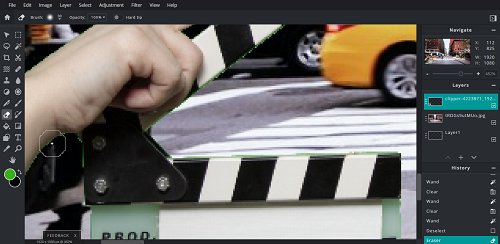
If you still see a green outline around your image, you can clean it up with the Eraser tool. Go to your toolbar and click on the Eraser icon close to the bottom of the list. Select your brush size at the top and zoom in to clean up those fine details.
Step 7 – Save Your Image
When you’re satisfied with your edited photo, go to the drop-down File menu and select “Save.” You have a variety of options in the Save window, such as:
- File name
- File type
- Quality
- Image width
- Image height
Click on the “Download” button and save it to your computer.
One Last Thing…
Editing photos with a green screen image is a simple process, but it takes time to master the finer details. Experiment with different background types and images so that you get to practice with different types of details. And don’t worry if you make a mistake. That’s what the “Undo” button is for!


One thought on “How to Use a Green Screen on Pixlr”