


How To Watch Live TV on Kodi

There’s no doubt in our minds that the age of cord cutting is officially upon us. With the rapid advancement of technology and internet speeds increasing on average around the country, it’s possible to completely dump your cable or satellite provider in exchange for either full internet consumption or a combination of on-demand internet access and using an antenna to watch your local news and general entertainment over the air, for free in HD. Choosing to leave your cable provider has never been as easy as it is right now. For the same price as your cable bill, you can grab Netflix, Hulu, HBO Now, and Amazon Prime to build a network of your favorite movies, original television programs, and other online and exclusive content to stream for free, thus bypassing the need for local access altogether.
Still, there are a few things à la carte television programming can’t replace, and perhaps none of them are more important than live television events. While you can catch up with The Good Place or Grey’s Anatomy on Hulu after it airs the next day, there are annual or even weekly events you can only catch with live television. Whether you’re looking to watch the Superbowl, the Oscars, the Emmys, or just watch your favorite sports team in action as they play each week, you may find yourself missing your cable subscription. But at $60 or more per month, signing back up for the service may prove to be too expensive to justify the content you receive in return. Netflix, Hulu, and Amazon can take care of much of your entertainment, but when it comes to watching shows live, it’s hard to find a solid middle ground. And while antennas are fairly affordable to purchase and provide over-the-air access for free, not everyone lives close enough to a city to receive a strong signal—and that’s to say nothing of weather conditions that can’t stop your service dead in its tracks.
So what is a cord cutter to do when the cost of cable television is too high and the pain of using an antenna is too great? Luckily, one of our favorite media streaming platforms might be able to help. Kodi, for the unfamiliar, is a free, open-source program that allows you to add all sorts of sources and repositories to your device, making it easy to stream your favorite TV shows and movies from both your local network and from around the web. Kodi is an extremely powerful program, so it should be of no surprise that we can also use it to stream live television from a number of providers to your computer, your Chromecast, Amazon Fire Stick, Apple TV, or nearly any other program designed to run programs and apps and stream content from the web. Setting up Kodi to stream television takes a few steps, and you have some options for choosing which provider for live TV you wish to follow. Let’s get started with this guide on Kodi streaming and how to set up your very own live television service.
Kodi: A Starter’s Guide
Chances are you have some familiarity with Kodi if you’ve come looking for a guide on how to setup live television streaming with the service. That said, if you’re unfamiliar with Kodi, you should know it’s one of the internet’s favorite open-source media players. Originally launched over fifteen years ago as XBMC, Kodi functions as both a media center and a home-theater PC client, allowing you to stream and download your favorite content from anywhere around the world. Kodi has a fantastic, responsive interface, a great theming engine complete with tons of options, preferences, and appearance choices, and most importantly for our uses, the ability to install and add applications from multiple outside sources using software repositories.
If you’re still not sure if Kodi is the right platform for you, let’s put it this way: Kodi allows you to access all your favorite content, both through your paid services like Netflix and through other means, on one device. You can access videos, music, podcasts, and more, all directly from the internet. Meanwhile, Kodi also makes it easy to play back media files from your local storage and over your network, making it easy to stream content wirelessly that Amazon may not approve of streaming on their boxes. That said, with mainstream add-ons including options for Netflix, Spotify, and YouTube, you can pretty easily use Kodi to replace the entirety of your streaming box’s own operating system on your platform, instead switching over to streaming content through Kodi.
We also, of course, have to address the elephant in the room: Kodi allows users to stream pirated content and TV streams, and while both Kodi and the writers at TechJunkie don’t support the use of a HTPC platform for illegal content, it’s a feature that millions of people use Kodi for all around the world. While we’ll be discussing multiple ways to stream television with Kodi, there are both legal and illegal ways to do so, and you should use the platform at your own risk, paying for feeds when necessary.
Streaming Live TV with Kodi
When you’re looking to begin streaming live television with Kodi, there’s a few things to keep in mind. First, the legal ramifications of it all. Though there are legal television streams on the web, if you begin to start streaming cable channels or other content typically hidden behind a paywall, you may find yourself in legal hot water. Over-the-air channels are in a bit of a gray area—legally speaking, they are free for anyone to watch, thanks to decade-old agreements with the United States government in exchange for broadcast licenses and access to radio frequency spectrum with which you can broadcast signals over the air. There has been some argument whether or not a streamed version of an OTA channel online falls into a fair, legal use case or into the piracy camp, but regardless, we’ll be primarily focusing on how to stream over-the-air content from providers like NBC, CBS, and ABC. This typically allows you to gain access to big events like the Superbowl or the Oscars, which is typically what cord cutters want most from streaming television online. Here’s how it’s done.
USTVNow Plus
For most users, our main suggestion is to download and install USTV Now, a free and legal online television streaming service designed originally to help military personnel watch streaming content online from the United States when overseas. You don’t have to be in a branch of the military to use the program, however, and with three distinct plans (including a free option for local channels), there are plenty of options for which to choose from to plug into your Kodi service. For the curious, here’s how the program works. USTV Now uses a station service set up in Harrisburg, Pennsylvania, which means you won’t be able to access your own local channels. If you’re looking to access your city’s news, weather, and other region-specific content, you’ll be out of luck—unless, of course, you live in Harrisburg, Pennsylvania. This also means that the sports lineups on their channels will typically favor Pennsylvania-based teams; for example, as we write this guide, the Harrisburg, Pennsylvania CBS affiliate is showing a Steelers game, so anyone based in other parts of the nation looking for their specific teams we’ll have to find other methods (we do happen to have a full guide on watching the NFL with Kodi available here). Other than that limitation, you’ll be streaming your favorite live events and television shows from the service as soon as USTVNow Plus is installed.
Here’s a full list of the channels provided for free with USTVNow:
- ABC
- CBS
- The CW
- Fox
- NBC
- PBS
- MyNetworkTV
With this free plan, you gain access to free HD streaming for 45 days, with your stream reverting to standard definition after that, as well as access to a limited DVR function and access to movie rentals through USTVNow’s own online store. The service also offers two paid tiers at $19 per month and $29 per month, respectively. The first paid plan adds premium channels like Nickelodeon, Comedy Central, Spike, and ESPN for a total number of 28 channels, along with permanent HD streams, while the second plan offers unlimited DVR access. If you don’t mind paying $20 per month for limited cable access and could care less about your local news and programming, USTVNow’s paid plans are a great middle ground between paying $60 per month for cable and not having service at all. You’ll still be missing out on local channels from your area, but if that’s something you’re interested in, using USTVNow is probably not for you.
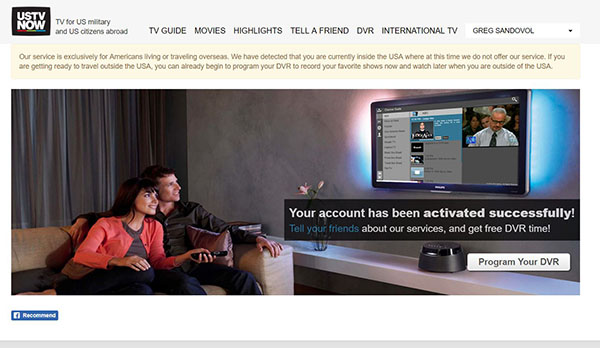
To install USTVNow with Kodi, you’ll first need to head over to their website to create an account. Select your plan from the three described above, and then enter your email into the signup field. You can also choose to login with either Facebook or Google. Enter your password, name, and location, and hit continue. Head over to your email, click on the link entered in your email that informs you to verify your address, and your account will now be active. USTVNow will give you a notice that their service is designed for users outside of the United States to watch US-based television, specifically users within the US who happen to be on active duty or travelling abroad. Though their website will inform you that, as a US-based viewer, you won’t be able to use their site, Kodi will let us bypass this.
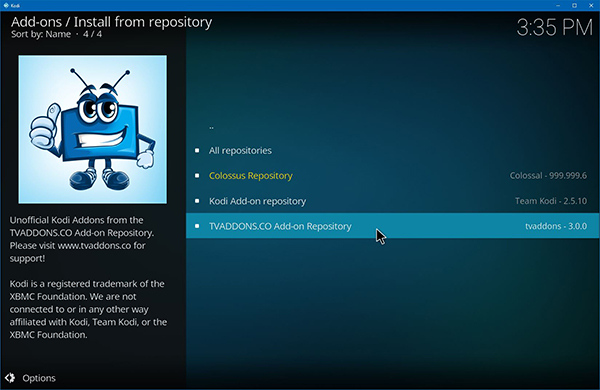
The next thing we need to do is open up Kodi on your laptop, desktop, phone, or set-top box. For most devices, installing Kodi is as easy as using an executable file on your computer, though if you’re looking to install Kodi on your Amazon Fire TV or your Apple TV, we have guides you can view here and here, respectively. Once you’ve finished setting up Kodi on your device, we’ll need to install a new app repository on your device in order to gain access to USTVNow. If you already have several repos installed, check your video add-ons folder; you’d be surprised how many repos we’ve found USTVNow in. We’ll be using the Fusion repo, a fairly popular repository that was shut down earlier in 2017 thanks to piracy concerns. It has since reopened, along with its supported site TVAddons, and now offers fairly standard, legal add-ons for the platform that you can use without getting yourself into trouble. Though Fusion had—and still has—a bad name, we think it’s the best add-on for the job here.
Installing Fusion Repo
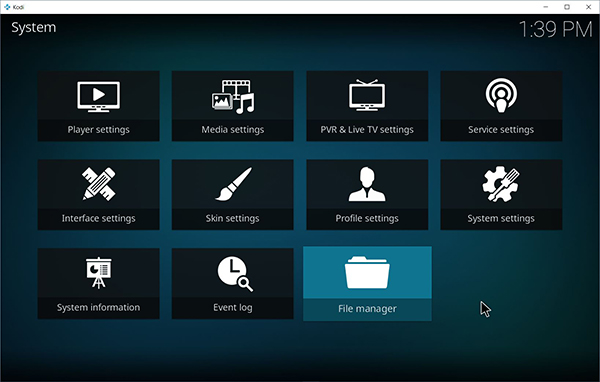
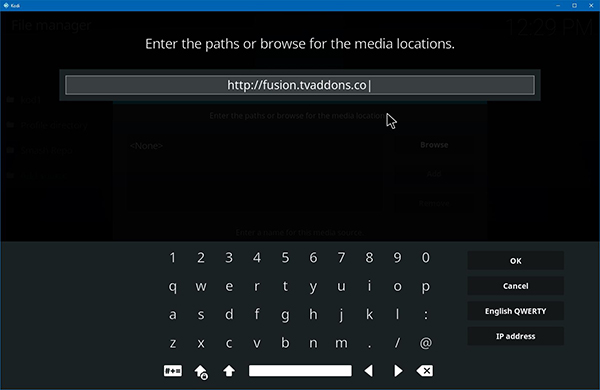
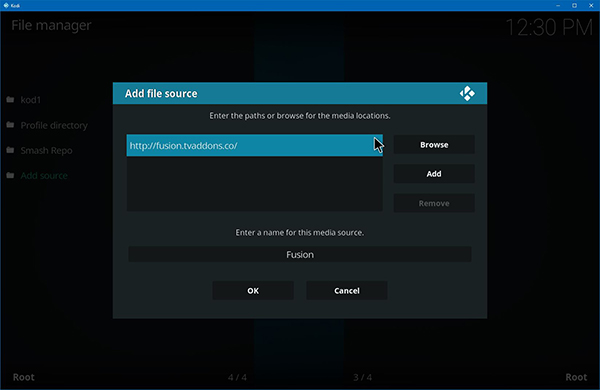
After opening Kodi, use your mouse, controller, or remote to arrow over to the left side of the menu and select the settings cog icon from the corner of your display. This will open up a list of your settings inside your Kodi browser; select “File Browser” on the bottom of the list. When you open this menu, you’ll see a few distinct settings to select from, including “Add source,” allowing you to add a new URL source for Kodi to browse through on your device and granting access to a brand new repository. This is how we’re going to add the Fusion repository, but you’ll need the correct URL to do so. There are several URLs for Fusion available online, and it can initially be difficult to know which one you should select. Fusion has been shut down a few times, leading to a dead URL for users looking to add the program to Kodi. As of November 2017, the correct URL is: “http://fusion.tvaddons.co”
Once you’ve added the URL to Kodi, hit “OK” and move your cursor down to the bottom input box to rename the URL to something you can easily recognize. By default, the Fusion Repo leaves this spot blank, so fill it in with whatever label you want to add to the program (“Fusion” works well) and hit the OK button again. Once you’ve added the repo URL, you can back out from your file browser to the main menu of Kodi by selecting or clicking on the top-left corner menu names to exit the display open on your screen.
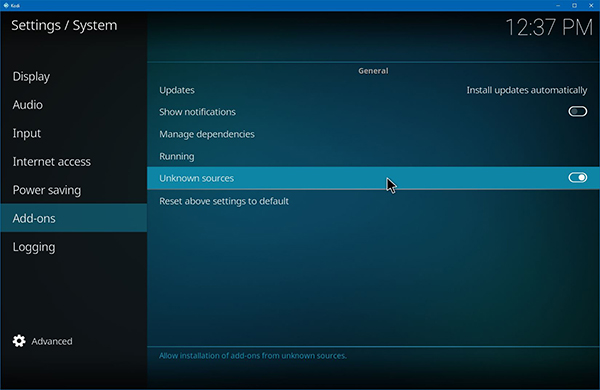
What you’ll need to do next really depend s on whether or not you’ve installed repositories from zip files before. If you have, you’ve probably already adjusted your Kodi settings to allow for installing content from “unknown sources,” you’ll be all set to continue onto the next step. If not, dive into the Settings menu using the settings cog we pointed out earlier and select “System Settings.” Using your mouse or remote, select “Add-ons” from the side menu and move your cursor to the toggle that reads “Unknown sources.” This will allow you to install content from sources like TVAddons and Fusion. Confirm the prompt that appears on your display, and tap on the menu icon in the top-left corner to return back to the main menu.
Now, from here, we’ll need to head to the Add-ons menu on your display. You can find this on the left banner side of your screen, in between Radio and Pictures on the menu. Add-ons is where you can head to install or uninstall specific add-ons and repos from your menu, and it’s here that we’ll be able to install a second repo, Smash, onto your device. Enter the add-on browser by clicking the box icon or selecting “Add-on browser” in the middle of the page if you don’t have any add-ons yet. Here you’ll find five different options for the add-on browser. Four from the top, you’ll see “Install from zip file.” Select that option to install Fusion from the URL you added in the earlier step. Look for the name you gave Fusion earlier from this list and select it from this list.
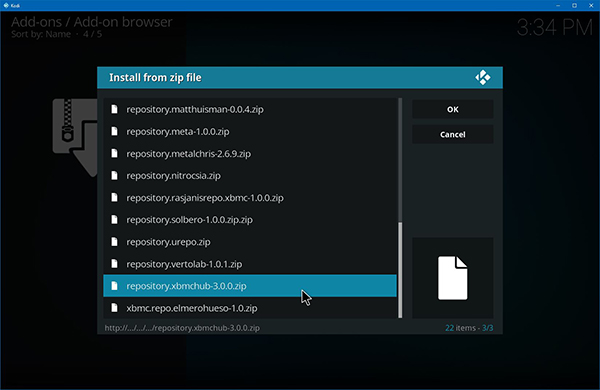
At this point, you’re all set. Fusion has been added to your list of add-ons and you can use it to install any of the repositories supplied by TVAddons, along with the Indigo plugin that makes it easy to customize and install addons to your device. Fusion comes with three basic folders to install from: Begin Here, Kodi Repos, and Kodi Scripts. Start with “Begin Here” and install Indigo onto your platform. Then, move down to the Kodi Repos section, select “English,” and find “repository.xbmchub-3.0.0.zip” to install the main Fusion repository. After you’ve installed this, you can back out of the “Install from zip file” menu and click on “Install from repository.” Here you’ll find the entire listing of the XBMC Hub content that we added in the last step, but you can also find more repositories in the “Zip file” menu we used to install the Fusion hub just moments ago. All of these repositories are free and available for download, offering tons of content to watch.
Installing USTVNow
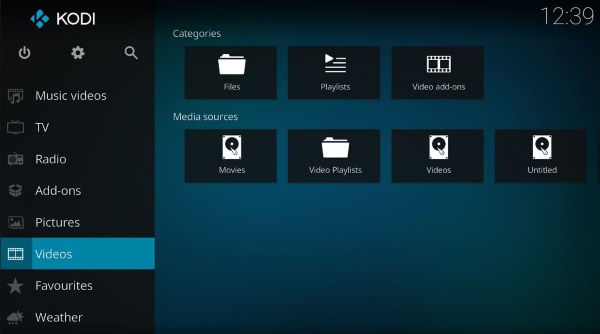
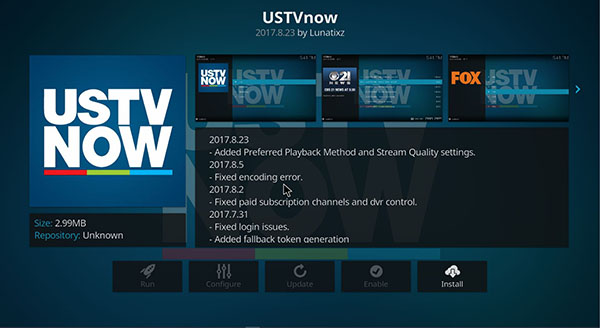
Once you’ve installed the Fusion repo onto your device, you’re ready to finally grab USTVNow from your add-on browser. Start by heading back to the main menu within Kodi. Using your cursor, arrow keys, or remote, select the Add-on menu from the list along the left-side of the screen, then select the Add-on browser by clicking on the open-box icon in the upper-left corner of the screen. This will give you several options to choose from in the menu, including the abilities to install options from your repositories. Select this option, then scroll to the bottom of this menu and select the video add-ons. The length of this list will depend on how many repositories you’ve installed with Kodi. Scroll to the bottom of this list to find the option for “USTVNow;” since the list is in alphabetical order, you can find this option at the bottom of the screen. Click on the app and use your cursor or remote to select the install option. USTVNow will be downloaded to your PC, console, or set-top box, and you’ll be able to open the app. You can also now find the app in the Video category on your main display, and within the Add-on category.
Using USTVNow in Kodi
Once you’ve opened USTVNow on your computer, you’ll want to have your login information created above handy in order to enter into the prompts provided by Kodi. USTVNow will begin by asking whether you’re using an Apple TV; check yes or no on the option that corresponds with you. You’ll then need to enter your email and password information in order to properly join the website. Though you can bypass this login information, you’ll need to enter it in order to properly access the live television networks playing on your account. If you accidentally click passed the prompts to login, you can find the login prompt available in the configuration menu in your settings option for USTVNow, accessible by heading into the Add-ons section of Kodi and right-clicking on the USTVNow icon. You can also change the quality settings for your stream here; it’s worth noting that your streaming settings drop to low automatically after 45 days. By default, they’re set to “Medium.”
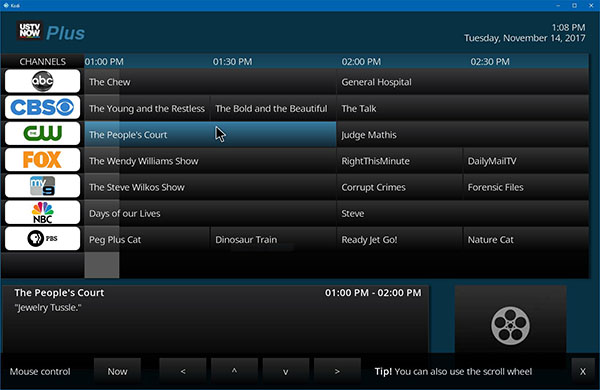
Once you’re inside USTVNow, it’s pretty easy to use. We mentioned above that the service informs its users upon signing up of the requirement for you to be outside the United States to stream content, but this isn’t true when using the app in Kodi. Without the use of a VPN or any other IP masking tool, we were able to stream all seven channels without any form of limitations. All seven channels can be found under the Live folder, complete with the option to see what’s playing on the channel at any given time. When you select a channel, that stream will begin to play on your Kodi software. You can pause the stream as you wish, and skip ahead to the live stream when you’ve unpaused the video feed, though obviously you can’t skip past the live point in the feed. We didn’t notice too much of a difference in the feed between the actual time and the time of broadcast with the feed, though your mileage may vary on this. Some channels also seem to stream better than others; for example, CBS seemed to have some issues with artifacts and skipping, but we had no issues streaming ABC. To stop the stream and return to the standard video menu, press the Stop button in the playing interface.

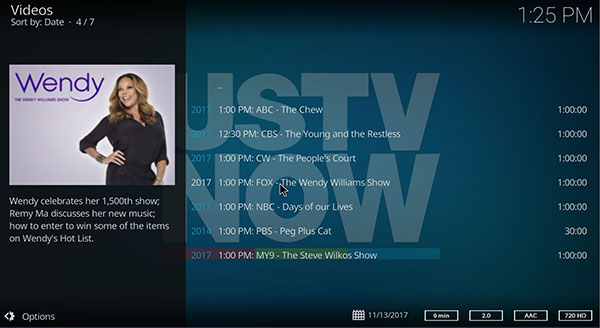
The TV Guide folder is second down from the list, and gives you a full interface for displaying what’s showing live on every network at any given time, along with a progress bar for each program. You can roll over programs to see more information, and can also set up recording functions, though remember that free users have limited DVR capabilities (we weren’t able to test the DVR and USTVNow’s own website doesn’t dive deep into what this means). The Movies folder might be exciting for some users, though they are pay-to-rent movies, similar to an On-Demand service you would expect to see from typical cable services. Finally, the DVR menu allows you to see your recordings, and the Settings menu allows users to change the quality and recording settings of your streams. Overall, it’s a pretty easy service to learn how to use, without too many limitations, though of course, your quality will automatically drop to low after 45 days if you aren’t willing to upgrade to the $20 per month plan. We didn’t have any issues streaming within the United States, though your mileage may vary depending on your internet connection and service provider. As with most of Kodi’s functionality, we suggest using a VPN if you’re nervous about your ISP tracking your usage.
Other Live TV Streaming Options
USTVNow is, by par, the best option in the streaming game right now, but that doesn’t mean it’s the only option. Though we suggest users looking for the bare minimal stream options with their online streams stick to USTVNow thanks to its ease of setup, relative legality, and free tier, there are some other ways to stream live television with Kodi. Some of the options below have some questionable legality; TechJunkie doesn’t condone using these streaming methods as a way to pirate content online. It’s also worth noting that some of these options don’t fully function with Kodi just yet, as most of them come from services with pre-established options on Kodi that have yet to be upgraded. Your mileage may vary.
- Hulu with Live TV: Not the cheapest option on the market at $39.95 per month, but it does include most of your market’s local channels, premium channels like SyFy and Cartoon Network, and nearly every live sports option you could ask for. You can even upgrade your cloud DVR to allow you to record up to 200 shows into the cloud, including content not typically uploaded to Hulu the next day, though that is considered an add-on and not a stock option. Oh, and you get Hulu access, too.
- Playstation Vue: Sony’s own streaming television service falls under the Playstation name, and it’s fairly similar to what we’ve seen from Hulu’s offering. Starting at $39.99 per month, Vue offers viewers local channels based on their area, as well as premium channels with several tiers available to choose from. Vue can get expensive pretty fast though, with full plans ranging up to $75 per month. If you’re looking for a wide variety of channels and shows, however, Vue is top-notch. You won’t need a Playstation to use it, either.
- YouTube TV: Another IP-based streaming television service, early reviews of YouTube TV have been positive following its launch earlier this year. At a flat rate of $35 per month, YouTube TV covers your local and national channels, allowing you to record and stream on up to six devices at once, with access to 40 or more channels depending on your area. The bad news? YouTube TV isn’t available in every market, and you may have to wait a while for its expansion.
- cCloud TV: A favorite of Reddit’s cCloud TV is a collection of IP-enabled television stations from around the globe. Adding cCloud to your Kodi player depends on the current working option, but there are also apps for Android, iOS, and Chrome that make it easy to stream user-uploaded channels wherever you are. cCloud is fairly grey in terms of its legality, but if you don’t care about that, it might be a great option.
- Vader Stream: Another favorite we found when looking through Reddit replies for live TV streams within Kodi, Vader Stream basically combines USTVNow and cCloud TV into one package. It isn’t free, though their website claims that most users only pay about $10 per month. Vader Stream’s own channel list includes dozens of listings from both the US and abroad, including CBS, ABC, NBC, Comedy Central, Bravo, and more. You can find the whole list here.
***
In the end, streaming live television through Kodi isn’t the cheapest thing to do in the world, but with USTVNow as an option, you can actually get some basic channels for free, albeit at a reduced visual quality than what you may expect from other paid cable and satellite services. If USTVNow isn’t your thing, or you try it out but can’t manage to get it working with Kodi, IP-based television services are finally becoming a reality that you can purchase today. With selections like Hulu TV, YouTube TV, and Playstation Vue, no one is hurting for options when it comes to streaming live television online, and Kodi plugins like Vader Stream and cCloud TV, though questionably legal, do offer cheaper alternatives than we’ve seen with bigger names, and come with strong recommendations from the Kodi Reddit community. Overall, whether you choose to use USTVNow, a free, somewhat-limited option that places you in fairly clear legal waters, a bigger-name, more expensive service like Hulu or YouTube, or cCloud or Vader Stream, the good news is that you’ll finally be able to stream your favorite live events right to your computer, smartphone, or set-top box.


