


7 Tips for Keeping Control of Remote Desktop Users Permissions
Remote Desktop is arguably the most straightforward way to log onto a PC you can’t access physically. But this also makes those devices a target for hackers or people who want to abuse being given permission to log into a device they shouldn’t. When using Windows Group Policy settings for enterprise systems, it’s the Remote Desktop Users group decides who gets in, but that only works so long someone actively maintains it, and there’s one other catch. Here is how to keep remote desktop users permissions in check without making life difficult for the people who legitimately need access.
Tip 1 – Know Which Accounts Already Have Remote Desktop Users Permissions
Apart from members of the Remote Desktop Users group, accounts with administrator rights get a free “pass” into the system. They don’t need to be listed in the group and likely won’t, so you need to check those accounts.
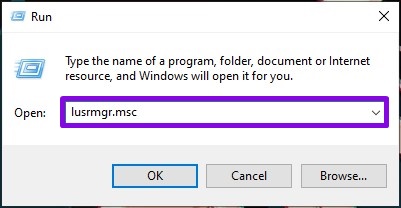
Step 1. Hit “Win + R,” type in “lusrmgr.msc,” and hit “Enter.”
Step 2. Expand “Groups” and double-click “Remote Desktop Users” to see the current list of members.
Step 3. Go to the “Administrators” group in the same screen and cross-reference the members against the Remote Desktop Users group.
Step 4. If you need to do this on multiple machines, you can use the command “Get-LocalGroupMember -Group ‘Remote Desktop Users’” in an amdin-enabled PowerShell window.
Tip 2 – Add a Group for Remote Control Users Instead of Individual Accounts
Adding people one at a time to a Remote Desktop Users group can be slow and might mean you unintentionally omit someone. You can instead add a domain or an entire security group tied to a job role, then add accounts to the group from there.
Step 1. Open the Terminal window as an administrator (available by right-clicking on “Start”).
Step 2. Run “Add-LocalGroupMember -Group ‘Remote Desktop Users’ -Member ‘DOMAIN\Helpdesk-Tier1’” using your own group name.
Step 3. To remove access, use “Remove-LocalGroupMember” with the same parameters.
The Command Prompt equivalents for these commands are “net localgroup “Remote Desktop Users” username /add” for adding and using “/delete” for removing access.
Tip 3 – Review the Membership on a Schedule
For each account on lists you use, confirm the person using or assigned to that account is still employed at the role referenced in the Group Policy view. Remove anyone who has changed teams or left the company, and flag shared or service accounts, contractor accounts, and any entry no one can explain for independent review.
Tip 4 – Use the Deny Right When You Need a Hard Block
Removing someone from the Remote Desktop Users group won’t do anything if they are also a local administrator. You will need to block their access fully.
Step 1. Hit “Win + R” to go to the Run utility, then type in “secpol.msc” and hit “Enter.”
Step 2. Go to “Local Policies,” then to “User Rights Assignment.”
Step 3. Go to the “Allow log on through Remote Desktop Services” section to see exactly which accounts and groups access remote desktops.
Step 4. In the “Deny log on through Remote Desktop Services” category, add the accounts that shouldn’t connect remotely.
This is also where you should look when a user gets an “Access Denied” message while being in the group.
Tip 5 – Manage Group Membership With Intune
Intune allows you much broader access and control, which can be great if you have dozens of devices to manage and monitor.
Step 1. In the Intune admin center, go to “Endpoint security,” then “Account protection,” and click “Create Policy.”
Step 2. Choose “Windows” as the platform and “Local user group membership” as the profile type, then click “Create.”
Step 3. Name the policy. For configuration settings, select “Remote Desktop Users” as the local group.
Step 4. Add the users or groups, set any scope tags, and assign the policy to the correct device group.
The policy can take up to 60 minutes to be applied, so wait a bit and see if they do.
Tip 6 – Set Lockout and Idle Session Policies
These two settings minimize the change someone accidentally leaves on a remote desktop and makes it available to anyone passing by or to other remote-entry options.
Step 1. Open “secpol.msc,” go to “Account Policies,” then “Account Lockout Policy.”
Step 2. Set a lockout threshold for failed logins. Microsoft suggests around 10 sign-in attempts, but it’s up to you to set a tolerance limit.
Step 3. In Group Policy, go to the following address:
Computer Configuration > Administrative Templates > Windows Components > Remote Desktop Services > Remote Desktop Session Host > Session Time Limits.
Step 4. Configure a time limit for disconnected and idle sessions. This can be as low as you want, just make sure it doesn’t accidentally interfere with work if the PC is used for processing-heavy tasks that don’t require user input.
Tip 7 – Watch the Logon Events
The Security log tells you who logs onto the PC.
Step 1. Open Event Viewer and go to “Windows Logs,” then “Security.”
Step 2. Open the Filter and look for Event ID 4624 (successful logon) and “logon type 10,” which is a remote access session.
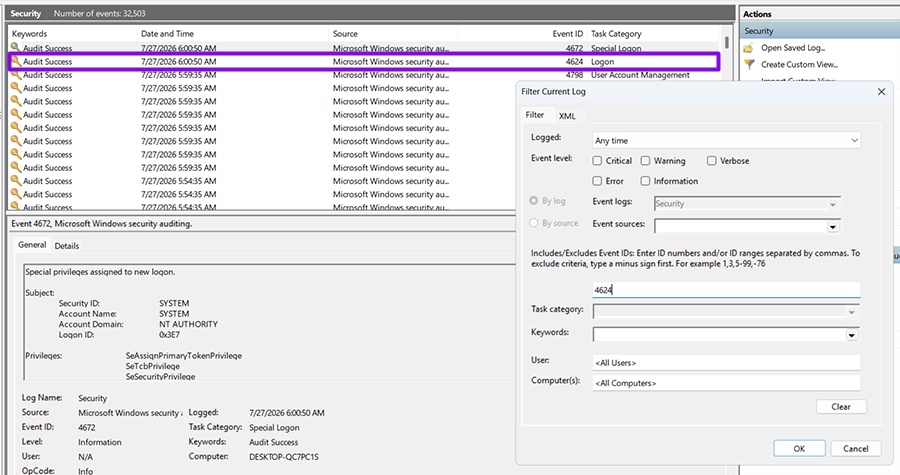
Step 3. The Event ID 4625 can be used for failed logons. If you spot a consistent pattern or IP address here, it might indicate brute force entry attempts.
Step 4. Use Event ID 4634 for logoffs, and 4778 and 4779 for sessions being reconnected and disconnected.
Installed Desktop Themes Aren't Appearing or Syncing With the Microsoft Store Library
Read Next