


How To Make a Chrome Extension

If you’re a Chrome user, it’s likely that you will be using one or more extensions. Whether it’s to block ads or to add features, extensions add a lot of utility to the browser. So wouldn’t it be cool if you could build your own Chrome extension? That is exactly what I’ll show you here.
As I maintain websites for clients, I like to know how each site performs with regards page loading. As Google now uses load times in its SEO calculations, knowing how fast, or slow a page loads is an important metric when optimizing a site. This is even more true when optimizing a website for mobile. It has to be light, fast and load without any errors to score highly within Google.
Add to that, the fact an enterprising person over at SitePoint also uses the same website I do to check page speeds, GTmetrix and has developed a Chrome extension to check it, I thought I would do the same and walk you through it.
Chrome Extensions
Chrome Extensions are mini programs that add features to the core browser. They can be as straightforward as the one we’re going to create or as complicated as secure password managers or script emulators. Written in compatible languages such as HTML, CSS and JavaScript, they are self-contained files that sit alongside the browser.
By necessity, most extensions are simple icon click executions that perform a given action. That action can literally be anything you want Chrome to do.
Build your own Chrome extension
With a little research, you can tweak your extension to do whatever you like but I like the idea of a one button speed check so am going with that.
Usually, when you check site speed you would paste the URL of the page you are on into GTmetrix, Pingdom or wherever and hit Analyze. It only takes a few seconds but wouldn’t it be nice if you could just select an icon on your browser and have it do it for you? After working through this tutorial, you will be able to do just that.
You will need to create a folder on your computer to keep everything in. Create three empty files, manifest.json, popup.html and popup.js. Right click inside your new folder and select New and text file. Open each of your three files in your text editor of choice. Make sure popup.html is saved as an HTML file and popup.js is saved as a JavaScript file. Download this sample icon from Google too just for the purposes of this tutorial.
Select manifest.json and paste the following into it:
{

  "manifest_version": 2,

  "name": "GTmetrix Page Speed Analyzer",

  "description": "Use GTmetrix to analyze a website page loading speed",

  "version": "1.0",

  "browser_action": {

   "default_icon": "icon.png",

   "default_popup": "popup.html"

  },

  "permissions": [

   "activeTab"

   ]

}
As you can see, we have given it a title and basic description. We have also called a browser action that includes the icon we downloaded from Google that will appear in your browser bar and popup.html. Popup.html is what is called when you select the extension icon in the browser.
Open popup.html and paste the following into it.
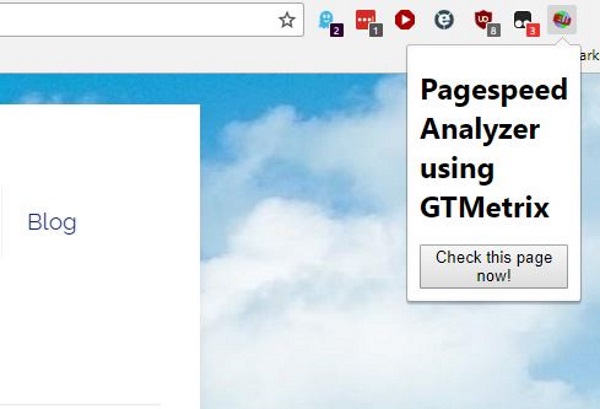
<!doctype html>

<html>

  <head>

    <title>Pagespeed Analyzer using GTMetrix</title>

    http://popup.js

  </head>

  <body>

    <h1>Pagespeed Analyzer using GTMetrix</h1>

    <button id="checkPage">Check page speed!</button>

  </body>

</html>
Popup.html is what is called when you select the extension icon in the browser. We have given it a name, labeled the popup and added a button. Selecting the button will call popup.js which is the file we will complete next.
Open popup.js and paste the following into it:
document.addEventListener('DOMContentLoaded', function() {

  var checkPageButton = document.getElementById('checkPage');

  checkPageButton.addEventListener('click', function() {

    chrome.tabs.getSelected(null, function(tab) {

      d = document;

      var f = d.createElement('form');

      f.action = 'http://gtmetrix.com/analyze.html?bm';

      f.method = 'post';

      var i = d.createElement('input');

      i.type = 'hidden';

      i.name = 'url';

      i.value = tab.url;

      f.appendChild(i);

      d.body.appendChild(f);

      f.submit();

    });

  }, false);

}, false);
I won’t pretend to know JavaScript which is why it was handy that SitePoint already had the file in place. All I know is that it tells GTmetrix to analyze the page in the current Chrome tab. Where it says ‘chrome.tabs.getSelected’ the extension takes the URL from the active tab and enters it into the web form. That is as far as I can go.
Testing your Chrome extension
Now we have the basic framework in place, we need to test to see how it works.
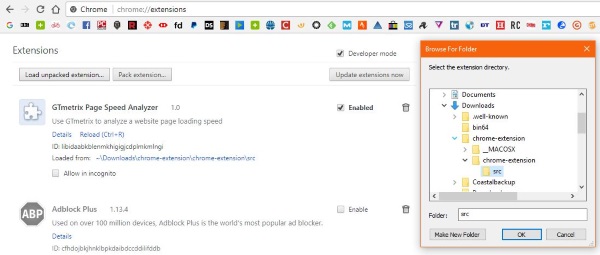
- Open Chrome, select More Tools and Extensions.
- Check the box next to Developer mode to enable it.
- Select Load unpacked extension and navigate to the file you created for this extension.
- Select OK to load the extension and it should appear in your Extensions list.
- Check the box next to Enabled in the list and the icon should appear in your browser.
- Select the icon in the browser so the popup appears.
- Select the button, Check this page now!
You should see the page being checked and a performance report from GTmetrix. As you can see from my own site in the main image, I have a little work to do on to speed up my new design!
Taking extensions forward
Creating your own Chrome extension isn’t as difficult as it may seem. While it certainly helped to have a head start by knowing a little code, there are hundreds of resources online that will show you that. Plus, Google has a huge repository of information, tutorials and walkthroughs that will help. I used this page from the Google Developer site to help me with this extension. The page walks you through every part of creating the extension and provides that icon we used earlier.
With enough research, you can create extensions that do pretty much anything the browser is capable of. Some of the best extensions in the Chrome store are from individuals and not companies, proving that you really can create your own.
All credit to John Sonmez at SitePoint for the original guide. He did the hard work, I just reorganized it a little and updated it slightly.
Have you created your own Chrome extension? Want to promote or share it? Let us know below if you do!


One thought on “How To Make a Chrome Extension”