Build Your Own Web Content Filter Using Linux And Privoxy

There are a bunch of reasons why you’d want to filter content when browsing the web. Security and privacy are among the most common. You can use content filtering to block ads, trackers, and malicious websites before they even reach your browser. It adds an additional layer of protection on to of your existing browsing add-ons.
The other common reason for using content filtering is to prevent children from accessing inappropriate content. As a parent, exactly how you go about this is up to you, but content filtering can help prevent young children from being accidentally exposed to graphic material.
What You’ll Need
Filtering web content on Linux is fairly simple, though there are a couple of ways to handle it. In the past, projects like Dansguardian were favorites, but that is currently unmaintained, and its successor E2guardian isn’t all that popular. As an added negative mark in that column, these programs require an additional proxy like Squid or Privoxy.
Oddly enough, all the filtering that you need can be accomplished transparently with just Privoxy. So, this guide is going to focus on setting up the simplest, most lightweight filter possible using Privoxy and iptables.
Privoxy is very popular, so it should be packaged for just about any distribution that you want to use. This guide will focus on Debian/Ubuntu based systems, since they’re the most popular.

Install Privoxy with Apt.
$ sudo apt install privoxy
Setting Up Privoxy
Everything that you’ll be doing can be handled through configuration files. There’s no slick graphical interface here. It’s just configuration. Sure, that’s not as nice to use in some cases, but it keeps the proxy light, so it doesn’t get in your way or slow down your connection too dramatically.
Base Configuration
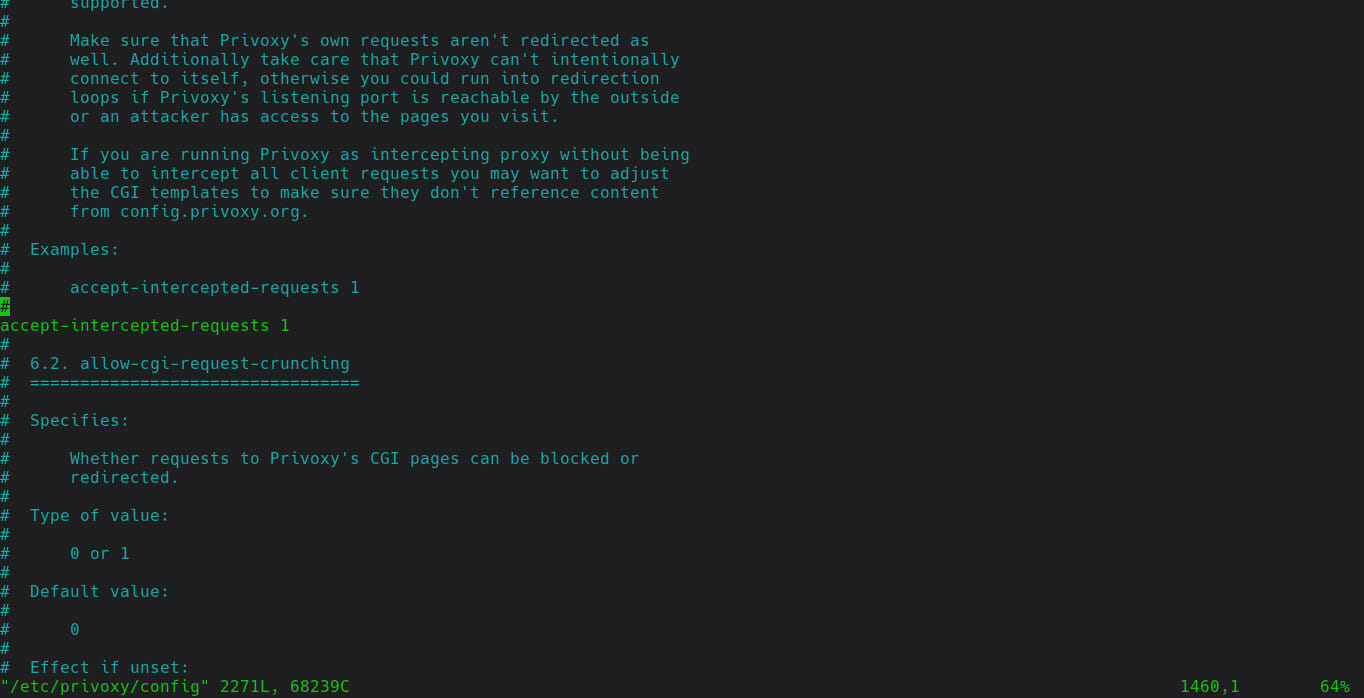
As root or with sudo, open up the file at /etc/privoxy/config.
First, find listen-address. This setting will set the address and port that Privoxy listens on. Usually, the setting is already set to an intelligent default, but if it isn’t, set it to match the following.
listen-address 127.0.0.1:8118Next, find the setting to allow Privoxy to intercept requests. Look for accept-intercepted-requests, and set the value equal to 1. If it’s not there, create the entry.
accept-intercepted-requests 1
Filters
By default, Privoxy will block a ton of things. That includes both security threats and inappropriate content. If you’re only here for one or the other, you can modify or remove things from the list.
Privoxy’s configuration file with the filter rules is at /etc/privoxy/filter.default. Have a look around. Privoxy uses regular expressions to filter, then may replace the blocked content with HTML. If you’re looking for the parental controls, they’re under crude-parental
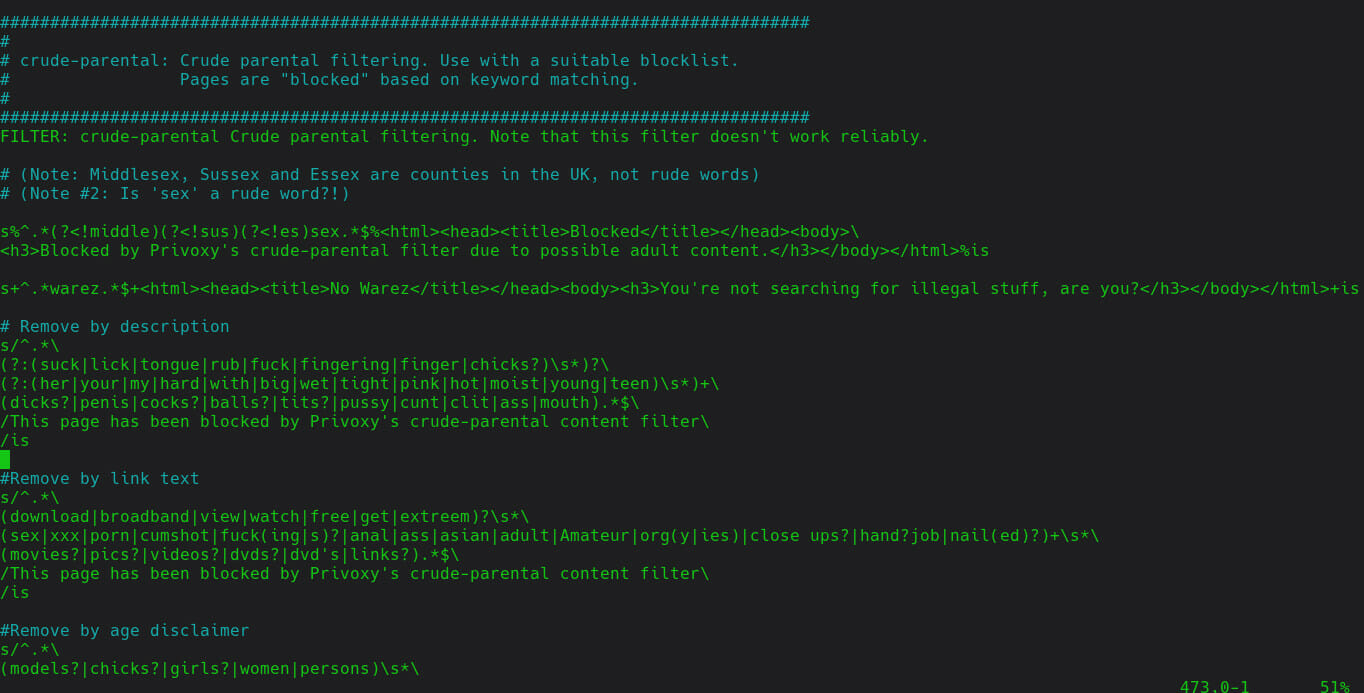
Feel free to modify, add, or remove any of these rules. If you’re not entirely sure what the regular expression does, copy one that has the behavior that you want, and modify it for the words/content that you want to block.
Iptables

Before you can put your filter to the test, you need to set up the iptables firewall to direct all web traffic through Privoxy. This is the “transparent” part of the content filtering. Users won’t be able to see what’s going on. Their traffic will automatically redirect and be filtered. Whether or not you add any more rules is entirely up to you. Run the following commands to add the redirect.
$ sudo iptables -t nat -A PREROUTING -p tcp --dport 80 -j REDIRECT --to-port 8118

$ sudo iptables -t nat -A PREROUTING -p tcp --dport 443 -j REDIRECT --to-port 8118
Now, all of your traffic will run through privoxy. Unfortunately, iptables doesn’t save your rules by default. You’ll need to install another package to save it.
$ sudo apt install iptables-persistent It will ask you if you want to save your rules. Answer, “Yes.”
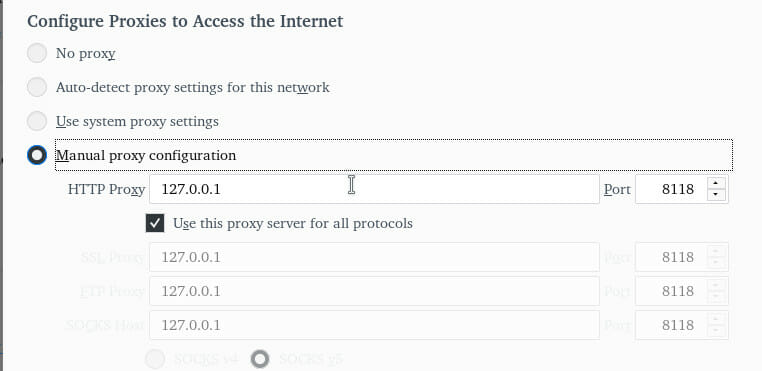
There’s still a chance that this won’t work. Transparent proxies and HTTPS generally don’t get along well. In this case, you’re going to need to rely on your browser’s proxy setting. There is a way that you can still lock this down, though, but it’s a bit more effort. If you’re trying to filter content for young children, though, this shouldn’t be much of a problem. Open your browser’s proxy settings, and point it to 127.0.0.1:8118. That will force all browser traffic through Privoxy. If you’re on Firefox, the proxy settings are at the bottom of he “General” tab in the “Preferences” menu.
If you’re dealing with more creative individuals that may try to bypass the proxy, you need to find the configuration file for your browser that governs the proxy and change the ownership to root and permissions to read only.
Test It Out

Test it! Use the browser on the computer that you configured to browse to content that you blocked. If you’re not super comfortable doing that, you can always go back and set up a temporary rule that you can test with.
Hopefully, everything is set the way you need it, and your computer is effectively blocking the content that you want. If not, you can always modify and tailor your rules.