How to Change Google Photos from High Quality to Original

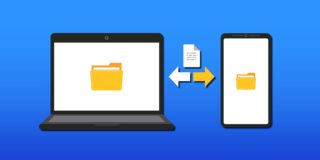
Different images and videos require different upload sizes. Less important images can be compressed, especially if they’re too big, to make way for more important, bigger files.
Google Photos has an option to upload images in various sizes, depending on your needs. However, once you choose a smaller size, it can be difficult (even impossible) to convert it to better quality. Unless you have the original image on your local drive, of course.
This article will explain the difference between the image quality in Google Photos, and a way to upgrade on quality.
The Difference in Google Photos Upload Size
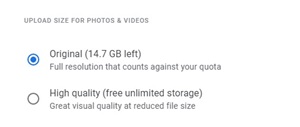
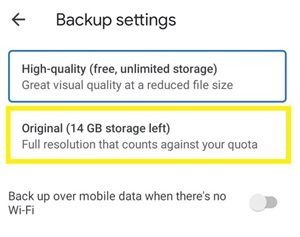
When you decide to back up your images to Google Photos, you’ll be able to choose between three different sizes – Express backup, Original quality, and High quality.
The Express backup is the most recent option, allowing you to compress large images and use less storage. It has unlimited free storage and it should back up the images much quicker than the other two options. It reduces the image quality to 3MP and video quality to 480p definition, thus keeping the near-original quality and saving space.
When it comes to High quality, it requires much more space than the previous option. You can maintain the original quality of the photos and videos up to 16MP and videos up to 1080p. However, larger items will be compressed to fit the mentioned size.
If you want to keep all images the way they are, you should pick the Original size. All items will be stored in the same definition and resolution. This is the best option if you want to store and print banners, posters, or high-quality graphics.
How to Change Google Photos from High Quality to Original on Your PC
As stated above, Google Photos doesn’t have an option that can automatically upgrade the quality of the photos. If you want to change the quality of the images that are currently in your library, you’ll have to remove them and upload them again.
Make sure you still have the images in the original quality on your computer’s storage drive. If you don’t, you won’t be able to complete the process.
With this process, you’ll need to remove all items from your Google Photos and back them up again from your PC in the original size. Proceed with the following:
- Go to the Google Photos
- Choose ‘Original’ upload size.

- Go to your Google Photos library.
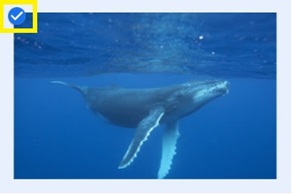
- Click the ‘Select’ (checkmark) icon at the top-left of the first picture.

- Hold the ‘Shift’ key and click on a different picture to select range. You may have to scroll all the way down to select the last picture if you want to instantly select all your library at once.
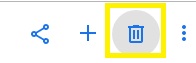
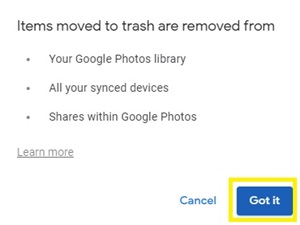
- Click the ‘Delete’ (trash can) icon at the top right.

- Confirm the removal of the image when prompted.

- Click the ‘menu’ icon (three horizontal dots) at the top-left of the screen.
- Select the ‘Trash’ tab.
- Select ‘Empty Trash’ option at the top-right.
- Restart your computer.
If the folders of the original images on your PC are synced with Google Photos, they should automatically upload in original quality back to the Cloud.
How to Change Google Photos from High Quality to Original on Phone
If you have an Android or Apple iOS device, the process of upgrading photo quality is similar. All it takes is that you still have photos of original quality on your device. Double-check if you have duplicates of all backed-up photos as you’re going to delete them all from your Google Photos library.
Follow these instructions:
- Launch your Google Photos app.
- Tap the ‘menu’ icon (three horizontal dots) on the top-left of the screen.
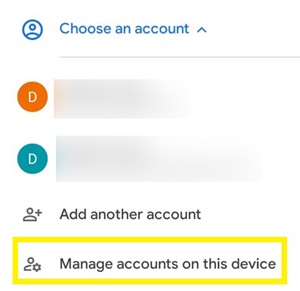
- Tap your account name.
- Select ‘Manage accounts on this device.’

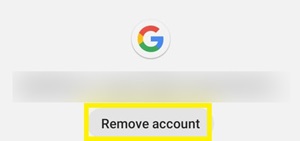
- Find your account among the listed.
- Select ‘Remove account.’

Now you’ll see only photos that are stored locally on the device’s storage.
- Remove all photos from the device and empty the trash file (steps 4-7 from the previous section).
- Go to ‘menu’ once again.
- Select ‘Add another account.’
- Enter your credentials.
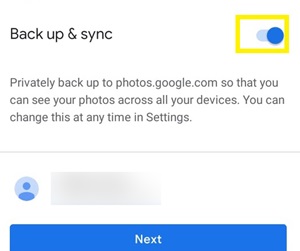
- Enable Backup & sync.

- Tap ‘Next.’
- Select ‘Original’ quality.

- Confirm your choice.
Now all your locally stored images and videos will be uploaded again, only this time in original quality.
Downgrading from Original to High-Quality
If for some reason you want to reduce the quality of backed-up photos to the Original quality, the process is fairly easy. Before you proceed, keep in mind that you’ll lose all Original-quality photos. If you don’t have them anywhere else, it would be wise to back them up to your local storage.
Follow these steps:
- Go to the Google Photos Settings page.
- Select the ‘Recover storage’ button.

- Select ‘Compress’ when prompted.
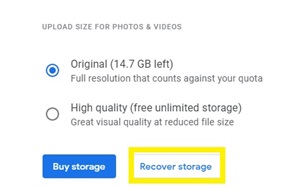
This will convert all Original quality photos to High quality and free up as much space as possible. Note: this only works with all images at once. You can’t select individual images instead.
Better Double than Sorry
When you’re upgrading and downgrading a high number of photos and videos, there’s always a risk of losing some items due to carelessness.
Before you undertake one of these processes, you should always double-check and compare your backed-up files with those at local storage. It’s better to make duplicates of files before you proceed to erase everything from your Google Photos.
Did you ever lose out an important photo or video because you thought you’d it backed up? Share your experiences in the comments section below.