


How to Crop Videos for Vertical Viewing in Adobe Premiere
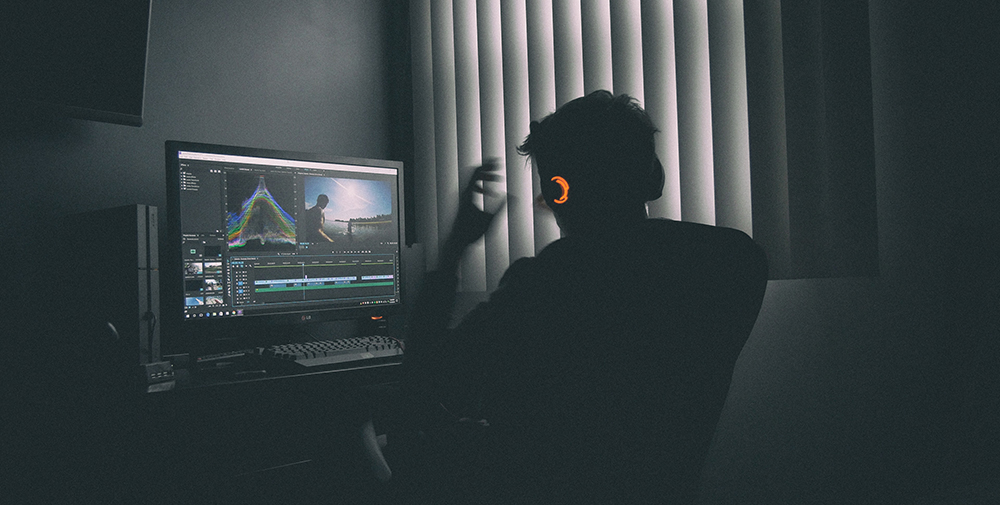
There are many reasons why Adobe Premiere is among the most popular programs for video editing. For starters, it can be quite easy to use for carrying out simpler tasks but is still very powerful.
Let’s say you want to crop a video to make it vertical. Instagram has always relied on vertical videos, and YouTube now does in a way as well. Not only can Adobe Premiere do this with great ease, it also lets you do this in multiple ways with options to even tweak the otherwise bland background. Let’s dig deeper into this.
Using the Crop Effect
There are two main ways to crop a video in Premiere: by cropping a video and by adjusting its scale and position. Which one is better usually depends on whether you’re working on an already vertical video that’s just slightly off or on a horizontal video that needs to be turned vertical. This is the better way if you have any part of the video you’d like to cut off:
- Open Adobe Premiere and import a video. The easiest way to do this is to drag and drop the video inside of the program. Another way is to double-click the program’s imported files list and find your video.
- You need to make a Sequence to suit the vertical dimensions. To do this, right-click on the video you’ve just added and select ”New Sequence from Clip.“
- The “Sequence Settings“ window will pop up. In the “Video“ tab, set the frame size to have 1080 pixels horizontally and 1980 pixels vertically, or just make sure that the aspect ratio is 9:16. This is a resolution that most current phone screens have and the one that Instagram and YouTube mostly use for vertical videos.
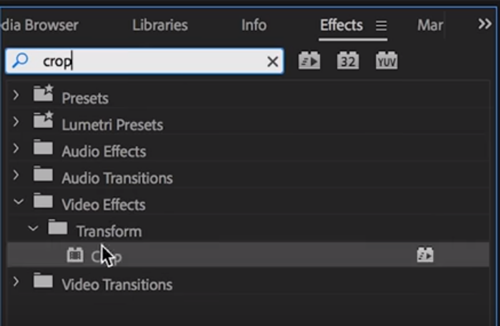
Note: Some newer smartphones have a screen aspect ratio of 9:18, so this may also be a viable option. For example, 1080×2160 pixels is a common 9:18 mobile screen resolution. - Find the crop effect. You can access it from the “Effects“ tab by going to Video Effects, opening the “Transform“ category, and finally choosing “Crop.“ You can also do this by looking for it in the search bar.

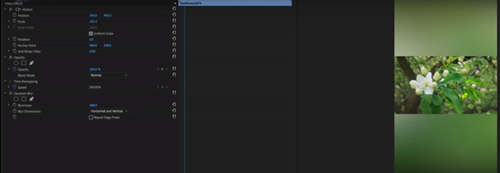
- Drag it to the timeline. If you drop it directly at the video you want to crop, its crop options will open in the “Effect Controls“ tab. It’s usually located on the left side of the screen. If you can’t find it, you can always enable it by opening the “Window“ menu.

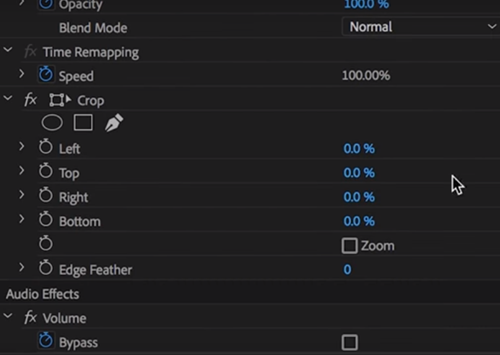
- The Crop effect consists of all four sides’ cropped percentage. These are all initially set to zero percent. If you’re not planning on moving the video around afterwards, make sure to set the crop for both left and right sides to the same percentage. This also goes for top and bottom cropping.

If you want to further adjust the clip’s position and scale, follow the next method.
Using Position and Scale
These two options are quite possibly some of the most important in all of Premiere. Like the previous method, this one also requires you to create a new sequence from your video after you upload it, setting its aspect ratio to 9:16. If you want to, say, resize a video so it fits the whole screen even with such a possibly awkward aspect ratio, this is what you need to do:
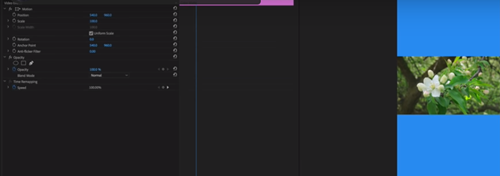
- With the vertical sequence created and the video uploaded, select the video and find the “Motion” effects. You’re looking for “Position” and “Scale.” Since these are basic functions, you can also press “P” to go straight to the Position options or “S” to access the Scale ones.
- Adjust the values to your liking. Position has two: the X and Y-axis, while Premiere only has a single scale value by default. This is a good thing, though, because it helps ensure that you’re scaling content uniformly.
If you want to fill out the black solid background with a method that doesn’t require text, you can do the same thing most people do nowadays: put a blurred copy of the video in the back.
- Duplicate the video you’re working on. Since you’re going to have two copies of a single video, make sure that they overlap perfectly.
- Increase the scale of one video until it takes up the whole screen vertically. Make sure that it’s underneath the other video by moving it below it in the timeline.
- Look up “Gaussian Blur” in the “Effects” tab. Once you find it, make sure to drag it and drop it on the background video.
- In the “Video Effects” tab, you’ll see that there are now Gaussian Blur options for your background video. You can play around with these, but increasing the “Blurriness” value is the only thing that actually matters. Keep increasing it until you’re satisfied with the result, as there’s no specific blurriness value that you should go for.

Alternatively, you can create a simple “Color Matte” to fill your background with a single color that’s not black:
- Open the “File” menu.
- Go over to “New” and select “Color Matte.”
- In the first popup window that follows, make sure the resolution is the same as your sequence’s and click on “OK.”
- In the second popup window, select the color of your new object. Hit “OK” whenever you’re ready.
- Finally, name the object however you want. It will be added to the sequence, but it still won’t be located in the timeline.
- To apply the matte, drag it over to the timeline and make sure that it’s below your video.

Note: You can also create your own background by creating a simple image in Photoshop. Just keep in mind that the resolution should ideally be the same as the sequence’s.
Adjusting to Modern Standards
The vertical video solution took the world by storm in a way since such videos were criticized for a long time. However, they’re back and they’re here to stay, so make sure to use these methods of making vertical videos to your advantage and spice up your social media profiles.
Why did you decide to create vertical videos? Do you think these will stay relevant or will they fall off like most trends in general? Share your thoughts in the comments below.


