How To Disable Startup Programs in Windows 7
As you install more apps, it may take longer for your PC to start up. This is because a bunch of programs launch on start-up, slowing down your system.
It’s wise to keep firewall, anti-virus, and system software on startup, but any other apps are pretty much unnecessary. Disabling startup programs in Windows 7 is straightforward. You don’t need any third-party apps or advanced computing skills.
And what’s best about it, the same method applies to Windows XP and Vista.
Disabling Startup Programs
MSConfig is a Windows-native tool that displays all the startup programs and allows you to quickly disable them. Aside from the Startup tab, MSConfig features a few other options you can use to reconfigure your system. However, each one deserves an article of its own, so we’ll stick to startup for now.
Step 1
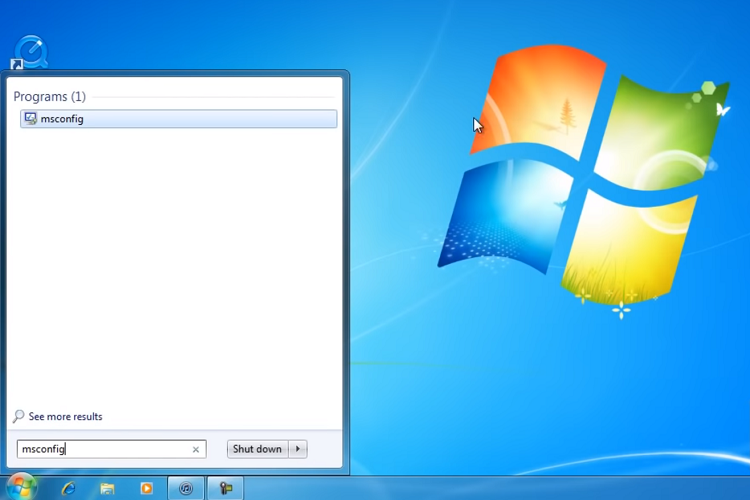
Type msconfig.exe in the Start menu Search box, hit Enter, and click on the result that pops up. Those who use Windows XP should do the same in the Run dialog box.
Step 2
Select Startup in the System Configuration window to see the list of programs that start running when your computer boots up. There is a checkbox in front of each one and you should uncheck the box to disable a program. When you’re done with unchecking the programs, click OK to confirm.

Step 3
As soon as you click OK a dialogue box pops up. It tells you to restart the computer to apply the changes. It’s advisable to restart, though you can also just exit and restart later.
How to Do It on Windows 10 and 8
Chances are you’ll decide to update your operating system at some point. This is why you should know how to get rid of unnecessary startup programs on the new platform. The methods are not exactly rocket science and the newer versions of Windows made the process somewhat easier.
Windows 10
The latest Windows 10 has a “Startup App management panel” which puts you a few clicks away from disabling the programs. Launch the Settings panel and click on Startup at the bottom left.
With the Startup panel on, you can just toggle off the buttons next to programs that run on startup and you’re good to go.
Note: The “Startup App management panel” arrived with the Windows 10 update in April 2018. If you are running an older version, this feature won’t appear in the Settings.
Windows 8
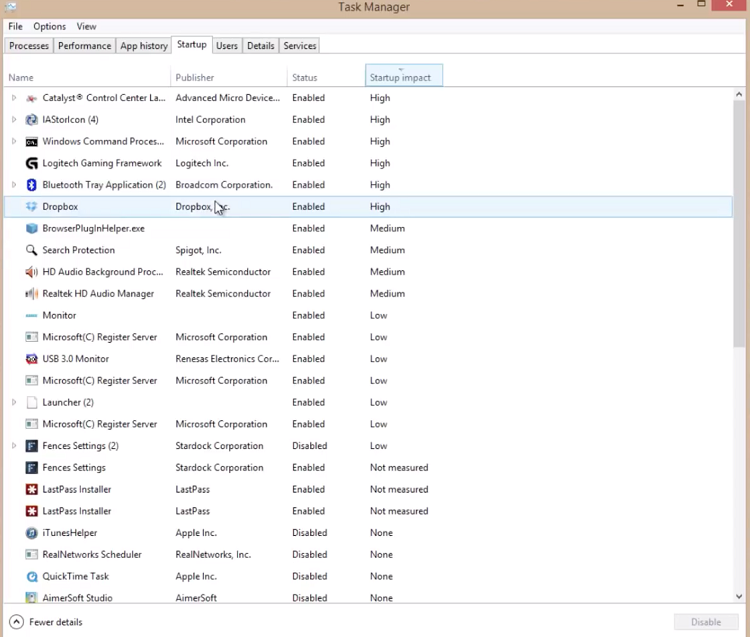
In Windows 8, you disable startup programs via Task Manager and there are two ways to launch it. Press Ctrl + Shift + Esc on your keyboard or right-click on the Taskbar.
Select the Startup tab in Task Manager and click on “More details” at the bottom to reveal all the programs. Aside from Publisher and Status information, you can also see Startup impact data for almost any app. To disable a program, select it and just click Disable.
Note: This method also applies to Windows 10 users who don’t have the “Startup App management panel”.
Third-Party Software
You don’t need third-party software to deal with startup programs. However, some users prefer these tools because they come with more options to optimize your PC. CCleaner is one such utility.
After you install CCleaner, click on Tools on the left and select Startup from the menu. The layout and actions are similar to the Task Manager. Select the enabled program and click on Disable to prevent it from running at start up.
This utility can do a few other things to make your PC faster. For example, it cleans old and unused files, as well as your registry. The basic version of the app is free and it’s more than enough for regular users.
Windows 7 Tips and Tricks
Aside from disabling startup programs, there are few other things you can do to make your PC run smoother. Here are the hacks:
- Right-click on your desktop, click Personalize, then change the theme to Windows 7 Basic.
- Open the Start menu, select Computer, right-click on it, and choose Properties. Go to “Advanced system settings”, click Settings under Performance, and click on “Adjust for best performance”. Click Apply to confirm.
- Right-click on Computer again and select Manage. Double-click Services and Applications in the menu on the left and select Services. Scroll down to Windows Search, double-click, then click on the menu next to “Startup type”, and select Disabled. Click Apply once more for the change to take effect.
Teach an Old Dog a New Trick
During its heyday, Windows 7 was considered the most stable operating system for PCs to date. At this point, there are probably a few people here and there who haven’t given up on it. Assuming you are one of them, you now know how to make a few small tweaks to make your operating system run like clockwork.