


How to Use Your Amazon Echo Dot as an Intercom
Amazon Echo Dot is a pretty neat gadget in its own right. But did you know that you can build your own home intercom system if you own two or more of these? That way, you’ll be able to communicate with everyone in your house without leaving your room.
When it’s dinnertime, instead of looking for everyone one by one, you can connect to all Echo Dots in your house and communicate through them.
This tutorial will show you how to do that in just a few easy steps.
Setting up the Amazon Echo Dot Home Intercom System
Before we begin, you should give your Amazon Echo Dot devices easy-to-remember names. Changing their default names to something you’ll easily recognize will significantly speed up the process of connecting them into your home intercom system.
If you’ve already done that, skip the section below and go through the main tutorial.
Renaming Your Amazon Echo Dots
The following steps will show you how to rename your Amazon Echo Dot:
- Open the Amazon Alexa app on your smartphone. If you don’t have the Alexa app and don’t want to download it, visit amazon.com and log in.
- Tap the Menu button (three horizontal lines in the upper-left corner).
- Select Alexa Devices (or Settings on older Alexa app versions). That will show you all Alexa-enabled devices that you currently own. If some of them are missing, click on the Add Alexa Device button and add your device. You can contact Amazon’s customer support if you need help with this or any other step.
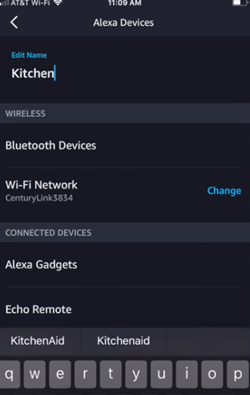
- From the Alexa Devices section, select the first device that you want to rename. That will open its configuration page.
- Tap on the Edit Name button which is the first option on the configuration page. If you have an older version of the Alexa app, this button can be found in the Device Name section.

- Rename your device.
- Click Save to finish.
- Repeat the same steps for all of your devices.
Although you can name your Amazon Echo Dot devices however you want, it’s probably best to name them after the room they’re located in. For example, if you have an Amazon Echo Dot in your kitchen, bathroom, and living room, you could name them Kitchen Echo Dot, Bathroom Echo Dot, and Living Room Echo Dot, respectively. As mentioned, that will help you recognize them faster.
Once you’re satisfied with your device’s names, it’s time to set up your home intercom system.
Connecting Your Echo Dots Into an Intercom System
You will need the Amazon Echo Drop In feature to connect all of your Amazon Echo Dots.
This feature might already be enabled for your devices. In case it isn’t, here’s how you can manually turn it on:
- Open the Amazon Alexa App on your smartphone.
- Navigate to the Amazon Devices list. Depending on the app version installed on your phone, you can do this by either selecting Alexa Devices or Settings.
- Tap on your first Amazon Echo Dot device.
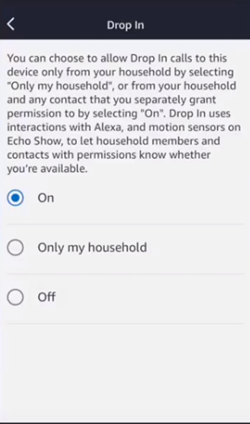
- Scroll down and select the Drop In option.
- Tap On to enable this feature for that specific Amazon Echo Dot.

- Repeat these steps for all remaining Echo Dots in your home.
After you’ve enabled the Drop-In feature on all of your Amazon Echo Dots, it’s time to see how your intercom home system works.
Using Your Home Intercom System
Once you’ve set up your Amazon Echo Dots and placed them around your house, you can start using them as your home intercom.
To access a specific Amazon Echo Dot, you’ll have to use the Alexa voice command system. Let’s say that you want to connect to the Amazon Echo Dot in your kitchen from your bedroom.
You’ll need to say – Alexa, drop in on [your Kitchen Echo Dot’s Name]. So, if you have named your kitchen Echo Dot device as we’ve suggested, your full voice command should look like this:
Alexa, drop in on Kitchen Echo Dot.
The voice command formula is simple. First, wake your device by saying “Alexa,” and then use the enabled Drop-In feature as shown above. You can access all of your Amazon Echo Dots by referring to them by their names.
If Alexa handled your command correctly, you’ll hear a signal on your Amazon Echo Dot (in this case, the one in your bedroom). You can then talk to people in that room and hear what they’re saying. Once you finished your conversation, use the following command: Alexa, end drop in.
If you want to broadcast a message to all Amazon Echo Dots in your home from one device, you should use the Amazon Announce command.
For example, you can notify your family members that dinner is ready by saying: Alexa, announce that the dinner is ready. Once again, you’re waking up your device by saying “Alexa” and using the Announce command by following with “announce that…”.
Enjoy Your Home Intercom System
With these instructions, you can easily set up your Amazon Echo Dots into your personal home intercom system.
So, no more yelling around the house when you need something. Simply use your newly set up intercom system to communicate with your family members.
Did you manage to set everything up? How many Amazon Echo Dots do you have? Tell us in the comments section below.


2 thoughts on “How to Use Your Amazon Echo Dot as an Intercom”