What is the Gmail Attachment Limit & What To Do When It’s Reached
Gmail is one of foremost webmail email clients with an extensive user base. Like any webmail, Gmail has a file attachment limit that restricts how many files you can attach to an email. So if you often attach large files to Gmail emails, you’ve probably already found that you can’t always send them without removing some of the files. This isn’t ideal as you then need to attach the files over multiple emails instead.
So what’s the Gmail file attachment limit? The Gmail attachment limit is 25 megabytes, which is not especially generous when compared with Mail.com’s 50 MB file limit. This might be ok for sending text documents, but a single image alone will usually amount to a few megabytes. Video clips also have average file sizes amounting to megabytes. So if you need to attach more than several photos, they might eclipse the 25 megabyte limit.
Set up a Google Drive Cloud Storage Account
However, Google has also integrated Gmail with its cloud storage. So Google Drive enables you to expand the Gmail attachment limit up to 10 GB! By registering a GD account, you can attach lots more to Gmail emails. You can set up a more general Google Account from this page, or a more specific cloud storage account at the Google Drive site. Google Drive gives you 15 GB cloud storage without any annual subscription fee. Check out this Tech Junkie guide for further GD details.
When you have some Google Drive cloud storage space, first upload the files you’re going to attach to the Gmail email. Press the My Drive button in Google Drive to open the menu shown in the snapshot directly below. Select Upload files from there, and then select the files you need to attach to the email. That will save them to your Google Drive cloud storage.

Log into Gmail and open its email message text editor. Enter the intended recipient’s email address as usual. Then you should press the Insert files using Drive button beside the standard file attachment option (paperclip icon). If the file you’re sending exceeds 25 MB, select the Drive Link option.
Now you should click the My Drive tab. You can select the files you need to send with the email from the My Drive tab. Click Insert to attach the selected Google Drive files to the email.
Next, press the Send button. Then a “These Drive files aren’t shared with recipient” window might open if some of the files added to the email aren’t yet shared with all the email’s recipients. You can select three permission options for the Anyone with the link setting that are: Can view, Can Comment or Can edit. So select an appropriate permission setting, and then click the Share & Send button.
Compress the Attachment Files in a Zip
Alternatively, you can compress files into a Zip file. This will reduce the overall size of the attachment. As such, it might be better to compress the files if you’re only marginally above Gmail’s 25 MB maximum attachment limit.
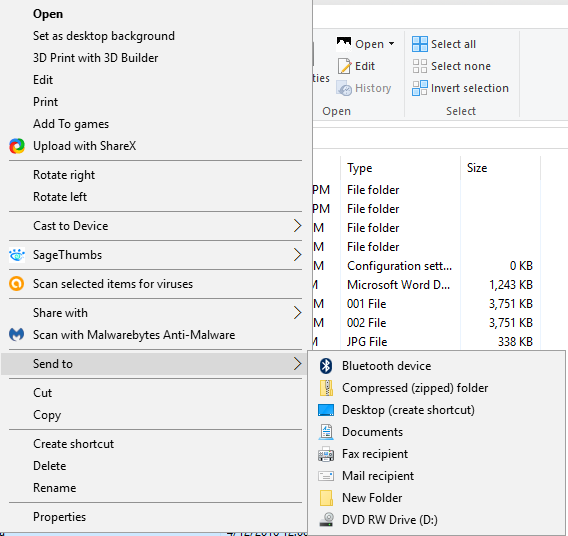
You can compress a group of files in Windows 10 with File Explorer. Click the File Explorer button on the taskbar to open the window shown in the shot directly below. Then open the folder that includes the files you need to attach to the email. Press, and hold, the Ctrl key and select the files you need to attach to the email. Next, you should right-click and select Send to > Compressed (zipped) folder from the context menu.
That option will compress the selected files into a single Zip folder. Give the Zip a suitable title, and note its overall file size. You’ll find that the Zip’s file size is at least a little smaller than all the files you selected. If you’re compressing lots of larger files, the Zip might compress them by a few megabytes. Now open your Gmail email, press the paperclip button and select to attach the Zip to it.
Attach Images With Compressed File Formats
If you’re attaching photos and other images to a Gmail email, you can also reduce their file sizes by saving them in more compressed formats. There are uncompressed and compressed image formats that take up more and less HDD space. For example, TIFF and BMP are two uncompressed image file formats.
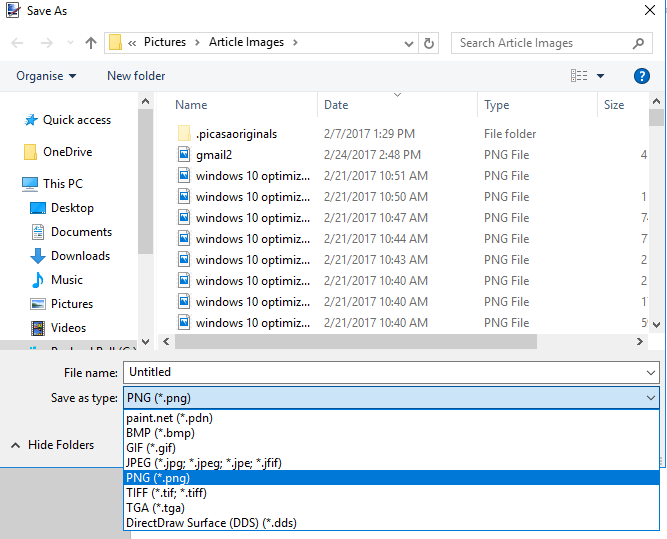
So if your images are TIFF or BMP files, convert them to alternative compressed formats for the Gmail email attachment. The best compressed formats for photos are JPEG and GIF. Open the images in editing software such as Paint.NET and then select File > Save As. Then you can select alternative JPEG and GIF file formats from the Save as type menu as shown below.
Alternatively, you could also use an image converter tool to convert the images to a compressed format. Click here to open an Online-Convert tool that converts images to JPEG. Press the Choose file button there to select a photo. You should also select Best Compression from the Quality Settings drop-down menu before pressing the Convert file button.
When you’ve converted the images to JPEG or GIF formats, compress them in a Zip for good measure. Then attach the Zip to the Gmail email and send it. Maybe now your attachment will be below the maximum 25 MB!
Share Files With Jumpshare
Jumpshare is a large file-sharing service with which you can send files. You can send attachments up to 250 megabytes with its free account. In addition, you can also add freeware Jumpshare software to the Windows or Mac platforms that enables users to send emails with attachments directly from the app. So if you’re finding Gmail file attachment limits a little restrictive, Jumpshare is something to check out.
Click here to open the Jumpshare website. Press the Login button at the top right to log in. Then you can click a Login with Google button to log into Jumpshare as in the shot below. Alternatively, press the Download button to add the Jumpshare software to Windows that enables users to drag-and-drop files to send onto the program’s system tray icon.
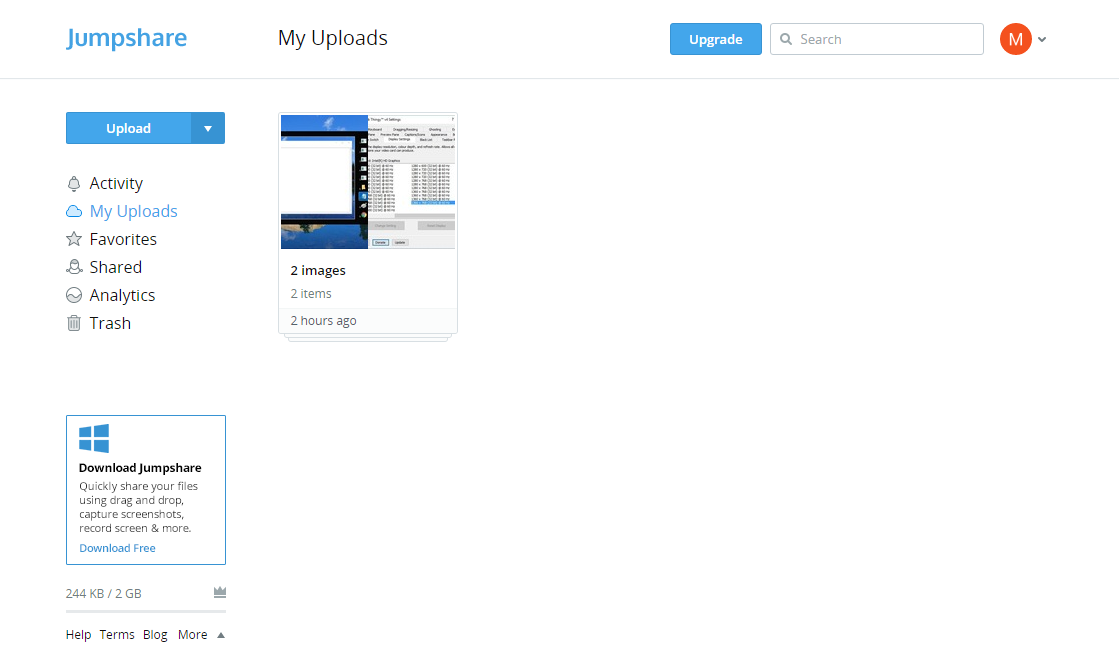
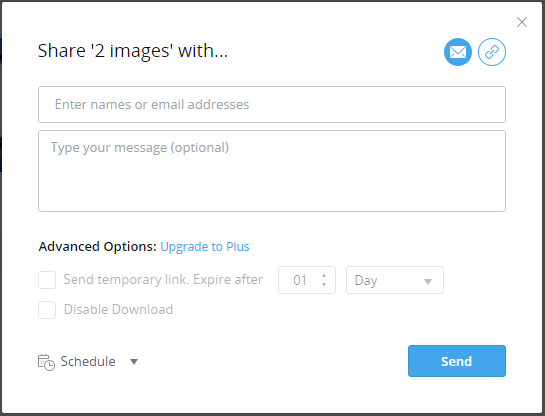
Press the Upload button on the left to select the files you need to send. Select the files to add to your Jumpshare My Uploads folder, and then you can press the Share button to open the email text editor in the shot directly below. There you can enter the email addresses in the top text box. Press the Send button to send the email. Note that recipients don’t need to have a Jumpshare account to open the shared files.
So those are a few of the best ways to bypass Gmail’s 25 attachment limit. First, compress the attachment into a Zip; and if that isn’t enough you can either expand the attachment limit with Google Drive or send the files with Jumpshare.