How To Flush the DNS in Mac Mojave

Flushing DNS on a Mac is a good idea, especially if you’ve made certain changes to the DNS settings. This action gets rid of the DNS cache and allows you to easily reach the correct website and establish a secure connection.
The process of flushing DNS on Mojave is simple. In fact, all you need to do is execute one Terminal command and the cached data goes down the digital drain. This article will explain how to do this, while also aiming to give you a better understanding of DNS itself and the right time to execute the command. So keep on reading to find out more about good DNS flushing practices.
DNS Disambiguated
Simply put, Domain Name System or DNS is a domain name directory which stores domains that collocate to a specific Internet Protocol (IP) address. In other words, this directory works like a phone book for all internet addresses you visit.
DNS’s primary function is to translate website information into IPs or domain names. Computers (Macs and PCs) use the IPs to steer you in the right direction and locate the online information you are looking for.
For example, when you type techjunkie.com in the browser address bar, your Internet Service Provider (ISP) checks out the domain and locates the correct IP address. Afterward, it takes you to your favorite website.
Best DNS for Macs
In general, OpenDNS works best on Macs. Some examples include 208.67.220.220 and 208.67.222.222. But if you find OpenDNS unsuitable, Google Public DNS is a good alternative and it’s available for IPv4 and IPv6 with the following access addresses.
- IPv4 – 8.8.4.4 and 8.8.8.8
- IPv6 – 2001:4860:4860::8844 and 2001:4860:4860::8888
Note: Any of the given addresses can be used as a secondary or primary DNS server.
You should know that DNS affects the way web pages are loaded on a Mac, even though it doesn’t have any direct connection to the internet speed. And in case you need them, some of the fastest DNS are GreenTeamDNS, Norton ConnectSafe, SafeDNS, and Comodo Secure DNS. In addition, all four of these are also public and free of charge.
How to Flush DNS on Mojave
Step 1
Press cmd + space, type “term,” and hit Enter to launch Terminal. The command you need to execute is sudo killall -HUP mDNSResponder;sleep 2;
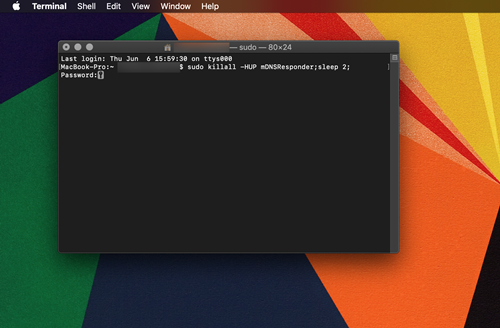
Step 2
Copy and paste the command into the line and hit Enter. To execute this command, you will need administrative privileges, which means that you need to enter the password after you hit Enter. (It’s the same password you use to unlock the Mac.) Press Enter again and let Terminal do its magic. The cache clears very quickly, and you can exit the app by pressing cmd + Q.
What to Expect
As indicated, DNS keeps a record of network requests which makes loading specific web sources easier. However, these records might get corrupted and cause certain issues when you try to load a website. To avoid the issues, a DNS flush clears all the invalid/corrupt data and allows for a more streamlined browsing experience.
That said, you shouldn’t confuse a DNS flush with clearing cache from your browser or app cache from the entire system. After a DNS flush, the website data, passwords, browsing history, and other temporary data all stay intact.
When to Perform a DNS Flush
If you keep getting error messages when you try to connect to a website or you get routed to a different address, it’s time for a flush. This resolves some problems that may occur from stale content issues, website server change, or DNS spoofing.
What’s more, a DNS flush prevents problems with slowly loading pages and helps with interruptions that can occur due to server tweaks. DNS flush is also a good way to protect from DNS hijacking and malware, plus you impose beneficial network settings changes.
Finally, a flush is necessary before you decide to use OpenDNS or Google Public DNS on your Mac.
Third-Party Apps
There are a bunch of third-party apps that offer quick and easy Mac maintenance and DNS flushing. Some of the popular options include Macbooster 7 and MacPaw CleanMyMac X, but there is no need to bother with third-party software.
There is no way to mess up the Terminal command if you use the guide above. Also, the software mentioned above is notorious for running in the background, which can unnecessarily drain the resources of your Mac. But if you find a certain third-party app particularly useful, don’t hesitate to give us your two cents in the comments section below.
Testing DNS Server
Once you are all finished, you can use Network Utility to test the server settings. Press cmd + Space, type Network Utility, and hit Enter to launch the app.
Go to the Lookup tab and enter the address you are interested in – for example, www.techjunkie.com. Click or tap on the Lookout button to initiate the DNS search.
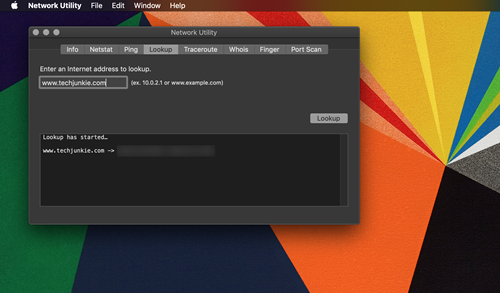
This gives you a list of IP addresses specific to a certain website. And if you want more advanced configuration options, get in touch with your ISP or administrator.
1, 2, 3, Flush
Performing a DNS flush on Mojave takes only two steps and there’s no need to be tech-savvy to do it. However, some users are still unaware of the connectivity problems the flush can easily solve.
So have you ever flushed DNS on a Mac before? If so, which method did you use? Tell us about your experiences in the comments section below.