How to Set Up Parental Controls on a Chromebook?

The importance of technological progress can’t be disputed, but it also has certain drawbacks. The internet is not the safest space for younger generations, and many parents are concerned about the content their kids access online. Thankfully, you have options when it comes to controlling your child’s Chromebook activity.
Today, we’ll tell you all you need to know to set up parental controls on a Chromebook. You’ll find out how to monitor and manage what your child watches on the web. Keep reading to create a safer environment for your youngster.
How to Set Up Parental Controls on a Chromebook?
Chromebooks don’t have any parental controls built-in, but you can utilize Google’s Family Link app for this purpose. This app enables parents to create an individual supervised account for their children. You can monitor activity, set limits, and restrict certain websites or apps right from your phone. Here’s how to create a Family Link child account:
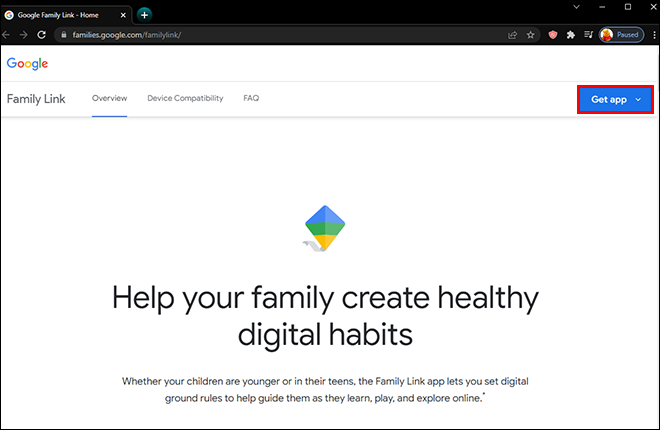
- Head to Family Link’s official website and click on Get App. Alternatively, you can download it from the Google Play Store.

- Launch the app and tap the plus icon to create a new profile.
- Follow the on-screen instructions to register an account. If the registration is successful, you will receive a confirmation email.

Next, you need to set up the controls. With Family Link, you can restrict browsing in incognito mode, block apps or websites, and prevent your child from downloading apps without your permission. Follow the steps below to block an app via Family Link:
- Launch the Family Link app and navigate to your child’s account.
- Tap More under Apps Installed.
- Select the app you wish to restrict.
- Shift the toggle button next to Allow app to the left.
If you’d like to prevent your child from downloading mature apps, follow the instructions below:
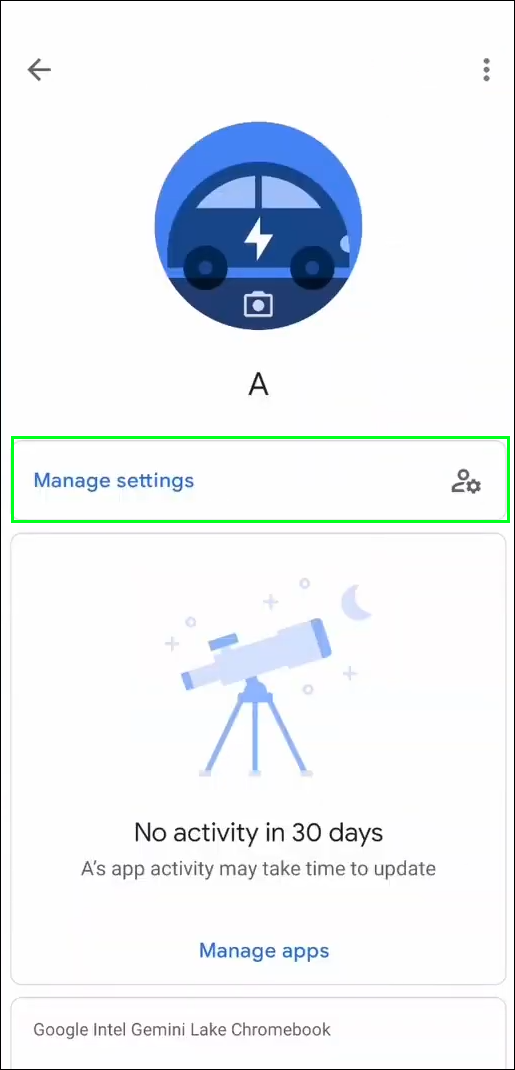
- Launch the Family Link app and select your child’s account.
- Click on Manage Settings, then on Google Play.

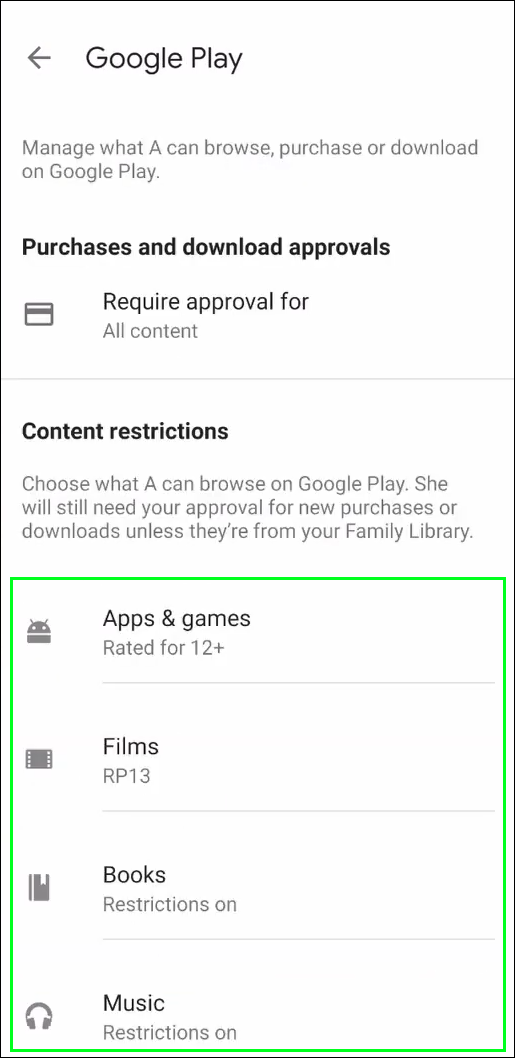
- Scroll down to the Content Restrictions section.

- Select your preferred filters. You can choose the allowed maturity level for apps, games, movies, books, and music.

Parents often experience issues with their children spending money on apps without permission. This is especially true for those who have card information saved on their Chromebook. You can prevent your child from making any purchases on your Google Play account without your approval if you have Family Link set up. Here’s how to set the limit:
- Open Google Play’s Account page and log in.
- Click on Family, then Family Group.
- Select your child’s name.
- Choose your limits – you can allow your child to purchase any content, only in-app content, or nothing without permission.
When your child attempts to make an app purchase, you will receive a request notification. To approve it, enter your password and tap Approve.
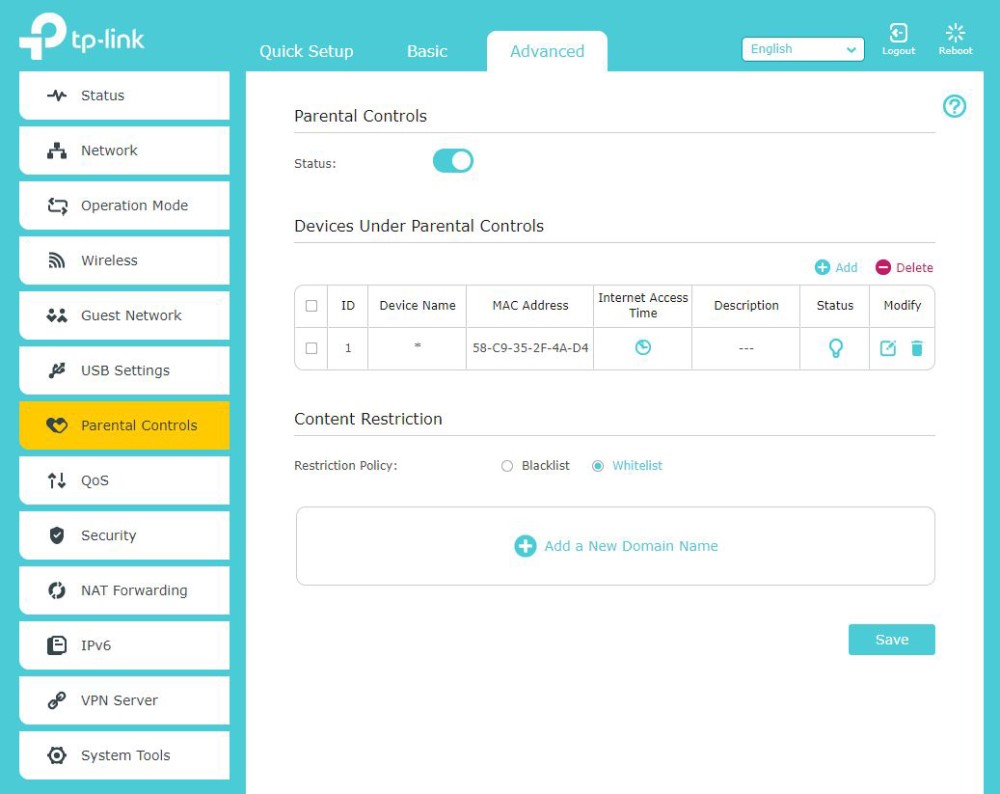
How to Set Up Parental Controls on a Chromebook With a Parental Control Router?
The Family Link app isn’t the only way to set parental controls on your Chromebook. You can also monitor and manage your child’s online activity using a parental control router.
Note that the parental control options and setup instructions vary depending on the router model. We’ve reviewed some of the best routers currently available on the market in this article. Generally, you’ll have to log in to your router’s dashboard via a browser and navigate to the Settings tab. From there, you can set your preferred restrictions.
How Can I Monitor My Child’s Chromebook?
With Google’s Family Link app, you can easily monitor your child’s app activity. Here’s how to view the app activity in three simple steps:
- Launch the Family Link app.
- Find your child’s profile.
- Tap App Activity.
You can also view detailed weekly and monthly reports containing the time spent on each app and the device’s location on the app’s dashboard. Unfortunately, you can’t view your child’s browsing history through the app. You can only do so by logging in to their Chromebook account and opening Chrome. Then, follow the steps below:
- Click on the three-dot icon in the upper right corner to open the dropdown menu.
- Select History.
- Follow the on-screen instructions to register an account. If the registration is successful, you will receive a confirmation email.
How Do I Set Limits on My Chromebook?
Apart from restricting content and purchases, the Family Link app also lets you set your child’s daily screen time limit directly from your Chromebook. Follow the steps below to do so:
- Open the Family Link app and select your child’s account.
- Find the Daily Limit card.
- Tap Set Up or Edit Limits.
- Choose the screen time limit by following the on-screen instructions.
Alternatively, set your child’s bedtime to restrict any app access after the selected time:
- Open the Family Link App.
- In your child’s profile, find the Bedtime card.
- Set the bedtime and use your parental access code to verify the selection.
Keep Your Child Safe
Now that you know how to set up parental controls on your Chromebook, you can keep your child safe and sound online. Never underestimate your kid’s tech skills – they often come up with ways to bypass parental restrictions. This is harder to do with a parental control router, so consider purchasing one and using it alongside the Family Link app.
What do you think parents should be aware of before letting their kids online? Share your tips and experiences in the comments section below.