How To Install Navi-X On Kodi

When looking for an all-in-one addons platform for streaming free open source media content, it’s really hard to find better than Kodi. Kodi consolidates all of your digital entertainment into a user-friendly, highly customizable media hub that is 100% free. Kodi boasts quite a few add-ons as seen at https://www.kodiaddonz.com/ but for this article, I’d like to set our sites on Navi-X.
What is Navi-X?
Navi-X offers free online media content in the form of an add-on for use with Kodi. Possibly the most popular Kodi add-on, Navi-X provides its users with an abundantly large database from which to pull videos, streams, and other forms of media. Live TV, sporting events, your favorite episodes of your favorite shows, all available at your fingertips. Sound like a worthwhile Kodi add-on that you’d be interested in? Well then, allow me to be your guide.
Prior to Installation
In order to install any third party add-ons for Kodi 17 Krypton, you’ll have to make sure that the Unknown Sources box has been checked.
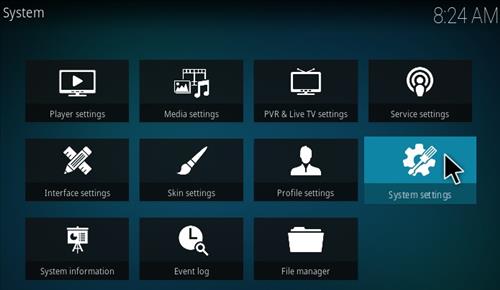
- Open up Kodi and in the top left click the Cog icon or “Settings”.

- Select “System Settings”.

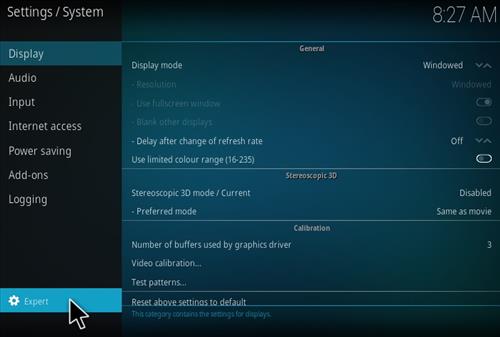
- Ensure that you are in Expert Mode. Do so by clicking the Cog icon in the lower left and choosing Expert Mode.

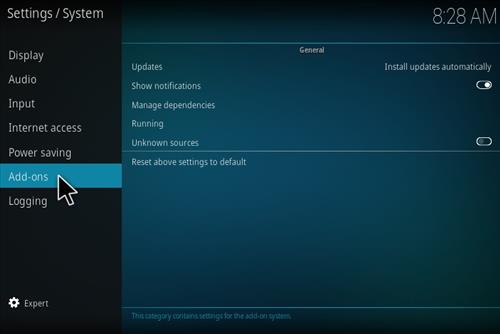
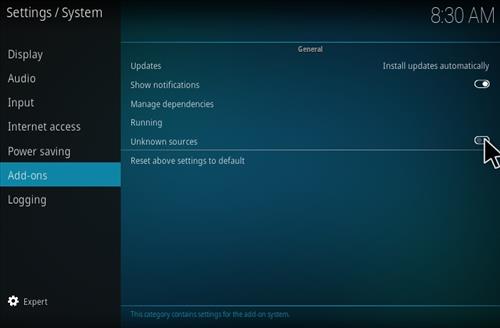
- In the left-side menu bar select Add-ons.

- Uknown sources should be the 5th option down, in the primary display field. Over to the far right, you’ll find a selector switch. Press it to turn it on.

- Once you’ve flipped the switch, you’ll be prompted with a Warning! box filled with a bit of dialog. Once you decide to proceed, click Yes.
Now that Unknown sources has been turned on you will be able to download add-ons such as Exodus, Phoenix, and of course, Navi-X.
Navi-X Installation for Kodi Krypton Version 17.6 or Lower
The steps are rather simple and straightforward:
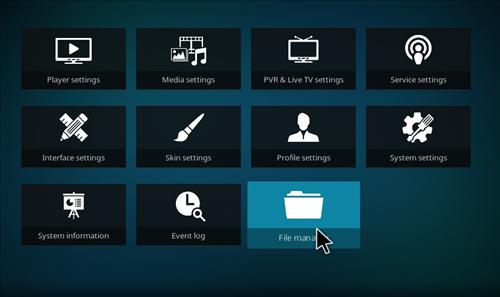
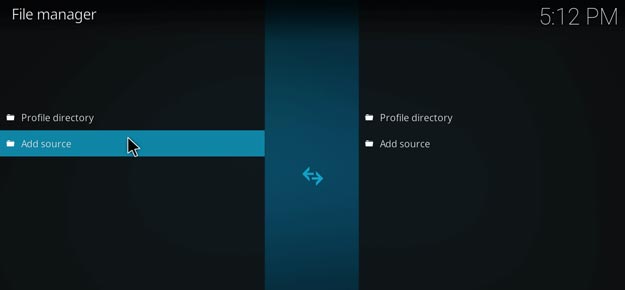
- As was previous, open up Kodi and in the top left click the Cog icon or “Settings”, then choose “File Manager” followed by double-clicking on Add Source.


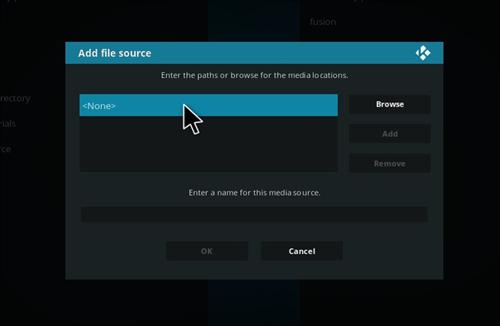
- Select <None> then type in (or copy/paste) this link http://kdil.co/repo/ or http://fusion.tvaddons.ag. Click the OK button and then, in the provided box, type in a name for the media source; for link 1 Kodil Repo or Fusion for link 2. Once typed in, finalize it by clicking on OK.

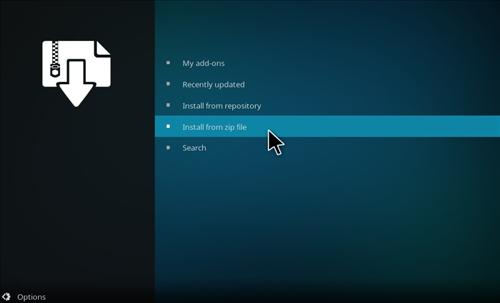
- Back on to the Home Screen, on the left side menu click the Add-ons tab. There will be an open box-shaped icon at the top left which you should click on and select “Install from zip file”. Based on the chosen link from step 2 will take different paths.

Kodil Repo
- Select and open Kodil Repo and then select the Kodil.zip
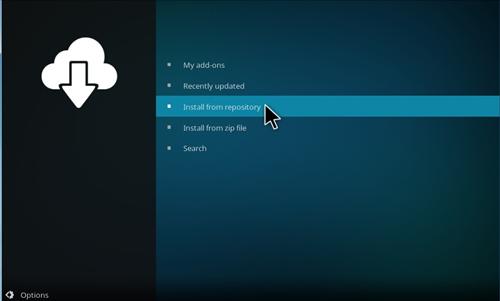
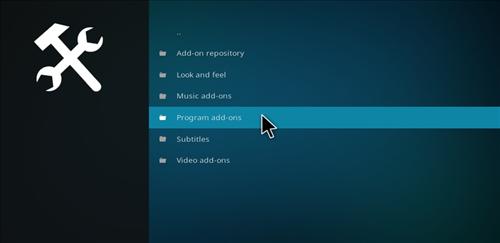
- Choose to “Install from repository” and then select “Kodil Repository”. At this point, double-click “Program Add-ons”, double-click Navi-X, and choose to Install. Await the “Add-on enabled” notification.
Fusion
- Select and open Fusion and then follow this path select kodi-repos > english > Repository.xbmchub-x.x.zip (the x’s will be digits that correlate to the version).
- Choose to “Install from repository” and then select the “TVADDONS.AG”. At this point, double-click “Program Add-ons”, double-click Navi-X, and choose to Install. Await the “Add-on enabled” notification.


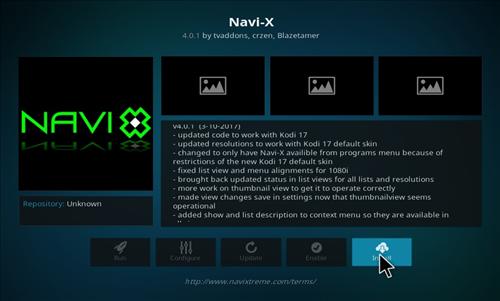
Regardless of which link was chosen, head back to the Main Menu and located in the Program Add-ons, you’ll now see Navi-X available for use.
Navi-X Installation for Kodi Jarvis Version 16 or Higher
The only major difference when attempting to download Navi-X for Jarvis over Krypton is the layout of the main menu. Instead of being on the left side of the screen, the Jarvis main menu is situated at the bottom. All else when it comes to the downloading and use of Navi-X remains the same for both.
Potential Issues with Navi-X
Navi-X can unexpectedly stop working. Needless to say, this can be a bit of an annoyance. Having any previous versions of Kodi or Navi-X already installed can be the culprit. Ensure that you have only the latest versions of both Kodi and Navi-X properly installed in order to resolve this potential error. The uninstall/reinstall method can help if the newest versions are giving you this same issue.