How To Record a Skype Call on Windows and Mac

Skype is a trusted software when it comes to making video calls, voice calls, and instant messages, wherever in the world you may be. Skype is not only popular among individuals but among businesses as well. You can use Skype on whatever suits you well – either through your desktop, tablet, or mobile.
Recording video calls is a feature that Skype allows you to do. There can be plenty of reasons why you may want to keep a recording of your calls. It could be to keep track of the minutes of a meeting, keeping track of interviews for accuracy, or simply recording your conversation with family and loved ones. Whatever your reasons are, this feature proves to be quite handy and essential for many Skype users.
In this article, we will show you how to record Skype calls on both Windows and Mac.
The Official Method
Skype has added a method for recording calls right in the program itself, instead of having to turn to third-party services; which makes it more convenient and easy to do. Skype will also notify the person on the other line that you are recording the call, so you don’t have to do the work yourself and it will make it more transparent to everyone as well.
Key Features
Let us first go through the key features of the in-app Skype recording before we dig in to the hows.
- Call recording is only available for Skype to Skype calls.
- Everyone in the call will be notified when the recording is performed.
- In the event when a desktop screen is shared, it will also be shown in the recording.
- The maximum call duration for recording is 24 hours.
- Once the recording is stopped, or if you end the call or leave the conversation, the recording will be automatically posted on your behalf.
- The recording will be available in your chat for 30 days.
How to Record a Skype Call on your Desktop
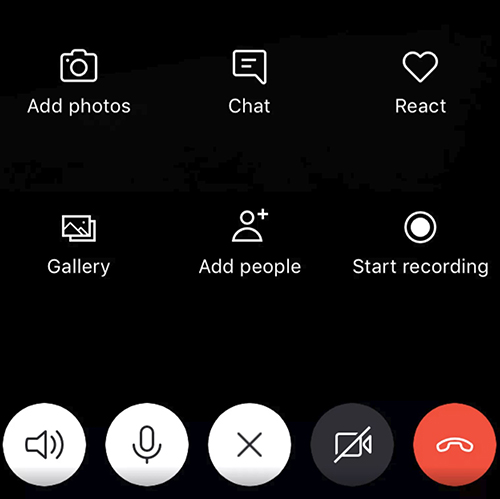
- During a video or voice call, click the three-dot button
 to take you to more options.
 - Click Start Recording.
- A message will appear in your call to let everyone know that the call is being recorded.
- At the end of the call, the recording will be automatically posted in your chat and it will be available for download for 30 days.
 to take you to more options.
How to Save a Skype Call Recording in your Desktop
- Open your chat where the recording is posted and click for More Options.
- Download and save the file by selecting Save to Downloads. Save it as an MP4 file.
 for More Options.
If you want to use the official method, it’s there and ready for you. However, if you’re interested in checking out some of the other programs available for Windows and Mac, continue through our guide below.
Recording a Skype call in Windows
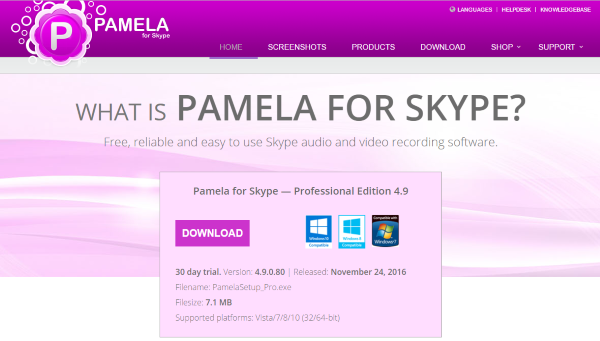
To record a Skype call in Windows, you can use an app called Pamela. Curious name but powerful tool. It has a free and premium version that can record calls, chats, videos, schedule calls, provide an answerphone service, forward emails and messages and more. It’s a neat program that works very well.
The UI is very similar to Skype which means you should quickly find your way around the options and settings. It can manage recordings, keep chat history, add media to podcast files. It also has lots of useful features like email forwarding, auto chat reply, Skype call scheduler, birthday reminders, and many more.
The only requirement for using Pamela is the desktop version of Skype for Windows. Download it here if you aren’t using it yet.
- Download and install Skype for desktop.
- Install Pamela. The download link is for the premium but the text link underneath will take you to the free version. It includes 15 minutes of free recording so will work for now.
- Open Pamela before Skype and then open Skype. You should see a window in Skype telling you how well it works with third party apps. That means the two have connected.
- Make a video or audio call and Pamela will automatically ask you if you want to record it.
- Use the buttons in the menu bar to record the call.
Pamela can record calls, add notes to them and even introduce sound effects into a call should you want to. It also has the option to work as a Dictaphone which is useful for compulsive note takers. Hit the microphone icon in Pamela and a recording window appears where you can record your own musings as you see fit or record video from your webcam.
There are other apps that can record Skype calls in Windows but Pamela surpasses them. Sure the free 15 minutes will soon get used up but by then you will know whether you like it or not and find it worth the $25 to unlock its full potential. The premium version does come with a 30-day trial, so you may be better off trying that first.
Recording a Skype call in Mac OS X
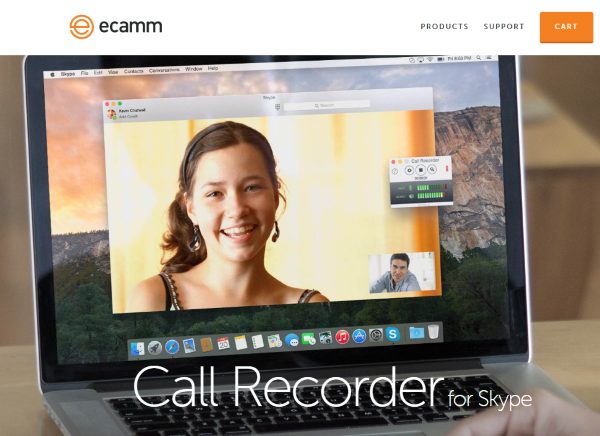
Mac, like Windows has a few options to record Skype calls using third party apps. My go-to app is Ecamm Call Recorder. It’s a paid-for app that offers a 7 day free trial. So unlike Pamela, you can record pretty much what you like for that time before having to pay the $29.95 to buy it.
Quicktime has the ability to record your side of any call by screen recording but it cannot record the other side of the conversation. That requires a third party tool. Ecamm Call Recorder is simple to use, has an intuitive UI and has an extension (paid for) that can record FaceTime conversations too.
- Download and install Ecamm Call Recorder. Use the free trial to start with. You can always buy it later if you like it.
- Open Skype as usual and you should see an extra window that opens alongside the main app. This is the call recorder.
- Press the red button in the app to begin recording the call. You should then see the audio levels in the small window showing you how clear the recording is.
- Open the recording file with the included Ecamm Movie Tools app.
The Ecamm Movie Tools app allows you to balance the audio, show both sides of a video conversation, or not and export the file in a range of formats. You can also share it on YouTube or export it to iMovie. While using the free trial, the file will be watermarked. If you buy the app, future files will not be watermarked.
There will also be a new menu option within Skype called Recording. Here you can modify the audio and video quality, format, image size and other details for each recording. It contains everything you’re likely to need while using the app.
Other Skype recording tools for Mac include IMcapture, WireTap Studio, Call Recorder for Skype for Mac and CallNote for Mac OS X. They might be worth trying though if you don’t like the look and feel of Ecamm.
Legal stuff
As you would expect, there are legal implications to recording calls. I’m not going to discuss that here but make sure you research those implications before you begin recording any conversation or video. The actual recording is not visible to the other party in either of these apps so you will likely need to notify them or whatever when recording calls or video. Get some expert legal advice if you’re not sure.