How to Change the Order of Products on Shopify

Just like in a normal store, how you organize your products in an online shop can be vital for sales. What products do you put first? Which ones will most likely attract new customers?
You may not want your products to be sorted by the default setting, but according to specific criteria. Shopify lets you do just that – choose how you want your products to be displayed. To learn more about organizing the items in your online shop, keep reading this article.
Changing the Order of Products
When you add products to your online shop, you create a collection. Your products are automatically sorted alphabetically. You can change that and sort them:
- According to the bestselling product,
- From newest to oldest product (or vice versa),
- From lowest to highest price (or in reverse order),
- In reverse alphabetical order, or
- Sort them manually.
Here’s how to change the order of your products according to different criteria:
From Desktop
- Open your admin panel.
- Select Products.
- Select Collections.
- Choose the desired collection.
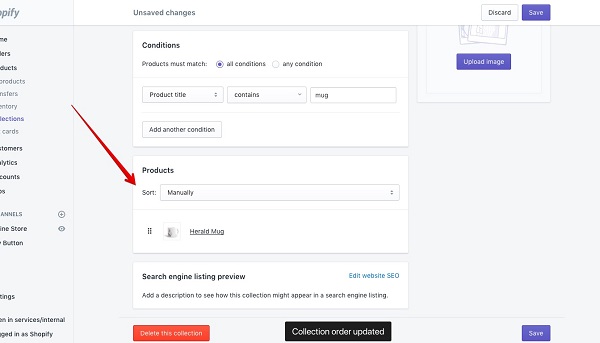
- Find a drop-down menu in the Products section. It’s next to Sort.

- Choose the order you’d like to apply to your collection.
- Opting for Manually will allow you to select products and drag them to their new position.
- Select Save to save your changes.
From Mobile Devices (Android and iPhone)
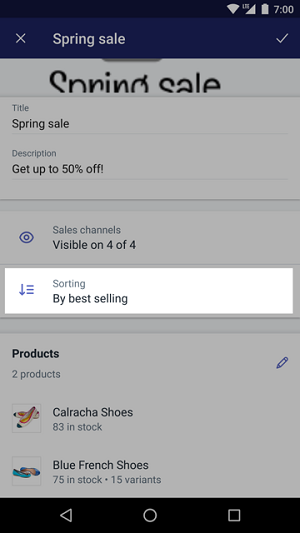
- Launch the Shopify app.
- Tap on Products.
- Tap on Collections and find the one you’d like to reorder.
- There’s a pencil icon in the upper-right corner of the screen – tap to edit the collection.
- Under Sorting, choose the desired order. To reorder your products manually, you need to tap and hold them till you drag them to the desired place.

- Tap the tick icon in the upper-right corner to save the changes.
Managing Your Online Catalogue
There are plenty of other features of your online catalog you can adjust, so it looks just how you want it to. You can add a new featured image for your collection and change its name or description.
Changing the Name and Description of a Collection
From the desktop, open your admin panel and click on Products. Open Collections and find the one you’d like to rename. When you open the collection page, type in the new name or edit the description, and select Save to keep the changes.
If you’re editing the collection from your mobile device, open the Shopify app and tap on Products. From Collections, choose the one you want to edit and enter the new name and description. Tap the checkmark to save the changes.
Changing the Featured Image of a Collection
For PC users, the steps are as follows:
- Go to your Shopify admin panel.
- Open Products and select Collections to find the one you want to change the image for.
- For collections that don’t have a picture, select Upload image. If you’re only replacing an image, choose Change image.
- When the image is uploaded, select Save.
If you’re adding an image from your mobile device, the steps are similar. However, to replace the old image, you need to delete it first. Then you can upload a new one.
How to Create a Collection
The easiest way to manage your products is through a collection. Although it’s possible to reorder them regardless of a collection, these make it easier for your customers to find what they’re looking for.
You can create a collection manually, but if you select specific conditions that will match products with common features, your collections can be automated. Here’s what to do:
From Desktop
- Open your admin’s panel and find Collections in the Products section.
- Select the Create collection option.
- Choose a name for your collection and set it as Automated.
- Choose what conditions your products need to match to be in the collection – all of them or just some.
- Select the conditions.
- Select Save and check if all the desired products are included in the new collection.
When you’re done with creating the collection, order the products according to your liking, add a featured image, and set the launch date for your collection. Also, don’t forget to share the link to the collection with your customers.

From Mobile Devices
- Go to your Shopify app and tap on Collections in the Products section.
- Tap the plus icon in the upper-right corner.
- Name your new collection and add a description.
- Choose a featured image.
- Select the Automatically select products option and add conditions that your products have to match.
- If you’d like to reorder your products, tap on Sorting to drag them to the desired position.
- Select Save and share the link to the collection with your customers!
Reorder Your Products as You Like
Shopify allows you to reorder your products and keep your online store neat. This enables your customers to find the desired products quickly and purchase them in a few clicks. User-friendly interfaces and simple purchasing processes have proven to be one of the reasons people come back to their favorite online stores. With excellent sorting options on Shopify, you can maximize your customers’ online shopping experience.
How will you sort your products? How many collections do you have? Let us know in the comments section below.