


How to Change Background Color in Snapseed

Snapseed is one of the most popular mobile photo editing apps. The range of editing tools in the app is huge and may even feel daunting and overwhelming at first. Many Instagram users use Snapseed to edit their photos before posting them, even if we’re talking about Instagram stories.
Changing the background color of a photo is one of the most popular reasons for using Snapseed. Fortunately, with little effort, you can make any photo look brilliant.
Why Change the Background Color?
The most obvious reason to change the background color would be to make a photo look better and more interesting. People often use Snapseed for this purpose, and it’s amazing how even the slightest background change can completely alter the vibe of a photo.
iPhone users regularly use Snapseed to make the main object in the photo pop out, and this is done by dialing down the color scheme of the photo’s background, while leaving the main object unchanged.
Here are some ideas for changing the background color in your photos using Snapseed. Before continuing, make sure that you’ve downloaded and updated the Snapseed app to the latest version.
Making a Clean Black Background
Blackening a photo’s background is one of the most common and most effective ways to accentuate the main object and make it look better while making the overall photo look more professional. Although other ways to “blacken” a photo do exist, using the Expand feature is perhaps the most effective.
First, open the photo in Snapseed. In the bottom part of the screen, select Tools. In the list of tools that opens, select Tune Image. Now, tap the Sliders icon at the bottom of the screen (second one from the left). Move the sliders until you’re satisfied with the result. You’re probably going to have to play around with these sliders for a while until the background is as black as possible. When you’re done, click the Tick icon in the bottom-right corner.

Navigate to the Tools section again and select Details. Again, use the Sliders icon to set the ideal Structure and Sharpening settings. Tweak these two settings until your background is as black as possible, without ruining the colors of the main object in the photo.
Going back to the Tools section, select Curves. Move the curves around until you’ve achieved the effect that you’re going for. Make sure to select different points of the diagonal line featured in the tool.
Finally, choose the Expand tool in the Tools section. The smart option is selected by default, so use it to expand the edges of the photo. This tool will help you enlarge the background, making the main object pop out more. Now, tap the Tick icon and export the image.
Darken the Background
There is a difference between making the photo background as black as possible and making it appear darker to add more style to your photo. Selective darkening is done using the Selective tool from the Tools menu. Starting from the outer edge, tap the background area. Use pinch gestures to decrease or increase the focus area. Once you’re done with this, lower the brightness of the area in question by swiping left. You can place multiple points of focus for selective darkening.
Play around with this tool, until you’ve reached satisfying results. Don’t refrain from zooming in for more a detailed view. Although this tool is smart enough to tell which object is in the foreground and will do its best to avoid darkening it, if your main object ends up being too dark, save the photo by exporting it, load it up again, place the selective marker on the main object, and then brighten it by swiping right.
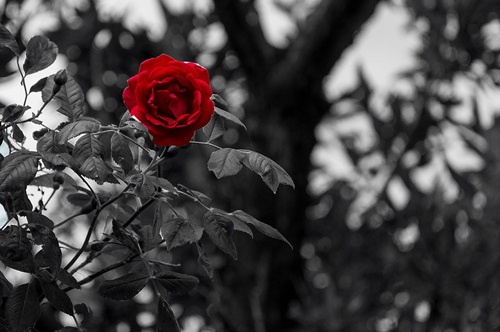
Making a Black-and-White Background
Black-and-white backgrounds are extremely popular. The main idea is to leave the main object colorized while turning the background black-and-white. This makes the main object vividly pop out in the picture.
Once you’ve selected the picture that you want to edit, go to the Tools section and select the Brush tool. From the options menu at the bottom, select Saturation and decrease it to -10 using the arrows. Now, paint over the background. It is as simple as that. Pinch the screen to zoom in or scroll the photo that you’re editing for more accurate strokes and, if the photo looks weird, click the Eye icon to display everything that you’ve painted in red.
That’s pretty much it regarding coloring the photo background in black-and-white. However, you can use other tools from the Tools menu to make the image look even better and sharper.
Be Creative
These three ways of changing the background color of a photo with the Snapseed app can help you make your photos look better with little effort. However, this app has a wide variety of tools for you to explore and use to make your photos look professionally edited. The more time you invest in editing a photo, the better it will look in the end.
Do you use the Snapseed app? What tools do you use to change the background color? Tell us more in the comments section below.


One thought on “How to Change Background Color in Snapseed”
I sometimes need to edit cutouts (png images with transparent BG for adjusting perspective, head Paulso position etc etc.
However, the readjusted images end up with a black background whereas I want it transparent like the original cutout.
How do I solve this problem?
cheers
KPVSK